Painting a Fibreglass Bathtub: A Comprehensive Guide
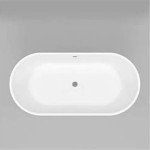
Fibreglass bathtubs offer a lightweight and relatively inexpensive alternative to cast iron or steel. However, over time, they can become stained, faded, or simply outdated in appearance. Opting to paint a fibreglass bathtub can be a cost-effective way to rejuvenate its look and extend its lifespan without the expense of a complete replacement. This article provides a detailed guide to painting a fibreglass bathtub, covering essential preparation steps, appropriate materials, and application techniques to ensure a durable and aesthetically pleasing finish.
Key Point 1: Surface Preparation is Paramount
The success of any paint job, particularly on a surface like fibreglass, hinges on thorough surface preparation. A poorly prepared surface will lead to adhesion problems, premature chipping, and an overall unsatisfactory result. This involves several critical steps, starting with cleaning and degreasing.
Begin by removing any caulk around the edges of the bathtub. Old caulk often harbors mold and mildew, and it will prevent the paint from adhering properly. Use a caulk removal tool or a utility knife to carefully slice through the caulk, taking care not to scratch the fibreglass surface. Once the caulk is removed, thoroughly clean the bathtub using a non-abrasive cleaner. Avoid harsh chemicals that could damage the fibreglass. A mixture of warm water and dish soap is often sufficient for removing everyday grime. Rinse thoroughly to remove any soap residue.
Next, degrease the surface. Even after cleaning, residual oils from soaps, lotions, or body washes can interfere with paint adhesion. Use a dedicated degreaser or a solution of trisodium phosphate (TSP), following the manufacturer's instructions and safety precautions. TSP is a strong cleaner, so wear gloves and eye protection. Rinse the bathtub thoroughly after degreasing to ensure no residue remains.
Sanding is a crucial step in preparing the surface for paint. Fibreglass is inherently smooth, and paint will struggle to adhere properly without creating some surface texture. Use a fine-grit sandpaper, typically around 320-400 grit, and lightly sand the entire surface of the bathtub. The goal is to create a slightly roughened surface, not to remove the existing finish entirely. Apply even pressure and avoid sanding too aggressively, which could damage the fibreglass. After sanding, thoroughly remove all sanding dust with a tack cloth or a damp cloth. Allow the surface to dry completely before proceeding.
The final step in surface preparation is taping off the surrounding areas. Use painter's tape to protect the walls, faucets, and any other surfaces that you don't want to paint. Ensure the tape is firmly adhered to create a clean line and prevent paint from bleeding underneath. Now the bathtub is ready for priming.
Key Point 2: Selecting the Right Primer and Paint
Choosing the appropriate primer and paint is essential for achieving a durable and long-lasting finish on a fibreglass bathtub. Not all paints are created equal, and using the wrong type can lead to a host of problems. The key is to select products specifically designed for use on fibreglass and in wet environments.
Primer plays a vital role in promoting adhesion between the fibreglass surface and the topcoat of paint. A high-quality epoxy primer is generally recommended for painting fibreglass bathtubs. Epoxy primers are known for their excellent adhesion properties and resistance to water and chemicals. They create a strong bond with the fibreglass, providing a stable base for the paint to adhere to.
When selecting an epoxy primer, look for one that is specifically formulated for use on fibreglass. Follow the manufacturer's instructions carefully when mixing and applying the primer. Typically, epoxy primers require mixing two components together. Ensure you use the correct ratio and mix thoroughly to achieve the desired consistency. Apply the primer in thin, even coats, using a brush or roller designed for epoxy paints. Allow the primer to dry completely according to the manufacturer's recommendations before proceeding to the next step. Multiple coats of primer may be necessary for optimal coverage and adhesion. After the primer dries, lightly sand it with fine-grit sandpaper (400-grit) to smooth out any imperfections.
For the topcoat, an epoxy-based paint or a specialized bathtub refinishing kit is recommended. Epoxy paints offer excellent durability, water resistance, and chemical resistance, making them ideal for use in a bathroom environment. Bathtub refinishing kits typically contain a combination of an epoxy primer and a topcoat specifically formulated for refinishing bathtubs and showers. These kits often come with detailed instructions and all the necessary components for a successful refinishing project. Consider two-part epoxy acrylic paints for their improved UV resistance, which helps prevent yellowing over time.
When choosing a color, consider the overall aesthetic of the bathroom and the desired look for the bathtub. White is a classic and timeless choice, but other neutral colors can also work well. Be aware that darker colors may show imperfections more easily. Always read the product labels carefully and follow the manufacturer's instructions for application, drying times, and safety precautions. Using the correct tools, such as high-quality brushes and rollers designed for epoxy paints, is crucial for achieving a smooth and even finish.
Key Point 3: Application Techniques and Curing
Proper application techniques are crucial for achieving a professional-looking and durable finish when painting a fibreglass bathtub. Even with the best materials and thorough preparation, improper application can lead to uneven coverage, drips, runs, and other imperfections. Furthermore, the curing process is essential for ensuring the paint fully hardens and achieves its maximum durability and water resistance.
Start by ensuring the bathroom is well-ventilated. Open windows and use a fan to circulate the air. This will help to remove paint fumes and speed up the drying process. Wear appropriate safety gear, including a respirator, gloves, and eye protection, to protect yourself from the fumes and chemicals in the paint and primer.
Apply the primer and paint in thin, even coats. Avoid applying too much paint at once, as this can lead to drips and runs. Use a high-quality brush or roller designed for epoxy paints. A foam roller can often provide a smooth, even finish. If using a brush, apply the paint in long, smooth strokes, overlapping each stroke slightly to ensure complete coverage. If using a roller, roll the paint in a W-pattern, then smooth it out with light, even strokes.
Allow each coat of primer and paint to dry completely according to the manufacturer's instructions before applying the next coat. Multiple thin coats are always better than one thick coat. This will help to ensure proper adhesion and a more durable finish. Lightly sand the surface between coats with fine-grit sandpaper (400-grit) to smooth out any imperfections and improve adhesion for the next coat. Remember to remove all sanding dust thoroughly before applying the next coat of paint.
Once the final coat of paint has been applied, allow it to cure completely before using the bathtub. Curing times can vary depending on the type of paint used, the temperature, and the humidity. Follow the manufacturer's recommendations for curing times. Typically, epoxy paints require several days to cure fully. During the curing process, avoid touching or using the bathtub. This will allow the paint to harden completely and achieve its maximum durability and water resistance.
After the paint has fully cured, remove the painter's tape carefully. Use a utility knife to score along the edge of the tape before peeling it off to prevent the paint from chipping. Re-caulk the edges of the bathtub with a high-quality mildew-resistant caulk. This will help to prevent water from seeping behind the bathtub and causing damage. Clean the bathtub with a mild, non-abrasive cleaner. Avoid using harsh chemicals or abrasive cleaners, as these can damage the paint finish.
Maintaining the freshly painted fibreglass bathtub involves regular cleaning with gentle, non-abrasive cleaners. Avoid using harsh chemicals or abrasive scrubbing pads, which can scratch and damage the paint. Promptly repair any chips or scratches to prevent water damage and further deterioration of the paint finish. With proper care and maintenance, a properly painted fibreglass bathtub can provide years of renewed beauty and functionality.

How To Paint A Bathtub Yourself The Nifty Nester

How To Paint Your Bathtub Yes Seriously Love Renovations

Super Simple How To Paint A Bathtub

Painting A Tub Shower Fiberglass Using All In One Paint Color Cashmere

Painting A Plastic Fibreglass Tub And Surround Using Marine Paint

Painting A Fiberglass Bathtub What You Need To Know Hometalk

How To Paint A Tub With Rustoleum What Not Do

How To Refinish Your Bathtub For 50

How To Paint Your Bathtub Yes Seriously Love Renovations

Diy Painted Bathtub Follow Up Your Questions Answered Addicted 2 Decorating
Related Posts