Painting a Plastic Bathtub: A Comprehensive Guide
Bathtub refinishing offers a cost-effective alternative to replacement, especially for plastic tubs showing signs of wear and tear. Painting a plastic bathtub can revitalize its appearance, extending its lifespan and enhancing bathroom aesthetics. However, successful refinishing requires careful preparation, proper product selection, and meticulous application.
Before embarking on the project, assessing the bathtub's condition is crucial. Minor chips, scratches, and surface discoloration are often easily addressed through painting. However, significant structural damage, deep cracks, or pervasive mold growth may necessitate professional repair or replacement. Evaluating the extent of the damage helps determine the feasibility and effectiveness of painting as a solution.
Choosing the appropriate paint is paramount for achieving a durable and aesthetically pleasing finish. Epoxy-based paints are generally recommended for plastic bathtubs due to their superior adhesion, hardness, and resistance to chipping, peeling, and chemicals. Specialty tub and tile paints are also available, formulated to withstand the humid bathroom environment and frequent exposure to water and cleaning agents. Avoid using standard latex or acrylic paints, as they are less likely to adhere properly to the plastic surface and may not withstand the rigors of regular bathtub use.
Thorough surface preparation is essential for ensuring paint adhesion. The bathtub should be cleaned meticulously to remove all traces of soap scum, mildew, and dirt. A strong bathroom cleaner and a scouring pad can be used for initial cleaning. Following this, a degreasing agent, such as trisodium phosphate (TSP), should be applied to remove any residual grease or oils. Rinsing the tub thoroughly with clean water is crucial after each cleaning step.
Once cleaned, the bathtub surface must be properly etched to promote mechanical bonding with the paint. Sanding the entire surface with fine-grit sandpaper (220-grit or finer) creates microscopic scratches that provide a better anchor for the paint. Focus on areas with existing paint chips or scratches to ensure a smooth and even surface. After sanding, rinse the tub again and allow it to dry completely.
Repairing any chips or cracks before painting is essential for a professional-looking finish. Epoxy filler or patching compound specifically designed for bathtubs can be used to fill these imperfections. Follow the manufacturer's instructions for application and drying times. Once the filler has dried, sand the repaired areas smooth and level with the surrounding surface.
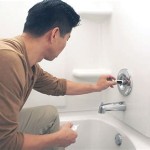
Masking off surrounding areas, such as tile walls, fixtures, and the floor, prevents unwanted paint overspray. Use painter's tape and masking paper to create a protective barrier. Ensure the tape adheres firmly to prevent paint seepage. Proper ventilation is crucial during the painting process to prevent the inhalation of paint fumes. Open windows and doors, and consider using a respirator or mask.
Applying the paint according to the manufacturer's instructions is critical for achieving optimal results. Epoxy paints typically require mixing two components – a resin and a hardener – immediately before application. The mixture has a limited pot life, so only mix the amount that can be used within the specified time frame. Multiple thin coats are preferable to a single thick coat, as this minimizes the risk of drips, runs, and uneven coverage. Allow each coat to dry thoroughly according to the manufacturer's recommendations before applying the next.
Different application methods can be used, including brushing, rolling, or spraying. Brushing offers greater control for detailed areas, while rolling provides faster coverage for larger surfaces. Spraying provides the smoothest finish but requires specialized equipment and expertise. Regardless of the chosen method, maintain a consistent application technique to ensure an even and uniform coating.
After applying the final coat, allow the paint to cure completely before using the bathtub. The curing time varies depending on the specific paint product, but it typically takes several days. Avoid exposing the painted surface to water or any other substances during the curing period. Once fully cured, the newly painted bathtub will provide a refreshed and revitalized appearance.
Maintenance of the painted surface is crucial for prolonging its lifespan. Avoid using abrasive cleaners or scouring pads, as these can scratch the painted finish. Gentle cleaning with a non-abrasive cleaner and a soft cloth or sponge is recommended. Promptly address any chips or scratches to prevent further damage and maintain the integrity of the painted surface.

How To Paint A Bathtub Yourself The Nifty Nester

How To Paint Your Bathtub Yes Seriously Love Renovations

Diy Painted Bathtub Follow Up Your Questions Answered Addicted 2 Decorating

How To Refinish Your Bathtub For 50

How To Paint Your Bathtub Yes Seriously Love Renovations

How To Paint A Tub With Rustoleum What Not Do

Painting A Plastic Bathtub In 4 Steps Success Tips Worst Room

How Can You Paint A Plastic Bathtub Expert Guide Bathinhouse Com

Can Plastic Acrylic Or Fiberglass Bathtubs Shower Stalls Be Reglazed Refinished America Refinishing Pros

Can You Refinish Fiberglass Tubs Rapid Refinishing Co
Related Posts