Installing a One-Piece Bathtub Shower Combo: A Comprehensive Guide
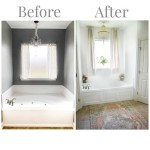
Installing a one-piece bathtub shower combo can seem daunting, but with the right tools and knowledge, it is a manageable task. This type of fixture offers a sleek and modern aesthetic while simplifying your bathroom's plumbing. This guide will walk you through the entire process, from preparation to finishing touches, enabling you to confidently tackle this project.
1. Preparation: The Foundation of a Successful Installation
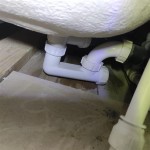
Before starting the installation, gather the necessary tools and materials. This includes a level, measuring tape, pencil, screwdriver, drill, wrench, plumber's tape, silicone caulk, and safety goggles. It is crucial to prepare the area where the bathtub shower combo will be placed. This involves ensuring the existing plumbing is compatible and that the floor is level and can support the weight of the fixture. You may need to adjust existing plumbing pipes to match the new fixture's location and size.
Carefully review the installation manual provided by the manufacturer. This manual outlines specific instructions and potentially unique aspects of the installation, specific to your chosen model. Additionally, make sure the area around the installation site is clear of obstructions that could hinder access or cause damage.
2. Installation: Step-by-Step Guide to Assembling the Combo
Following the preparation, begin the installation process. The specific steps may vary based on the chosen model, but the general sequence remains consistent. Here's a detailed walkthrough:
-
Positioning the Combo:
Carefully position the bathtub shower combo in the desired location, ensuring it is level and aligned with the existing plumbing connections. Use shims to correct any minor leveling issues, ensuring its stability. -
Connecting the Plumbing:
Attach the tub spout and showerhead to the combo. Connect the hot and cold water supply lines to the corresponding inlets on the combo, wrapping the threads with plumber's tape to ensure a secure and leak-proof connection. Tighten the connections securely, but avoid overtightening to prevent damage. -
Securing the Fixture:
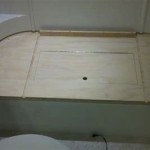
Once the plumbing is connected, secure the combo to the floor using the provided mounting hardware. Ensure the fixture is securely fastened to the floor and the mounting hardware is installed according to the manufacturer's instructions. -
Connecting the Drain:
Connect the drain to the bathtub's drain opening and secure it firmly. If the old drain needs to be replaced, install a new drain trap according to the manufacturer's recommendations. Double-check that the drain is properly connected and secured before continuing. -
Testing for Leaks:
After completing the installation, test the plumbing for leaks by turning the water supply on. Check all connections meticulously for any signs of leakage. If leaks are detected, immediately turn off the water supply and investigate the source of the leakage. Tighten any loose connections or re-apply plumber's tape to ensure a secure seal. -
Caulking and Finishing Touches:
Apply a bead of silicone caulk around the perimeter of the fixture, creating a watertight seal between the combo and the wall. This prevents water from seeping behind the fixture. Clean up any excess caulk immediately for a neat and professional finish.
3. Post-Installation Considerations: Ensuring Long-Term Performance
After completing the installation, take the time to perform some post-installation checks. This includes ensuring the water pressure is adequate and consistent across both the shower and bathtub. Test both the shower and bathtub functionality, examining water flow and temperature control.
It's also essential to ensure the shower's drain is working properly. If the drain is slow or clogged, address the issue immediately to prevent water from backing up and potentially causing damage. If the drain needs replacement, consult with a professional plumber for guidance on the best replacement options for your specific model.
Finally, read and become familiar with the manufacturer's care and maintenance instructions. This will help you understand how to properly clean and maintain the fixture for optimum performance and longevity.

Tub Shower Combo Replacement Kits With Base Walls Doors Innovate Building Solutions

48 Inch Tub Shower Combo Visualhunt

5 Ways To Upgrade Your Bathtub Shower Combo Better Living S Usa

Tub Shower Combo Remodeling Quick Tips

8 Bathtub And Shower Combo Ideas The Family Handyman

Tub Shower Combo Replacement Kits With Base Walls Doors Innovate Building Solutions

How To Install A Bath Tub Surround

How To Install A Direct Stud Shower Enclosure The Home Depot

Tub Shower Combo Replacement Kits With Base Walls Doors Innovate Building Solutions

Walk In Tub Shower Combo Kohler Bath
Related Posts