Essential Aspects of Old Bathtub Drain Stoppers
Bathtub drain stoppers play a crucial role in preventing water from escaping the tub, ensuring a comfortable bathing experience. While modern stoppers offer various features and designs, understanding the essential aspects of old bathtub drain stoppers is vital for proper maintenance and replacement.
Types of Old Bathtub Drain Stoppers
Old bathtub drain stoppers come in different types, each with its unique characteristics:
- Lift-and-Turn Stoppers: These stoppers are operated by lifting the knob and turning it to seal or open the drain.
- Push-Pull Stoppers: These stoppers are operated by pushing or pulling the knob to control the drainage.
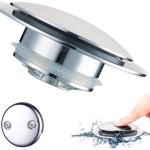
- Pop-Up Stoppers: These stoppers feature a push-button that raises or lowers the stopper to open or close the drain.
Materials and Finishes
Old bathtub drain stoppers were typically made from durable materials such as brass, chrome-plated brass, or rubber. These materials resist corrosion and provide long-lasting performance.
The finishes of old drain stoppers vary, with common options including polished chrome, brushed nickel, antique bronze, and oil-rubbed bronze. These finishes enhance the aesthetic appeal of the drain and complement the overall bathroom decor.
Compatibility and Sizing
When replacing an old bathtub drain stopper, it's important to ensure compatibility with the existing drain assembly. The diameter of the drain opening and the thread size of the stopper should match for proper fit and functionality.
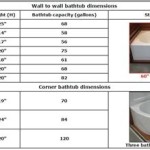
The size of the drain stopper is typically measured in inches and can range from 1-1/2 inches to 2 inches. It's advisable to measure the drain opening before selecting a replacement stopper to ensure compatibility.
Maintenance and Troubleshooting
Proper maintenance of old bathtub drain stoppers is essential for extending their lifespan and preventing clogs. Regularly cleaning the stopper and drain assembly with a mild cleaning solution and a soft brush helps remove buildup and debris.
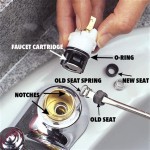
If a drain stopper malfunctions, it's important to troubleshoot the issue before attempting repairs. Common problems include loose or worn seals, stripped threads, or accumulated debris. Inspecting the stopper and drain assembly and replacing any damaged parts can restore proper functionality.
Professional Assistance
For complex drain stopper issues or if you feel uncomfortable performing repairs yourself, it's advisable to seek professional assistance from a licensed plumber. A plumber can accurately diagnose the problem and provide a permanent solution, ensuring your bathtub drain stopper operates correctly for years to come.

How To Replace Bathtub Drain Stopper With A Lift And Turn Diy

Drain Overflow Assemblies Fine Homebuilding

How To Replace Bathtub Drain Stopper With A Lift And Turn Diy

How To Remove A Bathtub Drain Forbes Home

Desperate Daily Backup In Bathtub Pics Please Help Identify The Cause Or Debris Diy Home Improvement Forum

How To Install A Stopper Drain In Your Bathtub Repair

This Bathtub Drain Stopper And Faceplate Kit Is Easy To Install Use Change Old Plunger Type Reglaze

How To Unclog A Bathtub Drain Without Toxic Chemicals

How To Replace Bathtub Drain Stopper With A Lift And Turn Diy

How To Remove Bathtub Drain Of Any Type
Related Posts