Moen Bathtub Handle Replacement Parts Diagram: A Comprehensive Guide
Replacing a Moen bathtub handle is a common home maintenance task. Understanding the various components involved is crucial for a successful repair. A Moen bathtub handle replacement parts diagram serves as an invaluable tool, providing a visual representation of the handle assembly and identifying each individual part. This article aims to provide a detailed guide to understanding and utilizing these diagrams for efficient and accurate handle replacements. We will explore the common parts found in Moen bathtub handle assemblies, discuss how to use a parts diagram effectively, and offer tips for identifying the correct replacement parts for your specific Moen model.
Moen is a reputable brand known for its durable and stylish bathroom fixtures. However, even the most well-crafted products can experience wear and tear over time. Bathtub handles, being subjected to frequent use and exposure to water, are particularly susceptible to issues like loosening, corrosion, or breakage. When these problems arise, replacing the handle or its components is often a more economical and practical solution than replacing the entire faucet fixture.
Before attempting any repair, it is essential to accurately identify the specific Moen model of your bathtub faucet. Moen faucets are typically identified through model numbers, often etched onto the faucet body or found in the original product documentation. Knowing the model number is paramount because Moen utilizes various handle designs and internal mechanisms across its product lines. Using the wrong replacement part can lead to incompatibility, leaks, or even damage to the faucet.
Once the model number is determined, the next step involves locating a Moen bathtub handle replacement parts diagram specific to that model. Moen provides these diagrams for most of their products on their website, and they can also be found on various online parts retailers’ websites. These diagrams are usually presented as exploded views, which display the components of the handle assembly separated from one another, illustrating their relationship within the overall structure.
The diagram typically includes labeled parts figures, with each part corresponding to a specific name and part number. The parts list accompanying the diagram will provide a detailed description of each component, along with its Moen part number. This is critical for ordering the correct replacement part. Common components featured on these diagrams include handles, handle adapters, retaining clips, screws, cartridges, and escutcheons.
Using the diagram effectively requires careful observation and accurate identification of the faulty component. Compare the diagram's visual representation of each part with the actual components of your disassembled handle. Pay close attention to the shape, size, and any unique features of the part. Once the faulty component is confidently identified, you can use the corresponding part number from the diagram's parts list to order the correct replacement.
Understanding Common Moen Bathtub Handle Components
A typical Moen bathtub handle assembly consists of several key components, each playing a crucial role in the smooth operation of the faucet. Familiarizing yourself with these components will greatly aid in understanding the parts diagram and identifying potential issues.
The Handle: The handle is the user interface for controlling the water flow and temperature. It can be a single-lever handle or a two-handle design, depending on the faucet model. Handles are typically made of metal or plastic and are available in various finishes to match the bathroom decor.
Handle Adapter: The handle adapter connects the handle to the faucet cartridge or valve stem. It is usually made of metal and is designed to provide a secure and stable connection. The adapter transfers the rotational force from the handle to the cartridge, which controls the water flow and temperature.
Retaining Clip: Retaining clips, often small metal or plastic pieces, are used to secure the handle or handle adapter to the faucet stem. These clips prevent the handle from dislodging during use. They are often easily overlooked but are essential for ensuring a stable and functional handle assembly.
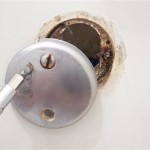
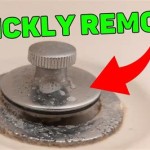
Cartridge: The cartridge is the heart of the faucet, controlling the flow of water and the mixing of hot and cold water to achieve the desired temperature. Moen utilizes various cartridge designs, including single-handle cartridges and two-handle cartridges. A faulty cartridge is a common cause of leaks or difficulty in controlling water temperature.
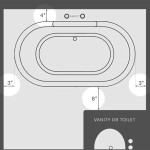
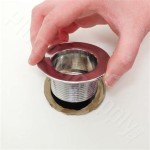
Escutcheon: The escutcheon is a decorative plate that covers the faucet valve and provides a finished look. It also protects the surrounding area from water damage. The escutcheon typically includes holes for the handle(s) and spout. Variations in escutcheon shapes and sizes are common across different Moen models.
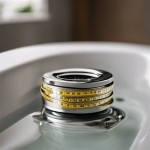
Handle Screws: These screws are used to fasten the handle to the handle adapter and are often hidden beneath decorative caps. Ensuring the correct size and thread pattern of these screws is critical for a secure and stable handle installation.
Utilizing the Moen Bathtub Handle Replacement Parts Diagram
The Moen bathtub handle replacement parts diagram is a visual roadmap for identifying and sourcing the correct components. To effectively use this diagram, follow these steps:
Locate the Correct Diagram: As previously mentioned, accurately identify the model number of your Moen faucet. Visit the Moen website or a reputable online parts retailer and search for the parts diagram specific to your model. Confirm that the diagram accurately reflects the design of your faucet before proceeding.
Study the Exploded View: The exploded view is the core of the diagram. Carefully examine the arrangement of the components and how they fit together. Pay attention to the relative sizes and shapes of each part. This will help you visualize the assembly process and identify the location of the faulty component.
Identify the Faulty Component: Compare the diagram's visual representation of each part to the actual components of your disassembled handle. Look for any signs of damage, wear, or corrosion. Once you have confidently identified the faulty component, note its corresponding number on the diagram.
Consult the Parts List: The parts list provides detailed information about each component shown on the diagram, including its part name, material, and most importantly, its Moen part number. Use the number you identified in the previous step to locate the corresponding entry in the parts list.
Order the Correct Replacement Part: Use the Moen part number from the parts list to order the correct replacement part from an authorized Moen retailer or parts supplier. Double-check the part number and description to ensure you are ordering the correct component.
Utilize Online Resources: Moen and various online retailers often provide supplementary resources, such as installation guides, videos, and frequently asked questions (FAQs), to assist with handle replacements. Take advantage of these resources to gain a better understanding of the repair process.
Tips for Identifying the Correct Replacement Parts
Identifying the correct replacement parts is essential for a successful repair. Here are some additional tips to ensure accuracy:
Compare Old and New Parts: When the replacement part arrives, carefully compare it to the old part. Ensure that the dimensions, shape, and material are identical. Any discrepancies could indicate that you ordered the wrong part.
Check the Product Specifications: Refer to the product specifications for your Moen faucet model, if available. These specifications may include details about the handle size, type, and material, which can further assist in verifying the compatibility of the replacement part.
Consult with a Professional: If you are unsure about identifying the correct replacement part or are uncomfortable performing the repair yourself, consult with a qualified plumber. A plumber can accurately diagnose the problem and recommend the appropriate replacement parts.
Inspect for Related Issues: While replacing the handle, take the opportunity to inspect other components of the faucet, such as the cartridge and O-rings. If these components show signs of wear or damage, consider replacing them as well to prevent future issues.
Keep Original Documentation: Retain the original product documentation for your Moen faucet, including the installation instructions and parts list. This information can be invaluable for future repairs or maintenance.
By carefully utilizing the Moen bathtub handle replacement parts diagram and following these tips, homeowners can effectively identify and order the correct replacement parts, ensuring a successful and long-lasting repair of their Moen bathtub faucet.

Moen Genuine Parts

Moen Cau Lavatory Replacement Knob Handle Kit 96782 The Home Depot

Moen 165903bn Replacement Handle Kit For Bathroom Faucets From The Arris Collection Build Com

Moen 165911 Replacement Shower Trim Escutcheon From The Build Com

1225 Cartridge Single Handle Shower Moentrol Valve Moen Solutions

Moen 140325 Shank Diverter Kit 9992 9993

Moen Faucet Cartridge Nut Stripped Doityourself Com Community Forums

Where S The Hot Water Single Handle Faucets Cartridges By Moen Ncw Home Inspections Llc

Shower Handle Moentrol Valve Lever Type 1 Moen Solutions

Moen Cau Lever 1 Handle Shower Valve Trim Kit
Related Posts