Moen Bathtub Faucet Repair Instructions
Moen bathtub faucets are known for their durability and style. However, like all plumbing fixtures, they can eventually require repair. This guide provides step-by-step instructions for troubleshooting and repairing common Moen bathtub faucet problems. Always remember to turn off the water supply before beginning any repair.
Identifying the Problem: Before starting any repair, accurate diagnosis is crucial. Common issues include leaks, low water pressure, and a malfunctioning diverter. A dripping faucet typically indicates a worn-out cartridge or O-ring. Low water pressure can result from a clogged aerator or a more serious problem within the plumbing system. A diverter that fails to switch between the tub spout and showerhead suggests a problem with the diverter valve itself.
Necessary Tools and Materials: Gather the necessary tools before starting the repair process. Common tools include an Allen wrench, Phillips screwdriver, flathead screwdriver, pliers, and adjustable wrench. Replacement parts, such as cartridges, O-rings, and aerators, should be purchased based on the specific Moen faucet model. Having these items ready streamlines the repair process.
Turning Off the Water Supply: Locate the shut-off valves for the hot and cold water supply lines under the sink or near the water heater. Turn both valves clockwise to shut off the water flow. Turn on the bathtub faucet to release any remaining water in the lines.
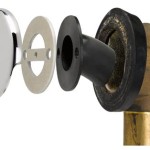
Removing the Handle: Moen faucets often feature a small cap on the handle, covering the handle screw. Use a small flathead screwdriver to pry off the cap. Use the appropriate Allen wrench or Phillips screwdriver to remove the screw securing the handle. Pull the handle straight off the faucet body.
Accessing the Cartridge: After removing the handle, the trim plate might need to be removed. This is usually secured by screws. Once the trim plate is removed, the cartridge will be visible. The cartridge is the core component controlling the water flow and temperature.
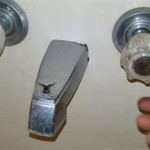
Removing and Replacing the Cartridge: Use pliers or an appropriate tool to pull the cartridge straight out of the valve body. Take the old cartridge to a hardware store to ensure purchasing the correct replacement. Insert the new cartridge into the valve body, ensuring it is positioned correctly. Reinstall the retaining clip, if applicable.
Addressing Leaks around the Spout: Leaks around the tub spout can be caused by a loose connection or a worn-out O-ring. First, try tightening the spout connection. If the leak persists, the O-ring likely needs replacement. Remove the spout, typically by unscrewing it or removing a setscrew, and replace the O-ring. Reinstall the spout.
Cleaning the Aerator: If low water pressure is an issue, the aerator might be clogged. Unscrew the aerator from the end of the spout. Disassemble the aerator and rinse all parts thoroughly with water. Remove any mineral deposits or debris. Reassemble the aerator and screw it back onto the spout.
Repairing the Diverter: A malfunctioning diverter can prevent switching between the tub spout and showerhead. The diverter mechanism varies depending on the Moen faucet model. Some models use a pull-up diverter on the spout, while others incorporate a push-button diverter. Disassemble the diverter mechanism and inspect it for any damage or debris. Clean or replace the diverter as needed.
Reassembling the Faucet: After completing the necessary repairs, reassemble the faucet in reverse order. Reinstall the cartridge, trim plate, and handle. Ensure all components are securely tightened.
Testing the Repair: Turn the water supply back on slowly. Check for leaks around the handle, spout, and diverter. Test the hot and cold water functionality. Ensure the diverter switches smoothly between the tub spout and showerhead.
Specific Model Instructions: While these general instructions cover common Moen bathtub faucet repairs, referring to the specific model's instructions is essential. These instructions provide detailed diagrams and specific procedures tailored to the faucet model. This ensures the repair is performed correctly and efficiently.
Professional Assistance: While many Moen bathtub faucet repairs can be handled with basic DIY skills, some complex issues may require professional assistance. If unsure about any step of the repair process, or if the problem persists after attempting these steps, contacting a qualified plumber is recommended.
Preventative Maintenance: Regular preventative maintenance can help extend the life of a Moen bathtub faucet. Periodically inspect the faucet for leaks or signs of wear. Clean the aerator regularly to prevent clogs. Address any minor issues promptly to avoid more significant problems down the road.

Shower Faucet Repair Advocate Master Plumbing

How To Repair A Moen Shower Tub Valve

Moen Bathtub Drippingfaucet Repair

Repair Shower Faucet Moen Posi Temp 1222 B

How To Repair A Leaky Moen Tub Shower In 30 Minutes

Remove And Install Moen 1222 Cartridge Repair Shower Tub Faucet Set Temperature Limit

How To Replace A Moen Cartridge And Fix Leaky Bathtub Faucet It Tutorials

How To Repair A Moen Shower Tub Valve

Replacing A Stuck Moen Shower Valve Cartridge

Moen Slip Fit Tub Spout Install Review Diy
Related Posts