Essential Aspects of Moen Bathtub Faucet Removal
Replacing a Moen bathtub faucet can be a straightforward task with the right tools and preparation. Here's a comprehensive guide to help you through the process:
Tools Required
- Adjustable wrench
- Allen wrench or hex key
- Phillips or flathead screwdriver
- Basin wrench (optional)
Safety Precautions
Before starting, ensure to turn off the water supply to the faucet. Open the taps to release any residual water.
Step 1: Remove the Handle
Using an Allen wrench or hex key, remove the screw securing the handle to the faucet. Pull the handle straight up to detach it.
Step 2: Disconnect the Supply Lines
Locate the supply lines connected to the faucet base. Use an adjustable wrench or basin wrench to loosen the nuts securing the lines. Be gentle to prevent damage to the lines.
Step 3: Remove the Aerator (Optional)
If your faucet has an aerator, unscrew it counterclockwise using your fingers or a small wrench.
Step 4: Remove the Cartridge
Using a Phillips or flathead screwdriver, remove the screws holding the cartridge retainer in place. Pull the retainer straight out and lift the cartridge.
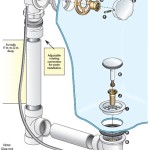
Step 5: Disconnect the Drain Assembly (Optional)
If you need to remove the drain assembly, locate the retaining nut beneath the drain and unscrew it using a large adjustable wrench.
Step 6: Remove the Faucet Base
Use an adjustable wrench to loosen the large nut securing the faucet base to the tub. Carefully lift the base straight up. Some models may have additional screws holding the base in place.
Tips:
- Take pictures of the plumbing before disassembling to assist with reinstallation.
- Consider replacing old O-rings or washers to prevent potential leaks.
- If you encounter any difficulties, do not force it. Consult a professional plumber for assistance.
Follow these steps to successfully remove your Moen bathtub faucet. By being prepared and following the instructions carefully, you can complete the task efficiently and effectively.

How To Remove A Moen Tub Spout Mr Kitchen Faucets

How To Repair A Leaky Single Lever Moen Bath Or Shower Faucet Older Style

How To Repair Remove Replace A Leaking Moen Shower Faucet Cartridge Valve With Single Knob 1225

How To Replace A Moen Cartridge And Fix Leaky Bathtub Faucet It Tutorials

How To Repair A Moen Shower Faucet Step By

How To Remove Moen Bathroom Faucet Handle In 2 Steps

Moen Bathtub Faucet Handle Repair

Learn How To Remove And Install Various Tub Spouts

Learn How To Remove And Install Various Tub Spouts

Moen Slip Fit Tub Spout Install Review Diy