Moen Bathtub Cartridge Replacement Instructions: A Detailed Guide for Homeowners
Updating your bathtub faucet can be a simple and cost-effective way to revitalize your bathroom. Replacing the bathtub cartridge is a common repair that can resolve leaks, drips, or temperature issues. While the process may vary slightly depending on the specific model, these general instructions will guide you through the steps necessary to replace a Moen bathtub cartridge successfully.
Tools and Materials Required:
- Phillips screwdriver
- Adjustable wrench
- Replacement Moen bathtub cartridge
- Bucket
- Cloth or paper towels
Step-by-Step Instructions:
1. Turn off Water Supply: Begin by turning off the water supply to the bathtub. This is typically done by closing the shut-off valves located under the sink.
2. Remove Handle and Escutcheon: Remove the handle by unscrewing the set screw located on the top or side of the handle. Pull the handle straight up to detach it. Next, use a screwdriver to remove the escutcheon (decorative plate) surrounding the handle.
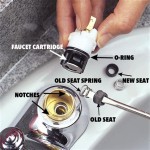
3. Remove Cartridge Retainer Nut: Locate the cartridge retainer nut, which is usually a large plastic nut located behind the escutcheon. Use an adjustable wrench to loosen and remove the nut.
4. Pull Out Old Cartridge: Once the retainer nut is removed, pull the old cartridge straight out of the valve body. Be prepared for some water to drip out, so have a bucket ready to catch any drips.
5. Clean Valve Body: Before installing the new cartridge, inspect the valve body for debris or corrosion. Clean it thoroughly using a cloth or paper towels to ensure a proper seal.
6. Install New Cartridge: Align the new cartridge with the valve body and push it in until it is firmly seated. Make sure the notch on the cartridge aligns with the corresponding notch in the valve body.
7. Tighten Cartridge Retainer Nut: Hand-tighten the cartridge retainer nut as much as possible. Then, use an adjustable wrench to further tighten the nut, but avoid overtightening.
8. Reassemble Handle and Escutcheon: Place the escutcheon over the cartridge retainer nut and secure it with the screws. Finally, reattach the handle by inserting it into the cartridge stem and tightening the set screw.
9. Turn on Water Supply: Slowly turn on the water supply to the bathtub and check for leaks. If any leaks occur, tighten the cartridge retainer nut or the handle set screw further.
Tips for Success:
- Ensure you have the correct replacement cartridge for your Moen bathtub model.
- If you encounter any difficulties, refer to the manufacturer's instructions for your specific model.
- If you are uncomfortable performing the replacement yourself, contact a licensed plumber for assistance.
By following these instructions, you can successfully replace the bathtub cartridge in your Moen bathtub and restore its functionality. Remember to take necessary precautions to turn off the water supply and handle the water with care. With a little patience and attention to detail, you can complete this repair confidently and enjoy a leak-free and efficient bathroom faucet once again.

How To Replace A Moen Shower Cartridge

Replacing A Stuck Moen Shower Valve Cartridge

1225 Cartridge Single Handle Shower Moentrol Valve Moen Solutions

Diy Bath And Shower Mixer Valve Repair Moen 1222 Posi Temp Cartridge Replacement It S Easy

How To Fix Leaky Shower Tub Faucet Replace Moen 1200 Or 1225 Cartridge Demo

How To Replace A Moen Cartridge And Fix Leaky Bathtub Faucet It Tutorials

Remove And Install Moen 1222 Cartridge Repair Shower Tub Faucet Set Temperature Limit

Moen Bathtub Drippingfaucet Repair

Replace A Moen Shower Cartridge Fix Leaky Tub Faucet

Bathtub Shower Moen Cartridge Replacement 1222 1224
Related Posts

