Leaky Bathtub Faucet Repair: A Comprehensive Guide
A leaky bathtub faucet is not just an annoyance; it can also waste water and increase your utility bills. Fortunately, repairing a leaky faucet is a relatively simple task that most homeowners can complete. Here's a comprehensive guide to help you tackle this plumbing issue:
Materials You'll Need:
- Replacement faucet cartridge or washer
- Allen wrench or screwdriver
- Adjustable wrench
- Plumber's tape
- Towels or rags
Step 1: Shut Off the Water Supply
Before starting any repairs, it's crucial to turn off the water supply. Locate the valves under the sink or behind the bathtub access panel and turn them clockwise to close them.
Step 2: Open the Faucet
Open the faucet to release any remaining water pressure. This will help prevent water from leaking out when you remove the faucet handle.
Step 3: Remove the Faucet Handle
Depending on your faucet type, you may need an Allen wrench or a screwdriver to remove the set screw on the faucet handle. Once the set screw is removed, gently pull the handle straight up to detach it.
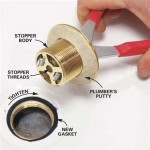
Step 4: Remove the Cartridge or Washer
Using an adjustable wrench, carefully loosen the bonnet nut that holds the cartridge or washer in place. Remove the old cartridge or washer and inspect it for any damage or wear.
Step 5: Replace the Cartridge or Washer
Wrap a few layers of plumber's tape around the threads of the new cartridge or washer. Insert the new part into the valve body and hand-tighten it. Use the adjustable wrench to further tighten the bonnet nut, but avoid overtightening.
Step 6: Reinstall the Faucet Handle
Align the faucet handle with the valve body and slide it down into place. Secure it by tightening the set screw using an Allen wrench or screwdriver.
Step 7: Turn on the Water Supply
Slowly turn on the water supply valves and check for any leaks. If you notice any dripping, tighten the bonnet nut further or adjust the washer until the leak stops.
Tips for Prevention:
To prevent future leaks, replace your faucet cartridges or washers every few years. Additionally, avoid applying excessive force when turning the faucet handles, as this can damage the seals.
If you encounter any difficulties or the leak persists after following these steps, do not hesitate to contact a licensed plumber for assistance.

How To Fix A Leaking Bathtub Faucet Diy Family Handyman

How To Fix A Leaky Bathtub Faucet 6 Ways Stop Drips

How To Fix A Leaking Bathtub Faucet Diy Family Handyman

How To Fix A Leaking Bathtub Faucet The Home Depot

Faucet Repair How To A Leaky Bath

How To Fix A Leaky Bathtub Faucet 6 Ways Stop Drips

How To Fix A Leaking Bathtub Faucet The Home Depot

How To Fix A Leaking Bathtub Faucet The Home Depot

How To Fix A Leaking Bathtub Faucet Diy Family Handyman

How To Fix A Leaky Bathtub Faucet Removing The Spout From