Leaking Bathtub Faucet Single Handle Moen: Diagnosis and Repair
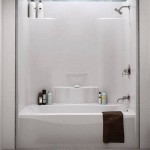
A leaking bathtub faucet, particularly a single-handle Moen model, can be a common household plumbing issue. This persistent dripping not only wastes water, leading to increased utility bills, but also can contribute to mineral buildup and staining in the bathtub or shower. Addressing the problem promptly is crucial to minimizing water waste and preventing potential long-term damage.
Moen faucets are well-regarded for their durability and relatively straightforward design. However, like any mechanical device subjected to constant use and exposure to water, components can wear down over time, leading to leaks. Diagnosing the source of the leak is the first step in the repair process. This article will delve into the potential causes of a leaking single-handle Moen bathtub faucet and provide a comprehensive guide to troubleshooting and repair.
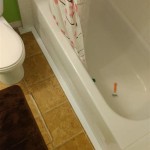
Before commencing any repair work, it is imperative to shut off the water supply to the bathtub faucet. Typically, there are shut-off valves located either behind an access panel in the wall behind the bathtub or in the basement directly below the bathroom. Once the water supply is turned off, the faucet handle can be removed to gain access to the internal components.
Identifying the Common Causes of Leaks in Single-Handle Moen Bathtub Faucets
Several factors can contribute to leaks in single-handle Moen bathtub faucets. The most frequent culprits include worn-out O-rings, damaged cartridges, and corroded valve seats. Understanding the function of each component is essential for accurate diagnosis and effective repair.
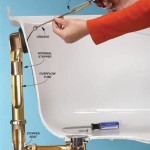
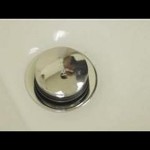
O-rings are small, circular rubber seals that provide a watertight barrier between moving parts within the faucet. Over time, these O-rings can become brittle, cracked, or flattened due to constant exposure to water and temperature fluctuations. When an O-ring fails, it no longer effectively seals the gap, allowing water to escape and resulting in a leak. Specifically, O-rings are found on the Moen 1222 cartridge, which is used in many Moen single-handle faucets. Damaged O-rings on this cartridge are a common cause of leaks.
The cartridge is a critical component of the single-handle faucet. It controls the flow of water and the mixing of hot and cold water. The cartridge contains internal seals and passages that can wear down or become clogged with mineral deposits. A damaged or malfunctioning cartridge is often the primary reason for a leaking faucet. In Moen faucets, the 1222 cartridge is a common type and prone to wear over time.
Valve seats are the surfaces against which the faucet's sealing components press to shut off the water flow. These seats can become corroded or damaged over time, preventing a tight seal and causing a leak. Although valve seats are less frequently the direct cause of leaks in single-handle faucets compared to O-rings and cartridges, they should still be inspected as part of the troubleshooting process. The valve seat is less accessible than the cartridge and may not be replaceable in all Moen faucet models, in which case the entire faucet body would need to be replaced.
Furthermore, high water pressure can exacerbate existing problems and contribute to leaks. If the water pressure in the home is excessively high, it can place undue stress on the faucet's components, accelerating wear and tear. A pressure regulator installed on the main water line can help mitigate this issue.
Step-by-Step Guide to Repairing a Leaking Single-Handle Moen Bathtub Faucet
Once the potential causes of the leak have been identified, the repair process can begin. This section provides a detailed, step-by-step guide to replacing the most common failing components in a single-handle Moen bathtub faucet.
Step 1: Shut Off the Water Supply. As mentioned previously, locating and turning off the water supply to the bathtub faucet is the initial, crucial step. Ensure the water is completely shut off before proceeding.
Step 2: Remove the Faucet Handle. The method for removing the faucet handle varies depending on the specific Moen model. Typically, there is a small set screw located on the side or underside of the handle. Use an Allen wrench to loosen and remove the set screw. Once the set screw is removed, the handle should pull straight off. Some models may have a decorative cap that needs to be pried off to access the set screw.
Step 3: Remove the Escutcheon Plate. The escutcheon plate is the decorative cover that surrounds the faucet handle. It is typically held in place by screws or friction. Remove any screws securing the escutcheon plate and gently pull it away from the wall. If it is held in place by friction, carefully pry it loose with a flathead screwdriver, being mindful not to damage the surrounding tile or wall.
Step 4: Remove the Retaining Clip. After removing the escutcheon plate, the retaining clip that secures the cartridge will be visible. This clip is typically U-shaped and can be removed with a pair of pliers or a small screwdriver. Take note of the orientation of the retaining clip before removing it, as it will need to be reinstalled in the same position.
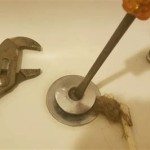
Step 5: Remove the Cartridge. With the retaining clip removed, the cartridge can now be extracted. Moen cartridges can be notoriously difficult to remove, as they often become stuck due to mineral buildup. A cartridge puller tool is highly recommended for this step. This tool provides leverage and helps to dislodge the cartridge without damaging it or the faucet body. If a cartridge puller is unavailable, try gently rocking the cartridge back and forth while pulling on it. Avoid using excessive force, as this could break the cartridge and make removal even more challenging.
Step 6: Inspect the Cartridge and Valve Seats. Once the cartridge is removed, thoroughly inspect it for any signs of damage, such as cracks, breaks, or mineral buildup. Also, inspect the valve seats inside the faucet body. If the valve seats are corroded or damaged, they may need to be cleaned or replaced; however, as mentioned earlier, replacement may not be possible in all models.
Step 7: Replace the Cartridge and O-Rings. If the cartridge is damaged or severely worn, it should be replaced with a new Moen cartridge of the correct model number. If the cartridge appears to be in good condition, but the O-rings are worn or damaged, they can be replaced separately. Moen sells replacement O-ring kits for many of their cartridges. Before installing the new cartridge, lubricate the O-rings with silicone grease. This will help to ensure a smooth insertion and a watertight seal.
Step 8: Reassemble the Faucet. With the new cartridge and O-rings installed, reassemble the faucet in the reverse order of disassembly. First, insert the cartridge into the faucet body, ensuring it is properly aligned. Then, reinstall the retaining clip, escutcheon plate, and faucet handle. Tighten the set screw on the handle securely.
Step 9: Turn on the Water Supply and Test for Leaks. Slowly turn the water supply back on and check for any leaks around the faucet handle, escutcheon plate, and spout. If leaks persist, double-check that the cartridge is properly installed and that the O-rings are sealing correctly. It may be necessary to tighten the set screw on the faucet handle further or to re-seat the cartridge.
Preventative Measures to Extend the Life of Moen Bathtub Faucets
While periodic repairs are inevitable, several preventative measures can be taken to extend the lifespan of a single-handle Moen bathtub faucet and minimize the risk of leaks. Implementing these practices will contribute to long-term cost savings and reduced water waste.
Regular cleaning of the faucet is essential to prevent mineral buildup and corrosion. Use a mild soap and water solution to clean the faucet exterior regularly. Avoid using abrasive cleaners, as these can scratch the finish. Periodically remove the aerator at the spout of the faucet and clean it to remove any debris that may be clogging it. A clogged aerator can increase water pressure and contribute to leaks.
Consider installing a water softener if the home's water supply is hard. Hard water contains high levels of minerals, such as calcium and magnesium, which can contribute to scale buildup and corrosion inside the faucet. A water softener removes these minerals from the water, reducing the risk of damage and extending the life of the faucet.
As mentioned previously, excessive water pressure can strain the faucet's components. Install a pressure regulator on the main water line to maintain consistent and safe water pressure throughout the home. This will help to protect the faucet and other plumbing fixtures from damage.
Finally, when replacing a cartridge or other components, use genuine Moen replacement parts. Generic or aftermarket parts may not meet Moen's quality standards and could fail prematurely, leading to leaks and other problems. Using genuine Moen parts ensures compatibility and optimal performance.
By understanding the common causes of leaks in single-handle Moen bathtub faucets and following the troubleshooting and repair steps outlined in this article, homeowners can effectively address these issues and maintain their plumbing systems. Regular maintenance and preventative measures will further contribute to the longevity and reliable operation of Moen faucets.

How To Replace A Moen Cartridge And Fix Leaky Bathtub Faucet It Tutorials

Moen Bathtub Faucet Dripping Wasting Water How To Repair A Leaking Single Handle Bath Shower

How To Repair A Leaky Single Lever Moen Bath Or Shower Faucet Older Style

How To Fix Moen Single Handle Faucet That Leaks Diy

How To Repair A Moen Shower Faucet Step By

How To Fix A Leaking Single Handle Bathtub Faucet Quick And Easy

How To Repair A Moen Shower Tub Valve

How To Repair Remove Replace A Leaking Moen Shower Faucet Cartridge Valve With Single Knob 1225

How To Fix Leaky Shower Tub Faucet Replace Moen 1200 Or 1225 Cartridge Demo

How To Fix A Leaking Bathtub Faucet The Home Depot