Leaking Bathtub Faucet: Troubleshooting and Repairing a Single Handle Delta
A dripping bathtub faucet is more than just an annoyance; it represents a steady expenditure of water and, consequently, money. Left unaddressed, a seemingly minor leak can significantly inflate a water bill over time, not to mention potentially leading to water damage in surrounding areas. While many faucets can suffer from this problem, single handle Delta bathtub faucets are a common and relatively straightforward system for homeowners to address, often without needing to call a professional plumber. Understanding the components involved and following a systematic approach to diagnosis and repair can save time, money, and further frustration.
This article will outline the potential causes of a leak in a single handle Delta bathtub faucet, provide step-by-step instructions for diagnosing the problem, and guide through the necessary repair procedures. Emphasis will be placed on safety precautions and proper tool usage to ensure a successful and lasting repair.
Identifying Potential Causes of the Leak
Several factors can contribute to a leaky single handle Delta bathtub faucet. Pinpointing the exact cause is the first crucial step towards an effective repair. The most common culprits often involve worn or damaged internal components. These include, but are not limited to, worn-out rubber seals, damaged cartridges, and corroded valve bodies.
Worn or Damaged Rubber Seals: Within the faucet assembly are numerous rubber seals, often referred to as O-rings or seats. These seals are designed to create a watertight barrier between different components, preventing water from escaping. Over time, these seals can degrade due to constant exposure to water, minerals, and temperature fluctuations. This degradation can lead to hardening, cracking, or even complete disintegration of the seal, resulting in a leak. Specifically, the seals around the cartridge are prime suspects in single-handle Delta faucets. Hard water, containing high mineral content, accelerates the breakdown of these rubber components. Visual inspection of removed seals will often reveal the damage.
Damaged Cartridge: The cartridge is the heart of a single-handle Delta faucet. It controls the flow and temperature of the water. The cartridge contains intricate internal passageways and seals that regulate water mixing and distribution. If the cartridge becomes damaged, either due to mineral buildup, physical wear, or debris accumulation, it can fail to properly shut off the water flow, leading to a persistent drip. A common symptom of a failing cartridge is a drip that persists even when the handle is in the fully closed position. The cartridge is usually a plastic or brass component that slides in and out of the valve body. It is essential to replace the cartridge with the correct model for the faucet, as cartridges are not universally interchangeable.
Corroded Valve Body: The valve body is the main structure of the faucet that houses the cartridge and provides the connection points for the water supply lines. While typically made of brass to resist corrosion, the valve body is still susceptible to damage, especially in areas with highly acidic water. Corrosion can weaken the valve body, leading to cracks or pinhole leaks. Although less common than cartridge or seal failures, a corroded valve body is a more serious issue and may require replacing the entire faucet assembly. Signs of corrosion include visible rust or green deposits around the valve body or water supply connections.
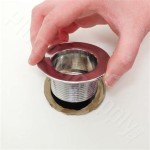
Loose or Damaged Aerator: Although less likely to be the primary source of a leak, a loose or damaged aerator can sometimes cause water to drip from the spout after the faucet is turned off. The aerator is the screen-like device at the tip of the faucet that mixes air with the water stream. If the aerator is clogged with mineral deposits or damaged, it can disrupt the water flow and cause dripping. Cleaning or replacing the aerator is a simple first step in troubleshooting a leaking faucet.
It’s important to note that the location of the leak can offer clues to the underlying problem. A drip from the spout when the handle is in the off position usually points to a faulty cartridge. Leaks around the base of the handle might indicate issues with the O-rings or seals surrounding the cartridge or handle assembly.
Diagnosing the Source of the Leak: A Step-by-Step Approach
Before disassembling the faucet, it is essential to gather the necessary tools and materials. This includes a set of screwdrivers (both flathead and Phillips head), an adjustable wrench, a cartridge puller (specifically designed for Delta faucets; often included with replacement cartridges), replacement cartridges and O-rings (ensure compatibility with the specific Delta faucet model), plumber’s grease (silicone-based), and a clean rag or towel.
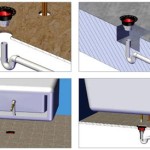
Step 1: Shut Off the Water Supply: The most crucial initial step is to shut off the water supply to the bathtub faucet. Locate the shut-off valves for the hot and cold water lines supplying the tub. These valves are typically located under the sink or in an access panel behind the tub. Turn both valves clockwise until they are completely closed. After shutting off the water, turn on the faucet to relieve any remaining pressure in the lines. If shut-off valves are not readily accessible, the main water supply to the house must be turned off. This is usually located near the water meter.
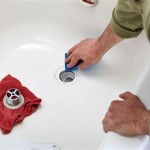
Step 2: Protect the Bathtub Finish: Before starting disassembly, protect the bathtub finish from scratches and damage. Place a towel or drop cloth over the tub surround to prevent tools from scratching the surface.
Step 3: Remove the Handle: The handle of a single handle Delta faucet is usually secured with a setscrew located underneath a decorative cap or on the side of the handle. Use a small flathead screwdriver to carefully pry off the cap, exposing the setscrew. Use a wrench or Allen wrench (depending on the screw type) to loosen and remove the setscrew. Once the setscrew is removed, gently pull the handle straight off the faucet body. If the handle is stuck, try wiggling it gently or using a handle puller tool.
Step 4: Disassemble the Faucet Escutcheon and Sleeve: After removing the handle, the next step is to disassemble the faucet escutcheon (the decorative plate behind the handle) and any retaining sleeves. These components are typically held in place by threaded connections or friction. Carefully unscrew or pull off these parts to expose the cartridge.
Step 5: Remove the Cartridge Retaining Clip: The cartridge is held in place by a retaining clip, usually made of brass or plastic. This clip must be removed before the cartridge can be extracted. Use a small screwdriver or pliers to carefully remove the clip, noting its orientation for reinstallation. Be cautious not to bend or break the clip, as it is essential for securing the new cartridge.
Step 6: Remove the Cartridge: With the retaining clip removed, the cartridge can now be extracted. This can sometimes be difficult, as the cartridge may be stuck due to mineral buildup or corrosion. A cartridge puller tool is highly recommended for this step. Insert the puller tool into the cartridge and use it to gently twist and pull the cartridge out of the valve body. If a cartridge puller is unavailable, try using pliers to grip the cartridge and gently rock it back and forth while pulling. Avoid using excessive force, as this can damage the valve body.
Step 7: Inspect the Cartridge and Valve Body: Once the cartridge is removed, thoroughly inspect it for signs of damage, such as cracks, breaks, or mineral buildup. Also, inspect the valve body for corrosion or damage. If the cartridge appears to be in good condition, examine the O-rings and seals on the cartridge for wear or damage. If the valve body is severely corroded, consider replacing the entire faucet assembly.
Step 8: Inspect Valve Seats and Springs (Delta Ball-Type Faucets): Some older Delta single-handle faucets use a ball-type cartridge instead of a stem cartridge. These faucets have separate seats and springs. Inspect these carefully for damage or wear. Replace if necessary.
Performing the Repair: Cartridge Replacement and Reassembly
After identifying the source of the leak, it's time to perform the necessary repairs. For most single handle Delta bathtub faucet leaks, replacing the cartridge is the most common and effective solution. This section outlines the steps involved in replacing the cartridge and reassembling the faucet.
Step 1: Obtain the Correct Replacement Cartridge: Before proceeding with the replacement, ensure that the new cartridge is the correct model for the specific Delta faucet. Delta faucets use different cartridge types, and using the wrong cartridge can lead to further problems. Consult the faucet's model number or refer to the manufacturer's specifications to identify the correct replacement cartridge.
Step 2: Lubricate the New Cartridge: Before installing the new cartridge, apply a thin layer of plumber’s grease (silicone-based) to the O-rings and seals on the cartridge. This lubrication will help the cartridge slide smoothly into the valve body and create a watertight seal. Avoid using petroleum-based lubricants, as they can damage rubber seals.
Step 3: Install the New Cartridge: Insert the lubricated cartridge into the valve body, aligning it correctly with the valve body's internal features. Ensure the cartridge is fully seated and oriented correctly. The cartridge should slide in smoothly with minimal resistance. If the cartridge is difficult to insert, double-check its orientation and ensure that there are no obstructions in the valve body.
Step 4: Reinstall the Cartridge Retaining Clip: Once the cartridge is in place, reinstall the retaining clip to secure it within the valve body. Make sure the clip is properly seated and engaged, preventing the cartridge from moving or dislodging. The clip should snap into place or be secured with screws, depending on the faucet model. Double-check that the clip is securely holding the cartridge in place.
Step 5: Reassemble the Faucet Escutcheon and Sleeve: Reinstall the faucet escutcheon and any retaining sleeves that were removed during disassembly. Tighten the threaded connections securely, but avoid over-tightening, which can damage the components. Ensure that the escutcheon is flush with the wall or tub surround.
Step 6: Reinstall the Handle: Reinstall the faucet handle, aligning it with the cartridge stem. Secure the handle with the setscrew, tightening it firmly but not excessively. Reinstall the decorative cap over the setscrew, if applicable. Test the handle's operation to ensure it moves smoothly and controls the water flow and temperature correctly.
Step 7: Turn on the Water Supply and Test for Leaks: Slowly turn on the water supply valves, checking for leaks around the faucet base, handle, and spout. Allow the water to run for a few minutes to flush out any debris or air trapped in the lines. If any leaks are detected, immediately shut off the water supply and inspect the connections. Tighten any loose connections or replace any damaged seals or components.
Step 8: Verify Hot and Cold Water Functionality: After confirming that there are no leaks, test the hot and cold water functionality. Ensure that the hot water is delivered from the correct side of the handle and that the cold water is delivered from the opposite side. If the hot and cold water are reversed, the cartridge may be installed backward. If necessary, remove the handle, retaining clip, and cartridge, rotate the cartridge 180 degrees, and reinstall it.
By following these steps carefully, most common leaks in single handle Delta bathtub faucets can be effectively resolved. If the leak persists or if there are any concerns about the repair process, consulting a qualified plumber is recommended.

How To Replace A Delta Cartridge And Fix Leaky Bathtub Faucet It Tutorials

How To Repair A Delta Tub Shower Valve

Fix A Leaky Delta Single Handle Shower Faucet For Under 2

How To Fix A Leaky Shower Faucet Delta Cartridge Replacement

How To Fix A Leaking Single Handle Bathtub Faucet Quick And Easy

Delta Shower Faucet Cartridge Replacement 1700 Monitor Leak Repair

How To Fix A Leaky Bathtub Faucet Delta Shower Cartridge L Replace

I Fixed A Leak In The Delta Tub Shower Single Handle Faucet

My 1300 1400 Series Monitor Is Leaking From The Shower Head Or Spout When Handle Off What Do I Need

Leaking Faucet Single Handle Shower Head Diy Home Improvement Forum
Related Posts