Leaking Bathtub Faucet Handle When Water Is Off: Understanding the Problem and Potential Solutions
A leaking bathtub faucet handle, even when the water is turned off, can be a frustrating and potentially costly plumbing issue. This seemingly minor drip indicates a problem within the faucet's internal mechanisms that requires investigation and repair. Ignoring the leak can lead to increased water bills, water damage to surrounding areas, and the eventual degradation of the faucet itself. Understanding the common causes of this problem is the first step towards implementing an effective solution.
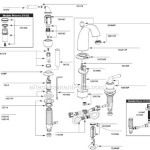
The primary function of a bathtub faucet is to control the flow of water from the supply lines to the bathtub spout. This control is achieved through a series of internal components, including cartridges, stems, valve seats, and O-rings, all of which work together to create a watertight seal when the faucet is in the off position. When one or more of these components fails, the seal is compromised, resulting in a leak. Pinpointing the exact cause requires careful examination and, in some cases, disassembly of the faucet.
Common Causes of a Leaking Bathtub Faucet Handle
Several factors can contribute to a leaky bathtub faucet handle when the water is supposedly off. These causes generally relate to the deterioration or malfunction of the faucet's internal parts. Regular use, water quality, and the age of the faucet all play a role in the likelihood of these issues arising.
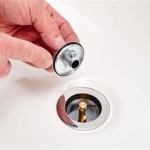
Worn or Damaged O-rings and Seals: O-rings and rubber seals are essential for creating watertight connections within the faucet. These small, circular components are typically made of rubber or silicone and are responsible for preventing water from escaping around the faucet handle and stem. Over time, these seals can become brittle, cracked, or worn down due to constant exposure to water and mineral deposits. When this happens, they lose their ability to effectively seal the connection, leading to a drip around the handle even when the water is turned off. The degradation process is accelerated by hard water containing high mineral content, which can cause the seals to become stiff and inflexible.
Corroded or Damaged Valve Seats: The valve seat is a stationary component against which the faucet stem or cartridge presses to shut off the water supply. Valve seats are typically made of brass or other corrosion-resistant materials, but they can still be susceptible to corrosion and damage over time, particularly in areas with hard water or acidic water. Corrosion can create pitting and irregularities on the surface of the valve seat, preventing the faucet stem from forming a tight seal. Similarly, mineral deposits can build up on the valve seat, interfering with the stem's ability to fully close off the water flow. Damage to the valve seat is often indicated by a persistent drip from the faucet, even after replacing other components.
Faulty Cartridge or Stem Assembly: Many modern bathtub faucets use a cartridge or stem assembly to control the flow of water. These cartridges contain internal mechanisms that regulate the mixing of hot and cold water and the overall water flow. If the cartridge itself is damaged, cracked, or worn out, it can cause a leak around the handle. Similarly, older faucets often use stems with rubber washers at the end. These washers, like O-rings, can deteriorate over time and lose their ability to create a tight seal. Cartridge replacements are often straightforward, but it is crucial to select the correct replacement cartridge that is compatible with the specific faucet model.
Identifying the Type of Faucet
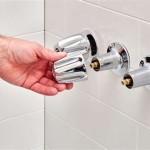
Before attempting any repairs, it is crucial to identify the type of bathtub faucet installed. Different types of faucets have different internal mechanisms and require different approaches to repair. The most common types of bathtub faucets include compression faucets, ball faucets, cartridge faucets, and ceramic disc faucets.
Compression Faucets: These are the oldest and simplest type of faucet, characterized by two separate handles for hot and cold water. Compression faucets use rubber washers that are compressed against a valve seat to shut off the water flow. Leaks in compression faucets are often caused by worn-out washers or corroded valve seats.
Ball Faucets: Ball faucets use a single handle that controls both the water flow and temperature. These faucets contain a slotted ball that fits into the faucet body. O-rings and springs create a seal around the ball, preventing leaks. Leaks in ball faucets are often due to worn-out O-rings or a damaged ball.
Cartridge Faucets: Cartridge faucets also use a single handle, but instead of a ball, they contain a cartridge that slides up and down to control the water flow. These faucets are known for their smooth operation and relatively easy repair. Leaks in cartridge faucets are typically caused by a faulty cartridge that needs to be replaced.
Ceramic Disc Faucets: Ceramic disc faucets are the most modern type of faucet and are known for their durability and leak-resistant design. They use two ceramic discs that slide over each other to control the water flow. These faucets are less prone to leaks than other types, but when they do leak, it is often due to a damaged ceramic disc or a faulty seal.
Troubleshooting Steps for a Leaking Bathtub Faucet Handle
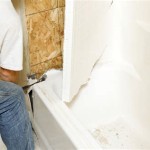
Once the type of faucet is identified, several troubleshooting steps can be taken to pinpoint the source of the leak. These steps involve a combination of visual inspection, disassembly, and component testing. Safety is paramount, so always turn off the water supply to the bathtub faucet before beginning any repairs.
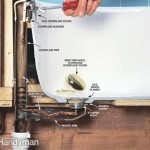
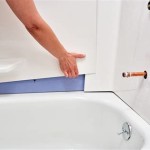
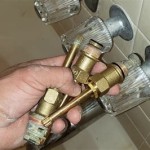
Shutting Off the Water Supply: Locate the shut-off valves for the hot and cold water supply lines leading to the bathtub faucet. These valves are typically located under the sink or in an access panel behind the bathtub. Turn both valves clockwise until they are fully closed. After shutting off the water supply, turn on the faucet to relieve any residual pressure in the lines. Place a towel or bucket under the faucet to catch any remaining water.
Visual Inspection: Carefully inspect the faucet handle, spout, and surrounding area for any signs of water damage, corrosion, or mineral buildup. Look for cracks or other visible damage to the faucet body or handle. Check the O-rings and seals around the handle for any signs of wear, cracking, or deterioration. If possible, use a flashlight to inspect the valve seat for any signs of corrosion or mineral deposits.
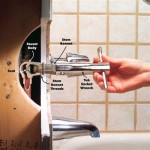
Disassembly and Component Inspection: Depending on the type of faucet, the disassembly process will vary. For compression faucets, remove the handle and unscrew the stem assembly. For ball faucets, loosen the set screw and remove the handle, cap, and ball. For cartridge faucets, remove the handle and retaining clip, then pull out the cartridge. Once the faucet is disassembled, carefully inspect each component for signs of wear, damage, or corrosion. Pay particular attention to the O-rings, seals, valve seats, and cartridge or stem assembly. Replace any damaged or worn-out components with new ones that are specifically designed for the faucet model.
Cleaning and Lubrication: Before reassembling the faucet, clean all of the components with a mild soap and water solution. Use a soft brush or cloth to remove any mineral deposits or corrosion. After cleaning, lubricate the O-rings and seals with a silicone-based plumber's grease. This will help to ensure a tight seal and prevent future leaks. Applying plumber's grease is particularly important for ceramic disc faucets, as it helps to protect the delicate ceramic discs from damage.
Repair Techniques and Component Replacement
The specific repair techniques will vary depending on the type of faucet and the cause of the leak. However, some general principles apply to most faucet repairs. These include using the correct tools, following the manufacturer's instructions, and taking care not to damage any of the components.
Replacing O-Rings and Seals: Replacing O-rings and seals is a common repair for leaky bathtub faucets. To replace an O-ring, simply remove the old O-ring and install the new one in its place. Make sure that the O-ring is properly seated and lubricated with plumber's grease. When replacing seals, be sure to clean the surrounding area thoroughly and apply a thin layer of plumber's grease to the new seal before installing it.
Replacing Valve Seats: Replacing a valve seat requires a special tool called a valve seat wrench. Insert the wrench into the valve seat and turn it counterclockwise to remove the old seat. Clean the area where the new valve seat will be installed and apply a thin layer of plumber's grease to the new seat. Insert the new valve seat into the faucet body and tighten it securely with the valve seat wrench.
Replacing a Cartridge or Stem Assembly: Replacing a cartridge or stem assembly is a relatively straightforward repair. Simply remove the old cartridge or stem assembly and install the new one in its place. Be sure to align the cartridge or stem assembly correctly and tighten any screws or retaining clips securely. When replacing a cartridge, be sure to purchase the correct replacement cartridge that is compatible with the faucet model.
Preventative Measures to Minimize Future Leaks
Once the leak has been repaired, taking preventative measures to minimize future leaks is essential. These measures include regular maintenance, proper water treatment, and careful usage habits.
Regular Maintenance: Regularly inspect the bathtub faucet for any signs of leaks or damage. Tighten any loose screws or connections and replace any worn-out components. Periodically clean the faucet with a mild soap and water solution to remove any mineral deposits or corrosion.
Water Treatment: If the water supply is hard or acidic, consider installing a water softener or filter to remove minerals and other contaminants. This will help to protect the faucet components from corrosion and extend their lifespan.
Careful Usage: Avoid using excessive force when turning the faucet handles. This can damage the internal components and cause leaks. When cleaning the bathtub, avoid using abrasive cleaners that can scratch or damage the faucet finish.
Addressing a leaking bathtub faucet handle promptly and effectively can prevent further damage and conserve water. While some repairs can be handled by homeowners with basic plumbing skills, more complex issues may require the expertise of a qualified plumber. Proper diagnosis and repair are crucial for ensuring the long-term functionality and efficiency of the bathtub faucet.

Moen Bathtub Faucet Dripping Wasting Water How To Repair A Leaking Single Handle Bath Shower

How To Fix A Leaky Bathtub Faucet 6 Ways Stop Drips

How To Fix Leaking Bathtub Faucet

How To Fix A Leaking Bathtub Faucet The Home Depot

How To Fix A Leaking Single Handle Bathtub Faucet Quick And Easy

How To Fix A Leaking Bathtub Faucet Diy Family Handyman

How To Fix A Leaking Bathtub Faucet Diy Family Handyman

How To Fix A Leaking Bathtub Faucet The Home Depot

How To Fix A Leaky Bathtub Faucet Blue Collars

How To Fix A Leaking Bathtub Faucet The Home Depot
Related Posts