Here's an article addressing leaking bathtub faucet handles, focusing on clarity, information, and technical accuracy.
Stopping Leaks: Understanding and Repairing Bathtub Faucet Handles
A dripping bathtub faucet is more than just an annoyance; it represents wasted water, increased water bills, and potential damage to the plumbing system and surrounding bathroom fixtures. While sometimes the leak originates directly from the spout, a common culprit is a leaking faucet handle. Identifying the source and understanding the mechanics involved are crucial for effective repair. This article provides a comprehensive overview of the causes of leaking bathtub faucet handles and outlines the steps involved in diagnosing and resolving the issue, minimizing water waste and preventing further complications.
The complexity of a faucet lies in its intricate components working in unison to control water flow. Repeated use, mineral buildup from hard water, and the gradual degradation of rubber or plastic parts contribute to wear and tear, ultimately leading to leaks. Recognizing the type of faucet installed is the first step in diagnosing the problem and determining the appropriate repair strategy.
Bathtub faucets generally fall into several categories: compression faucets, ball faucets, cartridge faucets, and ceramic disc faucets. Each type employs a distinct mechanism to regulate water flow, and therefore, the troubleshooting and repair procedures vary accordingly. A careful examination of the handle design and overall faucet appearance will typically reveal the type installed. Identifying the faucet type is paramount before attempting any repairs, as using the wrong techniques or parts could cause further damage.
Identifying the Source of the Leak
Before embarking on any repair work, it is imperative to pinpoint the precise origin of the leak. A leaking faucet handle doesn't always mean the issue is directly at the handle base. Water can travel along internal faucet pathways, making accurate diagnosis essential. Observe the faucet closely while it is in the "off" position, paying attention to where the water emerges. Is it dripping directly from around the handle itself, or is it flowing from the spout? Sometimes, water might be seeping from where the handle connects to the faucet body.
If the water is dripping from the spout even when the handle is fully turned off, the problem likely lies within the valve seat or the internal seals responsible for completely shutting off the water supply. In this case, the handle issue might be secondary, or simply a consequence of back pressure caused by the faulty valve. Replacing the valve stem or cartridge may be necessary to resolve the leak emanating from the spout.
However, if the water is clearly seeping from around the handle itself, the problem is more likely related to worn-out O-rings, packing nuts, or the cartridge (in cartridge-style faucets) located directly beneath the handle. These components are designed to create a watertight seal, and their deterioration over time is a common cause of handle leaks. Carefully inspecting these parts for cracks, tears, or mineral deposits will help confirm the source of the leak.
Another aspect to consider is the frequency and intensity of the leak. Does it leak constantly, or only when the faucet has been recently used? A constant leak suggests a more severe problem with the seals or valve components. An intermittent leak might indicate a less significant issue, such as a slightly loose packing nut. These observations contribute to a more accurate diagnosis.
Tools and Preparation for Faucet Repair
Once the source of the leak has been identified, gathering the necessary tools and replacement parts is the next crucial step. Having the right tools on hand not only makes the repair process easier but also minimizes the risk of damaging the faucet or surrounding fixtures. The specific tools required will depend on the type of faucet and the nature of the repair, but some common essentials include:
- Adjustable Wrench: For loosening and tightening packing nuts and other faucet components.
- Screwdrivers (various sizes and types): Flathead and Phillips head screwdrivers are often needed to remove handles and access internal parts.
- Pliers: Useful for gripping and manipulating small parts.
- Penetrating Oil: To loosen corroded or stuck components.
- Faucet Handle Puller: This specialized tool can help remove stubborn faucet handles without causing damage.
- Allen Wrench Set: Some faucet handles are secured with Allen screws.
- O-ring Kit: A selection of O-rings in various sizes to replace worn-out seals.
- Replacement Cartridge or Valve Stem: If necessary, purchasing the correct replacement part for the specific faucet model is crucial.
- Plumber's Grease: To lubricate new O-rings and cartridges, ensuring a smooth and watertight fit.
- Clean Rags or Towels: To absorb spills and protect the bathroom surfaces.
- Basin Wrench: Can be useful for accessing shutoff valves located beneath the sink.
Before starting any repair work, it is absolutely essential to turn off the water supply to the bathtub faucet. This is typically accomplished by locating the shutoff valves for the hot and cold water lines, usually located beneath the sink or in an adjacent utility area. Turning off the water supply prevents a potentially messy and damaging situation. If the shutoff valves are corroded or inaccessible, the main water supply to the house may need to be turned off. This is typically located near the water meter.
With the water supply safely turned off, open the faucet handles to relieve any remaining pressure in the lines. This will prevent water from spraying out when the faucet is disassembled. Plugging the drain with a stopper is also recommended to prevent small parts from falling into the drain during the repair process.
Step-by-Step Repair Based on Faucet Type
The specific repair steps will vary depending on the type of bathtub faucet being worked on. Here's a general overview of the repair process for each type:
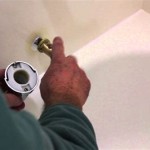
Compression Faucet: This is one of the oldest and simplest faucet designs. To repair a leaking handle, start by removing the decorative handle cap, usually located on the top of the handle. Unscrew the handle screw beneath the cap. Remove the handle, exposing the packing nut. Tighten the packing nut slightly to see if this stops the leak. If the leak persists, remove the packing nut completely. You may find a packing washer underneath; replace it if it appears worn or damaged. Apply plumber's grease to the new washer before reinstalling the packing nut. If this doesn't solve the problem, the valve stem itself may need to be replaced. Remove the valve stem and replace it with a new one of the same size and type.
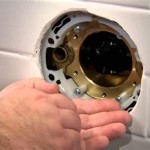
Ball Faucet: Ball faucets are characterized by a single handle that controls both temperature and water flow. To repair a leak around the handle of a ball faucet, you will typically need to replace the O-rings and springs located beneath the handle. First, loosen the setscrew on the side of the handle to remove it. Use a faucet wrench or adjustable pliers to loosen the retaining ring. Remove the spout assembly, exposing the ball and valve seats. Use a specialized tool to remove the valve seats and springs. Replace the O-rings on the ball and lubricate them with plumber's grease. Reassemble the faucet in reverse order, ensuring that all components are properly aligned.
Cartridge Faucet: Cartridge faucets are known for their smooth operation. A leak around the handle of a cartridge faucet usually indicates a faulty cartridge. To replace the cartridge, first, remove the handle by loosening the setscrew. Remove any decorative trim or cover plates that may be concealing the cartridge retainer clip. Use pliers to remove the retainer clip, which secures the cartridge in place. Pull the old cartridge straight out. Insert the new cartridge, aligning it properly with the faucet body. Replace the retainer clip, trim, and handle. Be sure to turn the water supply back on slowly to check for leaks.
Ceramic Disc Faucet: Ceramic disc faucets are known for being durable and leak-resistant. However, even these faucets can develop leaks over time. A leak around the handle may indicate a problem with the ceramic disc cylinder or the O-rings within the faucet body. To repair this type of faucet, first, remove the handle by loosening the setscrew. Remove any decorative trim or cover plates. Unscrew the cylinder retaining nut. Carefully lift out the ceramic disc cylinder. Inspect the O-rings on the cylinder and replace any that appear worn or damaged. Clean the cylinder and faucet body to remove any debris or mineral deposits. Reassemble the faucet in reverse order.
After completing the repairs, turn the water supply back on slowly and carefully inspect the faucet for any leaks. If leaks persist, double-check the assembly and ensure that all components are properly seated and tightened. It may be necessary to disassemble the faucet again and re-examine the O-rings, valve seats, or cartridge for any damage or misalignment.
Proper maintenance, such as regular cleaning and lubrication of faucet components, can help prevent future leaks and extend the life of the faucet. Consider installing a water softener to reduce mineral buildup, especially in areas with hard water. By understanding the mechanics of bathtub faucets and following the appropriate repair procedures, homeowners can effectively address leaking faucet handles and prevent water waste and further plumbing issues.

How To Fix A Leaking Bathtub Faucet The Home Depot

How To Fix A Leaky Bathtub Faucet 6 Ways Stop Drips

How To Fix A Leaking Bathtub Faucet The Home Depot

How To Fix Dripping Faucet Bathtub And Kitchen

How To 008 Leaking Bathtub Faucet Delta Handle Removal

How To Fix A Leaking Bathtub Faucet Diy Family Handyman

How To Fix A Leaking Bathtub Faucet Diy Family Handyman

How To Replace A Moen Cartridge And Fix Leaky Bathtub Faucet It Tutorials

How To Fix A Leaking Bathtub Faucet The Home Depot

How To 008 Leaking Bathtub Faucet Delta Handle Removal
Related Posts