Kohler Bathtub Faucet Leaking: Identifying, Understanding, and Addressing the Issue
Leaking faucets are a common household plumbing problem that can lead to wasted water, increased utility bills, and potential water damage. When the leak originates from a Kohler bathtub faucet, it's crucial to identify the cause, understand the underlying mechanisms, and address the issue effectively. Kohler is a reputable brand known for its quality plumbing fixtures; however, even the most well-crafted faucets can experience wear and tear over time, leading to leaks. This article will explore the common reasons behind Kohler bathtub faucet leaks, provide guidance on diagnosing the problem, and outline potential solutions for resolving the leak and preventing future occurrences.
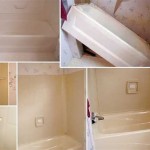
A dripping faucet, especially a bathtub faucet, can be particularly disruptive and wasteful due to the larger amount of water discharged compared to a kitchen or bathroom sink faucet. The constant sound can be a nuisance, and the cumulative water loss can significantly impact water bills. Moreover, prolonged leaks can lead to mineral buildup, staining within the bathtub, and potential damage to surrounding surfaces. Therefore, addressing a leaking Kohler bathtub faucet promptly is essential for maintaining the integrity of the plumbing system and the overall condition of the bathroom.
Common Causes of Kohler Bathtub Faucet Leaks
Several factors can contribute to a leaking Kohler bathtub faucet. Understanding these common causes is the first step in accurately diagnosing the problem and implementing the correct repair strategy. The most frequent culprits include worn-out or damaged rubber components, corroded valve seats, and loose connections. Each of these scenarios requires a specific approach to effectively stop the leak and restore the faucet to its proper working condition.
One of the most common reasons for a leaking faucet is the degradation of rubber parts within the faucet assembly. Kohler faucets, like most faucets, rely on rubber O-rings, washers, and seals to create a watertight barrier. Over time, these rubber components can become brittle, cracked, or worn due to constant exposure to water, temperature fluctuations, and the chemicals present in water supplies. This degradation can compromise the seal, allowing water to seep through and cause a leak. The specific O-rings and washers that are affected will depend on the specific Kohler faucet model.
Corrosion of the valve seat is another frequent cause of leaks. The valve seat is the area within the faucet body where the valve stem or cartridge makes contact to shut off the water flow. Over time, mineral deposits and corrosion can accumulate on the valve seat, creating an uneven surface that prevents a complete seal. This allows water to bypass the valve and drip from the faucet spout. The type of water supply, and its mineral content, can accelerate the corrosion process.
Loose connections within the faucet assembly or the supply lines can also be responsible for leaks. The constant vibration from water flow, changes in water pressure, and even minor physical impacts can gradually loosen the connections between various faucet components. This can create small gaps through which water can escape, resulting in a visible leak. These leaks may be located at the base of the faucet, around the handles, or even behind the wall, depending on the location of the loose connection. Addressing these loose connections typically involves tightening fittings or replacing damaged connectors.
Diagnosing the Source of the Leak
Accurately diagnosing the source of the leak is essential for implementing the correct repair and avoiding unnecessary replacements. A systematic approach to inspection and troubleshooting is crucial. This involves carefully observing the location of the leak, identifying the type of faucet (e.g., compression, ball, cartridge, or ceramic disc), and inspecting the individual components for signs of wear, damage, or corrosion. Understanding the faucet's construction will greatly assist in tracing the water's path and identifying the precise point of failure.
Begin by visually inspecting the faucet while it's both on and off. Observe where the water is dripping from. Is it coming from the spout, around the handles, or from the base of the faucet where it meets the bathtub? The location of the leak provides valuable clues about the potential source of the problem. If the water is dripping from the spout even when the faucet is turned off, it's likely that the valve seat, cartridge, or rubber components within the valve assembly are compromised.
Next, determine the type of Kohler bathtub faucet you have. Common types include compression faucets, ball faucets, cartridge faucets, and ceramic disc faucets. Each type has a different internal mechanism and requires a different approach to repair. Compression faucets typically have separate hot and cold handles and rely on rubber washers to create a seal. Ball faucets have a single handle that controls both the temperature and flow of water. Cartridge faucets also use a single handle and rely on a cartridge to regulate water flow. Ceramic disc faucets are known for their durability and use ceramic discs to control water flow. Identifying the faucet type will help you understand the specific components involved and the potential areas of failure.
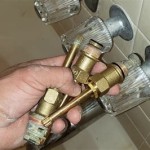
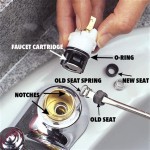
After identifying the faucet type, carefully inspect the individual components for signs of wear, damage, or corrosion. Turn off the water supply to the faucet before disassembling any parts. Examine the rubber O-rings and washers for cracks, tears, or deformation. Check the valve seat for mineral buildup or corrosion. Look for any signs of damage to the cartridge or ceramic discs. The presence of any of these signs indicates that the component needs to be replaced. Take photographs of the disassembled parts for reference during reassembly.
Addressing the Leak: Repair and Replacement Options
Once the source of the leak has been identified, the next step is to implement the appropriate repair. Depending on the severity of the problem and the condition of the faucet components, options include replacing worn-out parts, cleaning corroded valve seats, tightening loose connections, or, in some cases, replacing the entire faucet assembly. The objective is to restore the faucet to its proper working condition and prevent future leaks. Before embarking on any repair work, ensure the water supply to the faucet is completely shut off to avoid flooding.
Replacing worn-out rubber components, such as O-rings and washers, is often the simplest and most effective solution for many faucet leaks. Purchase replacement parts that are specifically designed for your Kohler faucet model. Generic parts may not fit properly and could compromise the seal. When replacing these components, ensure the surfaces are clean and free of any debris that could interfere with the seal. Apply a plumber's grease to the new rubber parts to help them slide into place and create a better seal. Plumber's grease should be NSF 61 certified.
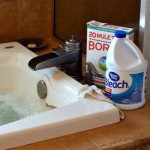
Cleaning corroded valve seats can sometimes restore their functionality and stop the leak. Use a valve seat wrench or a specialized tool to remove the valve seat. Clean the seat thoroughly with a wire brush or a descaling solution to remove any mineral deposits or corrosion. If the valve seat is severely corroded or damaged, it may need to be replaced. Ensure the new valve seat is properly installed and tightened to create a watertight seal.
Tightening loose connections is a straightforward process that can often resolve leaks around the base of the faucet or the supply lines. Use a wrench to carefully tighten any loose fittings or connections. Avoid overtightening, as this can damage the fittings or the pipes. If the connections are severely corroded or damaged, they may need to be replaced. When replacing connections, use Teflon tape or pipe dope to create a watertight seal. In some instances, if the faucet itself is corroded beyond repair or if multiple components are failing, replacing the entire faucet assembly may be the most cost-effective solution. This ensures that all components are new and functioning properly, minimizing the risk of future leaks. When installing a new faucet, follow the manufacturer's instructions carefully to ensure a proper installation.
Ultimately, regardless of the chosen repair, taking the time to diagnose the problem effectively and then implement a solution that specifically addresses the cause of the leak will prove to be cost-effective. If the repair is beyond the homeowner's comfort or skill levels, consulting a professional plumber may be the best course of action.

How To Fix A Leaking Tub Spout Kohler Shower

Fix A Leaking Single Handle Bathtub Faucet Kohler Repair

Fix Your Leaky Kohler Shower Complete Cartridge Swap Guide

How To Repair A Dripping Kohler Shower Valve

Replace Diverter Bathtub Spout Kohler K Gp85556 Cp With Slip Fit Connection

How To Fix A Leaking Tub Spout Kohler Shower

How To Repair A Dripping Kohler Shower Valve

Kohler Tub Shower Valve Cartridge Replacement Fix Your Leaky

How To Fix Kohler Shower Leaking Not Getting Hot Or Low Pressure

How To Fix A Leaking Bathtub Faucet The Home Depot
Related Posts