Installing a Moen Bathtub Faucet Cartridge
A leaky bathtub faucet can be a frustrating and inconvenient problem. Often, the source of the leak is a worn-out cartridge, which is the internal mechanism responsible for controlling water flow and temperature. Fortunately, replacing a Moen bathtub faucet cartridge is a relatively straightforward DIY project that can save you a significant amount of money on a plumber's call. This article will guide you through the process step by step, providing clear instructions and tips to ensure a successful installation.
Understanding the Moen Cartridge System
Moen faucets are known for their durability and reliability. Their unique cartridge system is a major contributor to this reputation. Moen cartridges are generally composed of a ceramic disc valve, typically with two or three seats, a stem, and a handle. The ceramic discs control water flow, while the stem connects the handle to the cartridge. This system is designed to be highly resistant to leaks and wear and tear.
Tools and Materials for Cartridge Replacement
Before you begin, gather the necessary tools and materials. You will require:
- A new Moen bathtub faucet cartridge (ensure it's compatible with your existing faucet)
- Adjustable wrench
- Channel-lock pliers
- Phillips screwdriver
- Flathead screwdriver
- Teflon tape
- Rag or towel
- Bucket or basin
- Optional: A cartridge removal tool, if necessary
Step-by-Step Guide to Replacing a Moen Bathtub Faucet Cartridge
Follow these steps to replace a cartridge in your Moen bathtub faucet:
- Turn Off the Water Supply: Locate the shut-off valves for the hot and cold water supply lines to your bathtub faucet. Turn both valves clockwise to completely shut off the water flow.
- Drain the Faucet: Turn on the bathtub faucet briefly to drain any remaining water in the lines and the faucet itself. This prevents water from spilling during the replacement process.
- Remove the Handle: Depending on your Moen faucet model, the handle removal process might vary slightly:
- Screw-on Handles: Locate a small screw on the handle. Use a Phillips screwdriver to remove this screw, then pull the handle off.
- Snap-on Handles: Look for a small pin or button on the handle. Press or pull this mechanism to release the handle.
- Lever Handles: Often these handles have a decorative cap that needs to be removed first. Use a flathead screwdriver to gently pry off the cap, then remove any screws holding the handle in place.
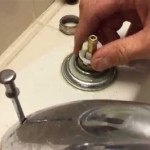
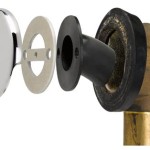
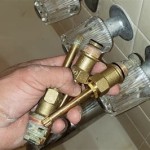
- Remove the Bonnet: The bonnet is the decorative cover that surrounds the cartridge. Unscrew the bonnet using an adjustable wrench or channel-lock pliers, turning it counterclockwise.
- Remove the Cartridge: You will now see the cartridge. In some models, it may be secured with a retaining nut. Use the wrench to loosen and remove this nut. Once the cartridge is free, carefully pull it out of the faucet body.
- Install the New Cartridge: Place the new cartridge into the faucet body, ensuring it sits snugly and the stem aligns properly with the handle mechanism.
- Reinstall the Retaining Nut: If your model uses a retaining nut, tighten it securely, but avoid over-tightening, which can damage the cartridge.
- Reinstall the Bonnet: Screw the bonnet back onto the faucet body, turning it clockwise.
- Reinstall the Handle: Reattach the handle to the faucet using the appropriate method (screw, snap-on, or lever). Tighten the screw or press the pin/button to secure the handle.
- Turn on the Water Supply: Slowly turn the water supply valves counterclockwise to reopen the water flow. Check for leaks at the handle, bonnet, and cartridge connections.
- Test the Faucet: Run the hot and cold water to test the water flow and temperature. Make sure the cartridge operates smoothly and doesn't leak.
Remember, if you encounter any difficulties or are unsure about any steps, it's best to consult a professional plumber. However, with careful preparation and a clear understanding of the process, replacing a Moen bathtub faucet cartridge is a DIY project that can be successfully done by most homeowners.

How To Replace A Moen Shower Cartridge

Remove And Install Moen 1222 Cartridge Repair Shower Tub Faucet Set Temperature Limit

Moen 1224 Cartridge Replacement Guide Fix Your Leaking Tub Shower Faucet

Replacing A Stuck Moen Shower Valve Cartridge

How To Remove Install The 1222 Cartridge

Replace Moen Handle Faucet Cartridge Fix A Leaky Bathtub Or Shower With Danco Core Puller

How To Fix Leaky Shower Tub Faucet Replace Moen 1200 Or 1225 Cartridge Demo

Replace A Moen Shower Cartridge Fix Leaky Tub Faucet

Moen Shower Faucet Cartridge Replacement Lever Is Hard To Turn

How To Replace A Moen Shower Faucet Cartridge