Installing a Bathtub Faucet Stem: A Comprehensive Guide
Replacing a leaky or malfunctioning bathtub faucet stem is a common plumbing repair that many homeowners can undertake with the right tools and understanding. The faucet stem, a critical component within the faucet assembly, controls the flow of water. Over time, its internal parts can wear down, leading to drips, leaks, or difficulty controlling water temperature. This article provides a detailed, step-by-step guide to installing a new bathtub faucet stem, ensuring a cost-effective solution to a frustrating plumbing issue.
Before commencing the installation process, it is essential to understand the purpose of the faucet stem and how it interacts with the other faucet components. The stem typically consists of a valve seat, a rubber washer, and a threaded body. When the faucet handle is turned, the stem moves, either pressing the washer against the valve seat to shut off the water flow or retracting the washer to allow water to flow through. Continuous pressure and the abrasive nature of water can gradually degrade the washer and the stem's internal mechanisms, resulting in leaks.
Proper identification of the correct replacement stem is crucial. Faucet stems are not universally interchangeable, and using the wrong stem can lead to improper sealing, continued leaks, or even damage to the faucet body. Therefore, meticulous attention to detail during the identification and selection process is paramount.
Identifying the Correct Replacement Faucet Stem
The first step in replacing a bathtub faucet stem is identifying the existing stem. There are several methods for achieving this. Ideally, the best approach involves visually inspecting the existing stem and taking it to a local plumbing supply store for comparison. However, if the stem is severely corroded or damaged, this may not be possible. In such cases, having the faucet's brand and model number is invaluable. This information can often be found on the faucet itself, in the original documentation, or online through the manufacturer's website.
If the brand and model number are unavailable, the next step is to carefully measure the stem's dimensions. Key measurements include the overall length of the stem, the diameter of the threaded body, and the length and diameter of the valve seat. Taking clear photographs of the stem from multiple angles can also be helpful for comparison purposes. Online plumbing supply retailers often have detailed product listings with specifications and dimension diagrams, allowing for a thorough comparison.
Another important factor to consider is the type of faucet stem. Compression stems, cartridge stems, and ball stems are common types, each with distinct characteristics. Compression stems, often found in older faucets, utilize a rubber washer that is compressed against the valve seat to stop the flow of water. Cartridge stems, more prevalent in newer faucets, use a cylindrical cartridge containing internal seals to control water flow. Ball stems, typically found in single-handle faucets, use a ball-shaped valve to regulate water flow and temperature. Identifying the correct stem type is crucial for ensuring compatibility and proper function.
When purchasing the replacement stem, it is advisable to buy from a reputable supplier that offers a warranty or return policy. This provides a safeguard against purchasing a faulty or incorrect stem. Always compare the replacement stem to the original before installing it, paying close attention to all dimensions and features. Discrepancies, even minor ones, can indicate incompatibility and should be addressed before proceeding.
Preparing for Installation and Shutting Off the Water Supply
Prior to commencing the installation process, gathering the necessary tools and materials is essential. These typically include a screwdriver (both flathead and Phillips head), an adjustable wrench, a faucet stem puller (optional but highly recommended), penetrating oil, plumber's grease, a new faucet stem, and possibly new valve seats. A basin wrench, also known as a sink wrench, may be necessary for removing stubborn valve seats.
The most critical step before any plumbing repair is to shut off the water supply to the faucet. Locating the shut-off valves under or near the sink is the first step. These valves are typically small handles or knobs that can be turned to stop the flow of water. If individual shut-off valves are not present, the main water shut-off valve for the entire house must be turned off. This valve is usually located in the basement, garage, or near the water meter. Once the water supply is shut off, turn on the faucet to relieve any remaining pressure in the pipes. Placing a bucket under the faucet can help catch any residual water.
Protecting the surrounding surfaces is equally important. Lay down a drop cloth or old towel to prevent scratches or damage to the countertop or bathtub. Gather all the necessary tools and materials and place them within easy reach. Proper preparation can significantly streamline the installation process and minimize potential problems.
If the existing faucet stem is difficult to remove due to corrosion or mineral buildup, applying penetrating oil to the stem and allowing it to soak for several minutes can help loosen it. Using a faucet stem puller, if available, can also facilitate removal without damaging the faucet body. Exercising caution and avoiding excessive force is crucial to prevent stripping threads or breaking the faucet body.
Installing the New Faucet Stem and Testing for Leaks
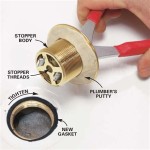
With the water supply shut off, the old faucet stem removed, and the new stem identified, the installation process can begin. Before installing the new stem, inspect the valve seat within the faucet body. If the valve seat is corroded or damaged, it should be replaced using a valve seat wrench or a specialized valve seat removal tool. Applying plumber's grease to the threads of the new valve seat before installation can help ensure a tight seal and prevent future corrosion.
Next, apply a thin layer of plumber's grease to the threads of the new faucet stem. This lubricant helps to ensure smooth operation and prevents the stem from seizing in the faucet body. Carefully insert the new stem into the faucet body, aligning the threads properly. Use an adjustable wrench to tighten the stem, but avoid over-tightening, as this can damage the stem or the faucet body. The stem should be snug but not excessively tight.
Once the new stem is installed, reassemble the faucet handle and any decorative trim. Turn the water supply back on slowly, monitoring for any leaks around the stem or the faucet body. If leaks are present, tighten the stem slightly or inspect the valve seat for damage. If tightening the stem does not resolve the leak, the valve seat may need to be replaced or reseated. Ensure the faucet handle operates smoothly and controls the water flow effectively. Check both hot and cold water lines for proper function.
After verifying that there are no leaks and the faucet is functioning correctly, allow the water to run for a few minutes to flush out any debris or air from the pipes. Clean up the work area and dispose of the old stem and any used materials properly. Monitor the faucet closely for the next few days to ensure that no leaks develop.
If the faucet continues to leak after installing the new stem, further troubleshooting may be necessary. This could involve inspecting the valve seat more closely, checking the O-rings or seals on the stem, or consulting with a professional plumber. In some cases, the faucet body itself may be damaged and require replacement.
Installing a new bathtub faucet stem is a manageable task for many homeowners, provided they have the necessary tools, a clear understanding of the process, and the correct replacement parts. By following these detailed steps, it is possible to resolve common faucet issues and restore proper function to the bathtub faucet.

How To Fix A Leaking Bathtub Faucet Diy Family Handyman

How To Fix A Leaking Bathtub Faucet Diy Family Handyman

How To Replace A Shower Valve 12 Steps With Pictures Wikihow

How To Remove Bathtub Faucet Stems Quick And Easy

Installing A Tub Faucet Fine Homebuilding

How To Fix A Leaking Bathtub Faucet Diy Family Handyman

Learn How To Remove And Install Various Tub Spouts

How To Replace Bathtub Faucet Stem Home For Relax

Learn How To Remove And Install Various Tub Spouts

How To Repair A Shower Valve Stem Ask This Old House
Related Posts