Installing Bathtub Drain Plumbing: A Comprehensive Guide
Installing bathtub drain plumbing is a project that often accompanies bathroom renovations or the installation of a new bathtub. While it can appear complex, understanding the components and following a systematic approach can make the process manageable for experienced DIY enthusiasts or homeowners comfortable with basic plumbing skills. This article provides a detailed guide to installing bathtub drain plumbing, covering necessary tools, materials, and step-by-step instructions.
Essential Tools and Materials
Before commencing the installation, gathering the necessary tools and materials is crucial for a smooth and efficient process. The specific items required may vary slightly depending on the type of drain and bathtub being installed, but the following is a comprehensive list:
1. Bathtub Drain Assembly: This includes the drain flange, drain shoe, overflow plate, overflow tube, and connecting hardware. Ensure the assembly is compatible with the bathtub model.
2. Drain Wrench (or Plumber's Wrench): This specialized wrench is designed to tighten and loosen drain nuts and couplings without damaging the finish.
3. Plumber's Putty: Used to create a watertight seal between the drain flange and the bathtub surface.
4. Teflon Tape (Plumber's Tape): Applied to threaded connections to prevent leaks.
5. Pipe Wrench: Useful for gripping and turning larger pipes, especially if modifications to existing plumbing are required.
6. Pliers: For gripping and manipulating smaller components.
7. Screwdrivers (Phillips and Flathead): To tighten screws on the overflow plate and other components.
8. Measuring Tape: For accurate measurements when cutting and fitting pipes.
9. Level: To ensure the bathtub is properly leveled, which is critical for proper drainage.
10. Pipe Cutter or Hacksaw: To cut drain pipes to the correct length. A pipe cutter provides a cleaner, more precise cut.
11. ABS or PVC Cement and Primer: Depending on the type of drain pipes, appropriate cement and primer will be needed to join the pipes.
12. Safety Glasses and Gloves: For personal protection during the installation process.
13. Rags or Towels: To clean up spills and excess plumber's putty.
14. Old Bucket or Container: To catch any water that may drain from the existing plumbing.
15. Pencil or Marker: For marking measurements on pipes.
Step-by-Step Installation Process
The following steps outline the process of installing a bathtub drain. Disconnecting the existing drain plumbing is assumed to have been completed before beginning the subsequent steps. If installing a new bathtub, proceed directly to step two.
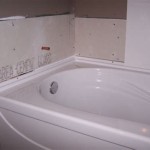
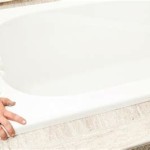
1. Preparing the Bathtub: Ensure the bathtub is clean and any existing putty or sealant is removed from the drain opening. Check that the bathtub is level. If it is not, use shims to level it before proceeding.
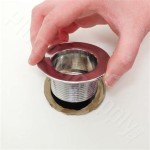
2. Applying Plumber's Putty to the Drain Flange: Roll a rope of plumber's putty in your hands, approximately the thickness of a pencil. Apply this rope of putty around the underside of the drain flange, ensuring it forms a continuous seal.
3. Installing the Drain Flange: Carefully insert the drain flange into the drain opening of the bathtub. Press firmly to ensure the putty makes solid contact with the bathtub surface. Remove any excess putty that squeezes out from around the flange.
4. Assembling the Drain Shoe: From underneath the bathtub, slide the rubber or plastic washer onto the drain tailpiece (the threaded part of the drain flange that protrudes below the tub). Then, slide on the cardboard or fiber washer. Finally, screw the drain shoe onto the drain tailpiece by hand until it is snug.
5. Tightening the Drain Shoe: Use a drain wrench (or plumber's wrench if a drain wrench is unavailable) to tighten the drain shoe to the drain flange. Be careful not to overtighten, as this can damage the bathtub or the drain assembly. A firm, snug fit is sufficient.
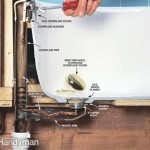
6. Installing the Overflow Assembly: The overflow assembly prevents the bathtub from overflowing. Insert the overflow tube into the overflow opening on the bathtub. Attach the overflow plate to the overflow tube using screws. Tighten the screws evenly to ensure a secure and watertight seal. Some overflow assemblies require plumber's putty around the back of the overflow plate; consult the manufacturer's instructions for specific guidance.
7. Connecting the Overflow Tube to the Drain Shoe: Most bathtub drain assemblies use a linkage system to connect the overflow tube to the drain shoe. This linkage operates the drain stopper. Follow the manufacturer's instructions for connecting the linkage. Typically, this involves inserting a rod or cable into the drain shoe and securing it with screws or clips.
8. Installing the P-Trap: The P-trap is a curved section of pipe that retains a small amount of water, preventing sewer gases from entering the bathroom. Connect the P-trap to the drain shoe using appropriate fittings and pipe cement (if using ABS or PVC pipes). Ensure the P-trap is properly aligned and securely connected.
9. Connecting to the Waste Pipe: Connect the P-trap to the main waste pipe using appropriate fittings and pipe cement. Measure the distance between the P-trap and the waste pipe to determine the length of pipe needed. Cut the pipe to the correct length using a pipe cutter or hacksaw. Deburr the cut end of the pipe to ensure a smooth connection. Apply primer and cement to the pipe and fittings before connecting them securely.
10. Testing for Leaks: After completing the installation, test for leaks by filling the bathtub with water and observing all connections for any signs of leakage. Pay close attention to the drain flange, drain shoe, overflow assembly, P-trap, and connections to the waste pipe. If leaks are detected, tighten the connections or reapply plumber's putty or Teflon tape as needed. Allow the putty to completely cure prior to using the shower for an extended period of time.
Key Considerations for a Successful Installation
Several factors can significantly impact the success of a bathtub drain plumbing installation. Paying attention to these considerations can help prevent problems and ensure a long-lasting, leak-free installation.
Choosing the Right Drain Assembly
Selecting the correct drain assembly is paramount. Bathtub drain assemblies come in various types, including pop-up drains, lift-and-turn drains, and toe-touch drains. It is important to choose a drain assembly that is compatible with the bathtub and that meets the homeowner's preferences. Consider the design and functionality of the drain assembly, as well as its ease of maintenance. Ensure the drain assembly includes all necessary components and that the materials are durable and resistant to corrosion.
Ensuring Proper Pipe Alignment and Slope
Proper pipe alignment and slope are crucial for efficient drainage. The drain pipes should be installed with a slight downward slope (typically ¼ inch per foot) to allow water to flow freely towards the waste pipe. Avoid creating dips or valleys in the pipe run, as these can trap water and lead to clogs. Ensure that all pipe connections are properly aligned to prevent stress on the joints, which can cause leaks. Use appropriate fittings to maintain the correct slope and alignment.
Using Appropriate Sealing Techniques
Proper sealing techniques are essential to prevent leaks. Plumber's putty should be applied generously and evenly to create a watertight seal between the drain flange and the bathtub surface. Teflon tape should be used on all threaded connections to prevent leaks. When using pipe cement, follow the manufacturer's instructions carefully. Ensure that the surfaces are clean and dry before applying the cement. Apply primer before cementing ABS or PVC pipes to soften the plastic and ensure a strong, permanent bond. Allow the cement to cure completely before testing for leaks. Regular inspection of all accessible couplings is recommended to prevent minor leaks turning into major repairs.

How To Replace A Bathtub Drain

Bathtub Plumbing Installation Drain Diagrams

7 Bathtub Plumbing Installation Drain Diagrams

How To Install A Bathtub Drain

Plumbing For Bathtub Installation And Drain Diagrams

How To Replace A Bathtub Drum Trap This Old House

Replacing A Bathtub Fine Homebuilding

Bathtub Plumbing Installation Drain Diagrams Diagram

Replacing A Bathtub Fine Homebuilding

7 Bathtub Plumbing Installation Drain Diagrams
Related Posts