Installing a Bathtub Faucet Stem: A Comprehensive Guide
Replacing a bathtub faucet stem is a common plumbing repair that can be undertaken by homeowners with a basic understanding of plumbing principles and tools. A leaky faucet stem is frequently the culprit behind persistent dripping, leading to water wastage and increased utility bills. While professional plumbers can address this issue, understanding the process and executing the repair oneself can save both time and money. This article provides a comprehensive, step-by-step guide to successfully installing a new bathtub faucet stem.
Before commencing the replacement process, it's crucial to identify the specific type of faucet stem installed in the bathtub. Bathtub faucets typically utilize one of three main types of valve mechanisms: compression, cartridge, and ball. Compression faucets are among the oldest designs, relying on a rubber washer to seal the water flow. Cartridge faucets employ a cylindrical cartridge that slides within the faucet body to control water flow. Ball faucets use a ball-shaped component with slots and seals to regulate the water mixture and flow. Each type of faucet requires a specific replacement stem or cartridge, ensuring compatibility and proper functionality.
Misidentification of the faucet type can lead to purchasing the incorrect replacement part and rendering the repair unsuccessful. Consult the faucet's original documentation, if available, to determine the valve type. If the documentation is unavailable, carefully examine the faucet handles and spout design. Compression faucets typically have separate hot and cold handles that require turning to fully shut off the water. Cartridge faucets often feature a single lever handle that controls both temperature and flow. Ball faucets generally have a rotating spout with a single handle on top.
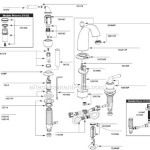
Once the faucet type is correctly identified, the next step involves identifying the precise make and model of the faucet. This information is crucial when sourcing the appropriate replacement stem. Many faucet manufacturers produce stems with varying dimensions and thread patterns, even within the same faucet type. The most accurate method of identifying the stem is to remove the existing stem and take it to a hardware store or plumbing supply retailer. The staff can then compare the stem to their inventory and identify a matching replacement. If the stem is heavily corroded or damaged, making identification difficult, try to locate the faucet's model number. This number is often stamped on the faucet body or on a sticker attached to the faucet underneath the sink or tub enclosure.
Key Point 1: Gathering the Necessary Tools and Materials
Successful installation of a bathtub faucet stem necessitates having the correct tools and materials readily available. Rushing to the hardware store mid-project can lead to delays and frustration. Prior to commencing the repair, assemble the following items:
*
New Faucet Stem:
This is the most crucial component. Ensure it precisely matches the make, model, and type of your existing faucet stem. Verification of its compatibility is paramount to ensuring a leak-free and functional repair.*
Adjustable Wrench:
An adjustable wrench is indispensable for loosening and tightening nuts and fittings without damaging them. Employ a wrench with a smooth jaw to avoid marring the faucet's finish.*
Screwdrivers (Phillips and Flathead):
Screwdrivers are required to remove faucet handles and other components. Ensure you possess both Phillips and flathead screwdrivers in various sizes to accommodate different screw types.*
Penetrating Oil:
Stubborn nuts and fittings can be challenging to loosen. Applying penetrating oil several minutes before attempting to loosen them can significantly ease the process.*
Plumber's Grease:
Plumber's grease is used to lubricate the new faucet stem's threads and O-rings, facilitating smooth operation and preventing premature wear. Apply a small amount to the appropriate areas during installation.*
Teflon Tape (Plumber's Tape):
Teflon tape is used to create a watertight seal on threaded connections. Wrap the tape around the threads of the faucet stem in a clockwise direction, overlapping each layer slightly.*
Basin Wrench (Optional):
A basin wrench, also known as a sink wrench, can be helpful for reaching tight spaces underneath the sink or tub enclosure. This tool is particularly useful when the faucet is difficult to access.*
Clean Rags:
Clean rags are essential for wiping up spills and keeping the work area clean. They can also be used to protect the faucet's finish from scratches during the repair process.*
Flashlight:
A flashlight provides illumination in dimly lit areas underneath the sink or tub enclosure. This allows for better visibility and facilitates accurate work.Key Point 2: Step-by-Step Installation Procedure
Once the necessary tools and materials are assembled, the following steps outline the process of installing a new bathtub faucet stem. Adherence to these steps will minimize the risk of errors and ensure a successful repair.
*
Shut Off the Water Supply:
This is the most important step before beginning any plumbing repair. Locate the shut-off valves for the hot and cold water lines connected to the bathtub faucet. These valves are typically located underneath the sink or behind an access panel near the bathtub. Turn both valves clockwise until they are fully closed. To verify that the water is completely shut off, briefly turn on the faucet handles. If no water flows, the valves are properly closed.*
Protect the Tub Surface:
Cover the bathtub surface surrounding the faucet with a towel or drop cloth to prevent scratches or damage from dropped tools. This will protect the finish of the tub and prevent unnecessary repairs later on.*
Remove the Faucet Handles:
Depending on the faucet type, the handles may be secured with screws or concealed behind decorative caps. Locate the screws or caps and remove them carefully. Once the screws or caps are removed, gently pull the handles off the faucet stems.*
Disassemble the Faucet:
With the handles removed, expose the faucet stem retaining nuts. These nuts hold the stems in place within the faucet body. Use an adjustable wrench to carefully loosen and remove the retaining nuts. Be mindful not to overtighten the wrench, as this could damage the nuts or the faucet body. If the nuts are exceptionally tight, apply penetrating oil and allow it to soak for a few minutes before attempting to loosen them.*
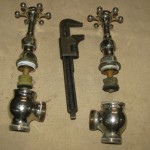
Remove the Old Faucet Stem:
Once the retaining nuts are removed, gently pull the old faucet stem out of the faucet body. If the stem is stuck, try wiggling it slightly while pulling. Avoid using excessive force, as this could damage the stem or the faucet body.*
Inspect the Faucet Body:
Before installing the new faucet stem, carefully inspect the interior of the faucet body for any signs of corrosion or damage. Clean any debris or mineral deposits with a soft cloth or brush. If the faucet body is severely corroded, it may be necessary to replace the entire faucet assembly.*
Apply Plumber's Grease:
Apply a small amount of plumber's grease to the threads and O-rings of the new faucet stem. This will lubricate the stem and ensure smooth operation and create a watertight seal.*
Install the New Faucet Stem:
Carefully insert the new faucet stem into the faucet body, aligning it properly with the valve seat. Ensure that the stem is fully seated and that the O-rings are properly positioned.*
Reinstall the Retaining Nut:
Thread the retaining nut onto the faucet body and tighten it securely with an adjustable wrench. Do not overtighten the nut, as this could damage the stem or the faucet body. The nut should be snug but not excessively tight.*
Reinstall the Faucet Handles:
Place the faucet handles back onto the stems, aligning them properly. Secure the handles with the screws or caps that were removed earlier. Tighten the screws or caps snugly, but do not overtighten them.*
Turn On the Water Supply:
Slowly turn on the hot and cold water supply valves. Check for leaks around the faucet stems and handles. If any leaks are present, tighten the retaining nuts or handle screws slightly until the leaks stop.*
Test the Faucet:
Turn the faucet handles on and off to ensure that the water flows smoothly and that the faucet shuts off completely without dripping. Adjust the water temperature to ensure that both hot and cold water are flowing properly.Key Point 3: Troubleshooting Common Issues
While the installation process is generally straightforward, certain issues may arise during the repair. Understanding these potential problems and their solutions can prevent frustration and ensure a successful outcome.
*
Stuck Retaining Nuts:
If the retaining nuts are difficult to loosen, apply penetrating oil and allow it to soak for several minutes. If the nuts are still stuck, use a basin wrench to provide more leverage. As a last resort, carefully heat the nuts with a propane torch to expand them slightly, making them easier to loosen. Exercise extreme caution when using a propane torch and ensure that the surrounding area is free from flammable materials.*
Incorrect Faucet Stem:
If the new faucet stem does not fit properly, it is likely that the wrong replacement part was purchased. Compare the new stem to the old stem to identify any differences in size, shape, or thread pattern. Return the incorrect stem to the hardware store and obtain the correct replacement.*
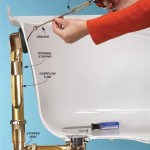
Leaking Faucet:
If the faucet continues to leak after installing the new stem, ensure that the retaining nuts are tightened securely. Also, check the O-rings on the stem for any damage or misalignment. If the O-rings are damaged, replace them with new ones. If the faucet is still leaking, the valve seat may be damaged. In this case, it may be necessary to replace the entire faucet assembly.*
Damaged Valve Seat:
The valve seat is the part of the faucet body that the faucet stem seals against. If the valve seat is corroded or damaged, it may prevent the new stem from sealing properly. A valve seat wrench can be used to resurface or replace the valve seat. However, this requires specialized tools and skills, and it may be more cost-effective to replace the entire faucet assembly.*
Difficulty Accessing the Faucet:
If the faucet is difficult to access due to a cramped space or obstructions, use a basin wrench or other specialized tools to reach the retaining nuts and other components. If necessary, consider removing the sink or tub enclosure to provide better access. However, this should only be done if you are comfortable with the process and have the necessary tools and skills.By understanding the different faucet types, gathering the necessary tools and materials, following the step-by-step installation procedure, and troubleshooting any potential issues, homeowners can confidently install a new bathtub faucet stem and resolve leaky faucet problems. If you are uncomfortable performing this repair yourself, it is always best to consult a qualified plumbing professional.
:max_bytes(150000):strip_icc()/how-to-replace-a-bathtub-faucet-5210836-10-6825223c1e75442187d5ab09690510d4.jpg?strip=all "How To Replace A Bathtub Faucet")
How To Replace A Bathtub Faucet

How To Fix A Leaking Bathtub Faucet Diy Family Handyman

Bathtub Spout With Diverter Replacement Fix Leaking Tub Jonny Diy

Installing A Tub Faucet Fine Homebuilding
:max_bytes(150000):strip_icc()/how-to-replace-a-bathtub-faucet-5210836-08-dde7e85413a9421cb4414bb4655e49e3.jpg?strip=all "How To Replace A Bathtub Faucet")
How To Replace A Bathtub Faucet

Learn How To Remove And Install Various Tub Spouts

Bathtub Stem And Seat Replacement

How To Change A Bathtub Faucet 14 Steps With Pictures Wikihow

How To Fix A Leaking Bathtub Faucet Diy Family Handyman

How To Install A Bathtub An Acrylic Tub And Surround
Related Posts