Installing a New Bathtub Drain Stopper: A Comprehensive Guide
A malfunctioning bathtub drain stopper can be a significant source of frustration. A stopper that doesn't seal properly leads to a constantly draining tub, wasting water and potentially increasing water bills. Conversely, a stopper that fails to open can result in a clogged tub, rendering it unusable until the blockage is resolved. Replacing a worn or broken bathtub drain stopper is a relatively straightforward DIY project that can be completed with basic tools and a little know-how. This article provides a detailed guide to installing a new bathtub drain stopper, covering various stopper types and installation procedures.
Identifying the Type of Bathtub Drain Stopper
Before embarking on the replacement process, accurately identifying the existing type of bathtub drain stopper is crucial. Different stopper mechanisms require different installation techniques. Common types include:
Lift-and-Turn Stoppers: These stoppers feature a knob or handle that is rotated to raise or lower the stopper. They are generally reliable and easy to operate.
Push-and-Pull Stoppers: These stoppers are activated by pushing down on the stopper to seal the drain and pulling up to release it. They often have a simple, streamlined design.
Toe-Touch Stoppers: Similar to push-and-pull stoppers, toe-touch stoppers are operated by pressing down on the stopper with a toe. A second press releases the stopper.
Pop-Up Stoppers: These stoppers are typically linked to a lever located on the overflow plate. Activating the lever raises or lowers the stopper. These often require accessing the linkage behind the tub.
Flip-It Stoppers: These stoppers feature a lever that is flipped to open or close the drain. They are often designed as retrofit solutions, fitting directly into the drain opening without requiring extensive disassembly.
Accurately identifying the type of stopper will determine the appropriate replacement part and the specific installation steps required.
Gathering the Necessary Tools and Materials
Prior to starting the installation, assembling the required tools and materials ensures a smooth and efficient process. The specific tools needed will vary depending on the type of stopper being installed, but a general list includes:
New Bathtub Drain Stopper: Purchase a replacement stopper that is compatible with the existing drain assembly and matches the identified type.
Flathead Screwdriver: This is useful for prying and loosening components.
Phillips Head Screwdriver: Necessary for removing screws on the overflow plate or stopper assembly.
Pliers (Channel-Lock or Needle-Nose): Helpful for gripping and manipulating small parts.
Adjustable Wrench: May be required for loosening and tightening connections.
Putty Knife or Scraper: Used for removing old plumber's putty or sealant.
Plumber's Putty or Silicone Caulk: Used to create a watertight seal between the stopper and the drain.
Clean Rags or Paper Towels: Essential for cleaning up spills and debris.
Flashlight: Provides better visibility in the drain area.
Having all the necessary tools and materials readily available minimizes interruptions and streamlines the installation process.
Step-by-Step Installation Procedures for Different Stopper Types
The following sections outline the installation procedures for several common types of bathtub drain stoppers. It's important to consult the manufacturer's instructions included with the new stopper for the most accurate and detailed guidance.
Installing a Lift-and-Turn Stopper:
1. Remove the Old Stopper: Most lift-and-turn stoppers can be removed by unscrewing the knob on top. Some may require loosening a small set screw on the side of the knob before unscrewing.
2. Clean the Drain Flange: Use a putty knife or scraper to remove any old plumber's putty or sealant from the drain flange (the metal ring around the drain opening).
3. Apply New Plumber's Putty: Roll a rope of plumber's putty and press it around the underside of the new stopper's flange.
4. Install the New Stopper: Insert the new stopper into the drain opening and screw the knob or handle back on. Tighten it securely, but avoid over-tightening. Remove any excess plumber's putty that squeezes out.
Installing a Push-and-Pull or Toe-Touch Stopper:
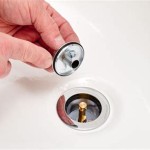
1. Remove the Old Stopper: Typically, these stoppers can be removed by gripping the stopper firmly and pulling straight up. Some may require a slight twisting motion.
2. Clean the Drain Flange: As with the lift-and-turn stopper, thoroughly clean the drain flange.
3. Apply New Plumber's Putty or Silicone Caulk: Apply a bead of plumber's putty or silicone caulk around the underside of the new stopper's flange.
4. Install the New Stopper: Insert the new stopper into the drain opening and press down firmly to seat it. Some models may have a threaded base that needs to be screwed into the drain flange.
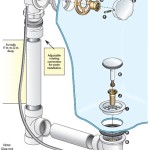
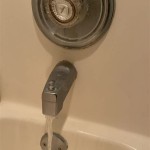
Installing a Pop-Up Stopper (With Overflow Plate):
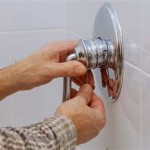
1. Remove the Overflow Plate: Locate the overflow plate on the bathtub wall, usually near the drain opening. Remove the screws holding the plate in place.
2. Remove the Linkage: Carefully pull out the overflow plate and the attached linkage. This linkage connects the lever on the overflow plate to the stopper in the drain.
3. Remove the Old Stopper: The old stopper is usually attached to the bottom of the linkage. Detach the old stopper from the linkage.
4. Install the New Stopper: Attach the new stopper to the linkage. Ensure the stopper is properly aligned and secured.
5. Reinstall the Linkage and Overflow Plate: Carefully reinsert the linkage through the drain opening and into the overflow pipe. Align the overflow plate with the holes in the bathtub wall and reattach it with the screws. Ensure the linkage is functioning correctly and the stopper moves freely when the overflow lever is activated.
Installing a Flip-It Stopper:
1. Remove the Old Stopper: depending on the previous stopper, it may need to be pulled out with pliers or screwdrivers.
2. Clean the Drain Flange: Clean the drain flange from any old sealant or build-up.
3. Insert the New Stopper: The Flip-It stopper requires no plumber's putty. Simply insert it into the existing drain hole. Push it down evenly to ensure a proper seal.
4. Test the Seal: Fill the tub with a small amount of water to ensure a tight seal. The Flip-It stopper should create a watertight barrier.
Addressing Common Installation Challenges
While installing a new bathtub drain stopper is often a straightforward process, certain challenges may arise. Understanding how to address these issues can prevent frustration and ensure a successful installation.
Stripped Screws: When removing screws from the overflow plate or stopper assembly, the screw heads may become stripped, making them difficult to remove. Try using a rubber band or steel wool between the screwdriver and the screw head to improve grip. Alternatively, a screw extractor may be necessary.
Corroded Drain Flange: The drain flange may be corroded or damaged, preventing a proper seal. If the corrosion is minor, it can be cleaned with a wire brush. However, if the damage is significant, the entire drain flange may need to be replaced, which is a more complex plumbing task.
Incompatible Stopper Size: Ensure the replacement stopper is the correct size for the drain opening. If the stopper is too small, it will not seal properly. If it is too large, it will not fit. Consult the manufacturer's specifications to determine the appropriate stopper size.
Leakage After Installation: If the stopper leaks after installation, re-examine the seal between the stopper and the drain flange. Ensure sufficient plumber's putty or silicone caulk was applied and that the stopper is securely tightened. If the leakage persists, the drain flange may be damaged or the stopper may be defective.
Difficulty Accessing Linkage: In some cases, accessing the linkage for pop-up stoppers may be challenging due to tight spaces or obstructions. Using a flashlight and flexible tools can improve visibility and access. If the linkage is severely corroded or damaged, it may need to be replaced as a complete assembly.
Testing and Maintenance
Once the new bathtub drain stopper is installed, it is essential to test its functionality. Fill the bathtub with a few inches of water and observe whether the stopper effectively seals the drain. If the water drains slowly or leaks, adjustments may be necessary. Check the seal between the stopper and the drain flange and ensure the stopper is properly aligned.
To maintain the stopper's performance and prolong its lifespan, regular cleaning is recommended. Remove any hair, soap scum, or debris that may accumulate around the stopper. A small brush or cleaning tool can be used to remove buildup from the stopper's surface and the drain opening. Periodically check the stopper for signs of wear or damage and replace it as needed.
By following these guidelines and addressing potential challenges, installing a new bathtub drain stopper can be a successful DIY project, restoring the functionality of the bathtub and preventing water waste.

How To Replace Bathtub Drain Stopper With A Lift And Turn Diy

How To Remove A Bathtub Drain The Home Depot

How To Replace Bathtub Drain Stopper With A Lift And Turn Diy

How To Replace A Bathtub Drain

How To Remove And Replace A Tub Drain Stopper Trial Error

How To Fix A Trip Lever Bathtub Drain Stopper Hofen

How To Remove A Bathtub Drain The Home Depot

Diy How To Replace A Bathtub Drain Stopper With Common Household Tools

How To Replace Bathtub Drain Stopper With A Lift And Turn Diy

How To Remove A Bathtub Drain Stopper
Related Posts