Installing a Bathtub Drain Stopper
Bathtub drain stoppers are essential plumbing components that prevent water from draining out of the tub. A properly functioning stopper allows for a relaxing soak. However, a malfunctioning stopper can be a nuisance, leading to wasted water and lower water levels in the tub. Fortunately, many bathtub drain stoppers are relatively easy to install with basic tools. This article outlines the steps involved in installing various types of bathtub drain stoppers.
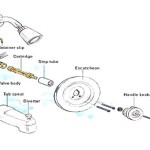
Identifying the Drain Stopper Type
Before beginning the installation process, it's crucial to identify the type of bathtub drain stopper currently installed. This will determine the correct replacement stopper and the appropriate installation method. Common types include:
*Push-and-pull stopper:
This type uses a simple push-and-pull mechanism to open and close the drain. *Toe-touch stopper:
This stopper is opened and closed by tapping it with your toe. *Lift-and-turn stopper:
This stopper requires lifting and turning the cap to operate the drain. *Trip-lever stopper:
This type uses a lever located on the overflow plate to control the stopper. *Pop-up stopper:
This stopper is controlled by a lever behind the faucet.Tools and Materials
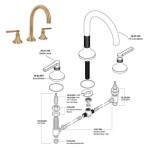
Gathering the necessary tools and materials beforehand will streamline the installation process. Common tools required include:
*Pliers (channel-lock and slip-joint):
Used for gripping and turning various components. *Screwdriver:
Essential for removing screws from the overflow plate or drain. *Putty knife:
Helpful for removing old putty or caulk. *Plumber's putty:
Used to create a watertight seal around the drain flange. *Replacement stopper:
Ensure the new stopper is compatible with the existing drain assembly. *Flashlight:
Provides visibility in tight spaces. *Teflon tape:
Used to seal threaded connections. *Safety glasses:
Protect eyes from debris.Installing a Push-and-Pull Stopper
Push-and-pull stoppers are one of the simplest types to install. The process involves:
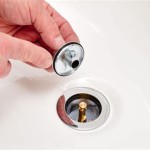
*Removing the old stopper:
Simply pull the stopper out of the drain opening. *Cleaning the drain opening:
Remove any debris or old putty from the drain. *Installing the new stopper:
Insert the new stopper into the drain opening, ensuring it sits flush. *Testing the stopper:
Fill the tub with a small amount of water to ensure the stopper holds.Installing a Toe-Touch Stopper
Toe-touch stoppers require a bit more involved installation process:
*Removing the old stopper:
Unscrew the cap from the top of the stopper and lift the stopper out. *Adjusting the linkage:
If the stopper doesn't close completely, adjust the linkage connecting the stopper to the toe-touch mechanism. *Installing the new stopper:
Insert the new stopper into the drain opening and screw the cap back on. *Testing the stopper:
Tap the stopper with your toe to check its operation.Installing a Lift-and-Turn Stopper
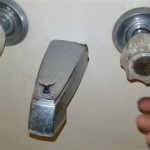
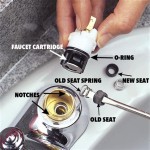
Lift-and-turn stoppers operate with a threaded mechanism:
*Removing the old stopper:
Turn the stopper counterclockwise to unscrew it from the drain body. *Cleaning the drain opening:
Remove any debris or old putty. *Installing the new stopper:
Apply plumber’s putty to the underside of the new stopper’s flange and insert it into the drain. *Tightening the stopper:
Turn the stopper clockwise to tighten it into place. *Testing the stopper:
Check for leaks by filling the tub with water.Installing a Trip-Lever Stopper
Trip-lever stoppers involve working with the overflow plate:
*Removing the overflow plate:
Unscrew the screws holding the overflow plate in place. *Disconnecting the linkage:
Disconnect the linkage connecting the trip lever to the stopper. *Removing the old stopper:
Pull the stopper out from the drain opening. *Installing the new stopper:
Insert the new stopper and reconnect the linkage. *Reinstalling the overflow plate:
Secure the overflow plate with the screws. *Testing the stopper:
Operate the trip lever to verify proper function.Installing a Pop-Up Stopper
Pop-up stoppers are controlled by a cable and lever mechanism behind the faucet:
*Accessing the pop-up assembly:
Access the pop-up assembly by removing the access panel behind the faucet. *Disconnecting the linkage:
Disconnect the linkage connecting the lever to the stopper. *Removing the old stopper:
Remove the old stopper assembly from the drain. *Installing the new stopper:
Install the new stopper assembly and reconnect the linkage. *Testing the stopper:
Activate lever to check proper stopper function.General Tips for Installing Bathtub Drain Stoppers
Regardless of the stopper type, the following tips apply to most installations:
*Turn off the water supply:
Before starting any plumbing work, turn off the water supply to the bathtub. *Inspect the drain assembly:
Check for any damage or wear to the drain assembly. *Use plumber's putty correctly:
Apply plumber's putty only to the underside of the flange, not the threads. *Do not overtighten:
Overtightening can damage the drain assembly. *Test for leaks:
After installation, fill the tub with water to check for leaks.Installing a bathtub drain stopper doesn't always require professional help. With proper identification of the stopper type and careful adherence to the appropriate installation steps, most homeowners can successfully replace their bathtub drain stopper.

Replacing A Tub Drain Bathtub Removal And Replacement

How To Remove A Bathtub Drain The Home Depot

How To Replace Bathtub Drain Stopper With A Lift And Turn Diy

Easy Replacement Of A Bathtub Drain

Diy How To Replace A Bathtub Drain Stopper With Common Household Tools

How To Replace Bathtub Drain Stopper With A Lift And Turn Diy

Replace Your Bathtub Drain Like A Pro Using The Right Tools

How To Install New Tub Drain Installing Universal Kit 2024

How To Replace A Bathtub Drain

How To Replace Bathtub Drain Stopper With A Lift And Turn Diy
Related Posts