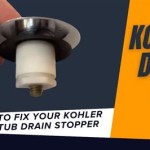
How to Remove the Stopper from a Bathtub
Bathtub stoppers can become stuck or difficult to remove due to a variety of factors, such as mineral deposits, soap scum, or hair buildup. If you're struggling to remove the stopper from your bathtub, here are some effective methods you can try.
Method 1: Pliers
Using a pair of pliers is a straightforward and effective way to remove a bathtub stopper. Place the tips of the pliers on the sides of the stopper and squeeze gently. If the stopper doesn't come loose easily, try rotating the pliers while pulling upwards.
Method 2: Screwdriver
If pliers don't provide enough grip, a screwdriver can be used as a lever to pry the stopper out of place. Insert the tip of a flathead screwdriver into the notch or gap on the side of the stopper. Apply gentle pressure and pry upward to loosen the stopper and remove it.
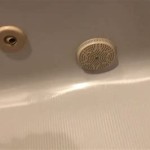
Method 3: Suction Cup
For stoppers that have a smooth surface without any notches or gaps, a suction cup can be a useful tool. Wet the suction cup and place it directly on the stopper. Pull on the suction cup with equal force to create a seal and remove the stopper.
Method 4: Vinegar and Baking Soda
Mineral deposits or soap scum can make the stopper difficult to remove. To dissolve these deposits, create a mixture of equal parts white vinegar and baking soda. Pour the mixture around the base of the stopper and let it sit for at least 30 minutes. After soaking, try using pliers or a screwdriver to remove the stopper.
Method 5: Lubrication
If the stopper is stuck due to friction, applying a lubricant can help to loosen it. Petroleum jelly, WD-40, or a silicone-based lubricant can be applied to the base of the stopper. Allow the lubricant to penetrate for a few minutes before attempting to remove the stopper.
Prevention
To prevent future issues with removing the bathtub stopper, it's recommended to clean the stopper and the drain regularly. Regularly remove hair and soap buildup from the stopper and drain cover. Also, avoid using harsh chemicals or abrasive cleaners on the stopper, as they can damage the surface and make it more prone to sticking.

4 Easy Ways To Remove A Tub Drain Stopper Wikihow

How To Remove Bathtub Drain Stopper That Spins Freely

How To Remove A Bathtub Drain Forbes Home

How To Remove A Bathtub Drain Stopper Mr Rooter

How To Remove Pop Up Tub Stopper Easy Method

4 Easy Ways To Remove A Tub Drain Stopper Wikihow

How To Easily Remove Bathtub Drain Plug Stopper Unclog In 1 Minute Jonny Diy

How To Remove A Bathtub Drain Stopper

How To Remove A Bathtub Drain Stopper

Steps To Take In Order Remove A Drain Stopper Ricks Plumbing
Related Posts