How To Remove a Bathtub Drain Plug: A Comprehensive Guide
Bathtub drain plugs, though small and often overlooked, are essential components of bathroom functionality. Their primary purpose is to create a watertight seal, preventing water from escaping during baths and showers. Over time, these plugs can become clogged with hair, soap scum, mineral deposits, and other debris, leading to slow drainage or complete blockage. Furthermore, the mechanisms that operate these plugs can fail, requiring removal for repair or replacement. Understanding how to safely and effectively remove a bathtub drain plug is a valuable skill for any homeowner, potentially saving time and money on plumbing service calls.
This article provides a detailed, step-by-step guide on removing various types of bathtub drain plugs. It covers common drain plug designs, the necessary tools, and the procedures for safe and successful removal. By following these instructions, individuals can confidently tackle this common household maintenance task.
Identifying the Type of Bathtub Drain Plug
Before attempting to remove a bathtub drain plug, it is crucial to identify the type of drain plug installed. Different types require different removal techniques, and using the wrong approach can damage the drain assembly or the bathtub itself. Common types of bathtub drain plugs include:
Pop-Up Drain Plugs: These plugs operate using a lever or knob located near the overflow drain. The lever is connected to a linkage that raises and lowers the plug, opening and closing the drain. Pop-up drains are among the most common types found in modern bathtubs.
Lift-and-Turn Drain Plugs: These plugs are manually operated. They feature a knob on the top that is lifted and turned to either seal or open the drain. To release the plug, the knob is turned in the opposite direction and lowered.
Push-and-Pull (Toe-Touch) Drain Plugs: These plugs are controlled by pushing down on the top of the plug with a foot or toe. Pushing once seals the drain, and pushing again releases it. They are sometimes referred to as toe-touch drains due to the actuation method.
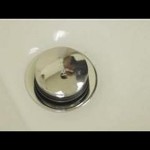
Stopper Drain Plugs (Standard Plugs): These are the simplest type of drain plug, typically made of rubber or plastic. They are manually inserted into the drain opening to seal it and removed by pulling them out.
Flip-It Drain Plugs: The Flip-It Drain Plug has a toggle lever located on its top. By flipping the lever one way, the drain is in its open position, and by flipping it the other way the drain is in its closed positions preventing drainage.
Once the type of drain plug is identified, the appropriate removal procedure can be determined and executed.
Gathering the Necessary Tools and Materials
Having the right tools and materials on hand is essential for a smooth and efficient drain plug removal process. The specific tools required may vary depending on the type of drain plug, but a basic toolkit should include:
Screwdrivers: A set of screwdrivers, including both flathead and Phillips head, is necessary for removing screws that may be holding the drain plug assembly in place.
Pliers: Needle-nose pliers or regular pliers can be useful for gripping small parts and removing debris from the drain.
Adjustable Wrench: An adjustable wrench can be used to loosen and tighten nuts and bolts on the drain assembly.
Drain Cleaning Tools: A drain snake or a bent wire can be helpful for removing hair and other debris that may be obstructing the drain.
Protective Gloves: Wearing gloves will protect hands from dirt, grime, and potential exposure to bacteria.
Towels or Rags: Towels or rags should be used to protect the bathtub surface from scratches and to clean up any spills.
Penetrating Oil (Optional): Penetrating oil can be used to loosen corroded or stuck parts of the drain assembly.
Replacement Drain Plug (If Necessary): If the existing drain plug is damaged or needs to be replaced, ensure a suitable replacement is available.
Having these tools and materials readily available will streamline the removal process and minimize potential complications.
Step-by-Step Removal Procedures for Different Drain Plug Types
The following sections provide detailed instructions for removing each type of bathtub drain plug. It is crucial to carefully follow the steps and use the appropriate tools to avoid damage to the drain assembly or the bathtub.
Removing a Pop-Up Drain Plug:
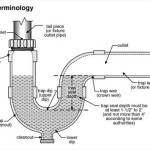
1. Locate the Overflow Plate: The overflow plate is located on the bathtub wall, near the drain opening. It typically has a lever or knob that controls the pop-up drain plug.
2. Loosen the Overflow Plate: Using a screwdriver, loosen the screw or screws holding the overflow plate in place. Remove the overflow plate.
3. Remove the Linkage: Behind the overflow plate, there will be a linkage connected to the drain plug. Carefully disconnect the linkage from the drain plug mechanism. This may involve unscrewing a nut or clip.
4. Remove the Drain Plug: Once the linkage is disconnected, the drain plug can usually be lifted straight out of the drain opening. If the plug is stuck, gently wiggle it or use pliers to carefully pull it out.
5. Inspect and Clean: Inspect the drain plug and the drain opening for any debris or obstructions. Clean them thoroughly before reassembling or replacing the plug.
Removing a Lift-and-Turn Drain Plug:
1. Locate the Set Screw: On the side of the knob or on the top of the drain plug, there may be a small set screw. This screw secures the knob to the drain plug shaft.
2. Loosen the Set Screw: Use a small Allen wrench or a screwdriver to loosen the set screw. Be careful not to strip the screw head.
3. Remove the Knob: Once the set screw is loosened, the knob should be able to be pulled off the drain plug shaft. If the knob is stuck, gently wiggle it or use pliers to carefully pull it off.
4. Unscrew the Drain Plug: After removing the knob, the drain plug itself can usually be unscrewed from the drain assembly. Turn the plug counterclockwise to unscrew it.
5. Inspect and Clean: Inspect the drain plug and the drain opening for any debris or obstructions. Clean them thoroughly before reassembling or replacing the plug.
Removing a Push-and-Pull (Toe-Touch) Drain Plug:
1. Determine the Screw Type: Some toe-touch drain plugs have a screw hidden beneath the top cap. Others may require a different method.
2. Remove the Top Cap (If Applicable): If there is a top cap, carefully pry it off using a small flathead screwdriver or a thin knife. Be careful not to damage the cap.
3. Loosen the Screw: If there is a screw beneath the cap, use a screwdriver to loosen it. Do not remove the screw completely.
4. Unscrew the Drain Plug: After loosening the screw, the drain plug should be able to be unscrewed from the drain assembly. Turn the plug counterclockwise to unscrew it.
5. Inspect and Clean: Inspect the drain plug and the drain opening for any debris or obstructions. Clean them thoroughly before reassembling or replacing the plug.
Removing a Stopper Drain Plug (Standard Plugs):
1. Grip the Stopper: Grasp the stopper firmly.
2. Pull Upward: Pull the stopper straight up and out of the drain opening. If the stopper is stuck, use pliers to get a better grip.
3. Inspect and Clean: Inspect the drain plug and the drain opening for any debris or obstructions. Clean them thoroughly before reinserting or replacing the plug.
Removing a Flip-It Drain Plug:
1. Locate the Toggle Lever: Identify the toggle lever atop the drain plug.
2. Flip the Lever: Confirm the lever is in the open position.
3. Grip the Plug's Body: Firmly grasp the body of the drain plug.
4. Twist and Pull Upward: While applying gentle pressure, twist the plug counterclockwise and pull it straight up and out of the drain opening.
5. Inspect and Clean: Inspect the drain plug and the drain opening for any debris or obstructions. Clean them thoroughly before reinserting or replacing the plug.
Following these step-by-step instructions, tailored to the specific type of drain plug, will facilitate a smooth and successful removal process.
Addressing Common Problems Encountered During Removal
Despite careful planning and execution, certain problems may arise during the drain plug removal process. Being prepared to address these issues can save time and prevent frustration.
Stuck or Corroded Parts: If parts of the drain assembly are stuck or corroded, applying penetrating oil can help loosen them. Spray the oil on the affected areas and allow it to sit for several minutes before attempting to remove the parts. Gentle tapping with a hammer may also help break the corrosion.
Stripped Screws: Stripped screw heads can make it difficult to remove screws. One technique to try is placing a rubber band between the screwdriver and the screw head to provide extra grip. Alternatively, a screw extractor tool can be used to remove the stripped screw.
Broken Parts: If a part of the drain assembly breaks during removal, it may be necessary to replace the entire assembly. Ensure that the replacement assembly is compatible with the bathtub and drain system.
Difficult Access: Limited space around the drain can make it difficult to access the drain assembly. Using smaller tools or a flexible extension can help overcome this issue.
Persistent Clogs: Even after removing the drain plug, the drain may still be clogged. Using a drain snake or a chemical drain cleaner can help clear the clog. Exercise caution when using chemical drain cleaners, as they can be corrosive and harmful.
By anticipating these potential problems and having solutions readily available, the drain plug removal process can be completed more efficiently.
It is critical to remember to turn off the water supply before commencing any plumbing work. Failure to do so can result in flooding and significant water damage. If unsure of any step in the process, consulting a qualified plumber is always recommended.

How To Easily Remove Bathtub Drain Plug Stopper Unclog In 1 Minute Jonny Diy

Remove A Bathtub Drain Stopper To Unclog The Quick Easy

4 Easy Ways To Remove A Tub Drain Stopper Wikihow
How To Remove 6 Diffe Kinds Of Drain Stoppers
How To Remove 6 Diffe Kinds Of Drain Stoppers

How To Remove A Pop Up Tub Drain Plug Stopper Easy No Tools Needed

How To Remove A Bathtub Drain The Home Depot

How To Remove Bathtub Drain Stopper That Spins Freely

How To Remove A Bathtub Drain Stopper Mr Rooter

How To Remove A Bathtub Drain Stopper
Related Posts