How To Take Off a Moen Bathtub Faucet Handle
Removing a Moen bathtub faucet handle is a task that homeowners may encounter when undertaking bathroom repairs, replacements, or upgrades. Moen faucets are known for their durability and design, but like all mechanical devices, they can require maintenance. Understanding the process of removing the handle is essential to prevent damage to the fixture and to facilitate the necessary repairs or replacements. This article provides a comprehensive guide to safely and effectively removing a Moen bathtub faucet handle.
Identifying the Faucet Style
Before attempting to remove the handle, it is crucial to identify the specific style of Moen bathtub faucet installed. Moen offers a variety of handle designs, each requiring a slightly different approach for removal. Common styles include single-handle faucets, two-handle faucets, and lever-style faucets. Single-handle faucets typically control both water temperature and flow with a single lever, while two-handle faucets have separate handles for hot and cold water. Lever-style faucets often feature a more modern design. Examining the faucet closely will help determine the presence of screws, caps, or other retaining mechanisms.
The age of the faucet is also a factor to consider. Older Moen faucets may have different construction compared to newer models. Online resources, such as the Moen website or appliance repair forums, can be helpful in identifying specific faucet models and their corresponding removal procedures. Having the model number, if available, will significantly streamline the identification process.
Once the faucet style has been identified, appropriate tools can be gathered. This may include screwdrivers (both flathead and Phillips head), Allen wrenches, pliers, and a soft cloth to protect the faucet finish. Having the correct tools minimizes the risk of scratches or other damage during the removal process.
Gathering Necessary Tools and Materials
Having the right tools and materials on hand is essential for a smooth and efficient handle removal process. The specific tools required will depend on the faucet style, but the following list provides a general overview of the items typically needed:
Screwdrivers: A set of screwdrivers, including both flathead and Phillips head, is crucial for removing screws that may be securing the handle. Different sizes may be necessary to accommodate various screw types.
Allen Wrenches: Many Moen faucets use Allen screws to secure the handle to the valve stem. A set of Allen wrenches of varying sizes is essential for loosening and removing these screws.
Pliers: Pliers, such as slip-joint pliers or needle-nose pliers, can be helpful for gripping and manipulating small parts, such as caps or washers.
Soft Cloth: A soft cloth is essential for protecting the faucet finish from scratches and marks during the removal process. Covering the faucet with a cloth before using tools can help prevent damage.
Penetrating Oil: If the handle is stuck or corroded, a penetrating oil can help to loosen it. Apply a small amount of penetrating oil to the base of the handle and allow it to sit for a few minutes before attempting to remove it.
Replacement Parts: If the intention is to repair the faucet, having replacement parts, such as O-rings or cartridges, on hand can save time and effort. These parts can often be purchased at local hardware stores or online retailers.
Safety Glasses: Wearing safety glasses is recommended to protect the eyes from debris or splashing water during the removal process.
Work Light: A work light can provide better visibility, especially in dimly lit bathrooms.
Before starting the removal process, ensure that the water supply to the faucet has been shut off. This will prevent water from leaking or spraying during the disassembly.
Step-by-Step Removal Process
The specific steps for removing a Moen bathtub faucet handle vary depending on the faucet style. However, the following provides a general guide applicable to many common Moen faucet designs:
Shut Off the Water Supply: Before beginning any faucet repair, it is essential to shut off the water supply to the faucet. This can typically be done by turning off the shut-off valves located under the sink or in the basement. If shut-off valves are not present, the main water supply to the house may need to be turned off.
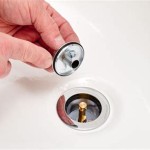
Locate and Remove the Decorative Cap: Many Moen faucet handles feature a decorative cap that conceals a screw. This cap can usually be pried off with a small flathead screwdriver. Wrap the screwdriver with a soft cloth to prevent scratching the faucet finish.
Loosen the Set Screw: Once the decorative cap is removed, a set screw will typically be visible. Use the appropriate size Allen wrench to loosen the set screw. In some cases, the set screw may be located on the side or bottom of the handle.
Remove the Handle: After loosening the set screw, the handle should be able to be pulled off the valve stem. If the handle is stuck, gently rock it back and forth while pulling. Avoid using excessive force, as this could damage the valve stem.
Inspect the Valve Stem: Once the handle has been removed, inspect the valve stem for any signs of damage or corrosion. If the valve stem is damaged, it may need to be replaced.
Two-Handle Faucets For two-handle faucets, repeat the process for both handles. Each handle will have its own decorative cap and set screw.
Lever-Style Faucets Lever-style faucets may have a slightly different design, but the general principles remain the same. Look for a decorative cap or set screw that secures the handle to the valve stem.
If the Handle is Stuck If the handle is stuck and will not come off easily, try applying penetrating oil to the base of the handle and allowing it to sit for a few minutes. This can help to loosen any corrosion or mineral deposits that may be causing the handle to stick.
Protecting the Faucet Finish Throughout the removal process, take care to protect the faucet finish from scratches or damage. Use a soft cloth to cover the faucet and avoid using excessive force when removing the handle.
Photographing the Disassembly Taking photographs of the disassembly process can be helpful when reassembling the faucet. This can serve as a visual guide to ensure that all parts are reinstalled correctly.
By following these steps, most Moen bathtub faucet handles can be removed safely and effectively. If encountering difficulty, consult a professional plumber for assistance.
Addressing Common Issues
During the process of removing a Moen bathtub faucet handle, several common issues may arise. Addressing these issues effectively can prevent further damage and ensure a successful outcome.
Stuck or Corroded Handles: If the handle is stuck due to corrosion or mineral buildup, applying penetrating oil can be helpful. Allow the oil to soak for several minutes before attempting to remove the handle again. Gently rocking the handle back and forth while pulling can also help to loosen it.
Stripped Set Screws: If the set screw is stripped, it can be difficult to remove. Try using a rubber band or steel wool to fill the gap between the Allen wrench and the screw head. This can provide a better grip. If this does not work, a screw extractor may be necessary.
Damaged Valve Stem: If the valve stem is damaged, it may need to be replaced. Replacing the valve stem typically requires removing the entire faucet and disassembling it further. Consult a professional plumber if uncomfortable with this process.
Broken Decorative Cap: If the decorative cap is broken, it can be difficult to remove without damaging the faucet finish. Use a small flathead screwdriver to carefully pry the cap off, being careful not to scratch the faucet. Replacement caps can often be purchased at local hardware stores or online retailers.
Leaking Faucet After Reassembly: If the faucet leaks after reassembly, it may be due to worn or damaged O-rings or cartridges. Replacing these parts can often resolve the leaking issue. Ensure that all parts are properly seated and tightened during reassembly.
Difficulty Identifying the Faucet Model: If having difficulty identifying the specific faucet model, consult the Moen website or contact Moen customer service for assistance. Providing photographs of the faucet can help them identify the model and provide the correct removal instructions.
Lack of Proper Tools: Attempting to remove the handle with incorrect or inadequate tools can damage the faucet. Ensure that the correct tools are available before starting the removal process.
Ignoring Safety Precautions: Failing to shut off the water supply or wearing safety glasses can result in water damage or injury. Always take necessary safety precautions before starting any faucet repair.
By being aware of these common issues and taking appropriate steps to address them, the process of removing a Moen bathtub faucet handle can be completed successfully and safely.
Reassembly and Testing
After completing the necessary repairs or replacements, reassembling the faucet is a crucial step. Careful reassembly ensures proper functionality and prevents leaks. Once the handle is removed, and any necessary repairs (i.e. replacing a cartridge) are finished, replace the handle back into the valve stem, making sure it is aligned correctly to allow for smooth operation.
Reinstalling the Handle: After making any necessary repairs or replacements, reinstall the handle onto the valve stem. Ensure that the handle is properly aligned before tightening the set screw.
Tightening the Set Screw: Use the appropriate size Allen wrench to tighten the set screw. Do not overtighten the set screw, as this could damage the handle or valve stem.
Reinstalling the Decorative Cap: Reinstall the decorative cap onto the handle. Ensure that the cap is securely in place.
Turning on the Water Supply: Slowly turn on the water supply to the faucet. Check for leaks around the handle and spout.
Testing the Faucet: Test the faucet by turning it on and off and adjusting the water temperature. Ensure that the faucet operates smoothly and that there are no leaks.
Addressing Leaks: If any leaks are detected, turn off the water supply and re-examine the faucet. Check for loose connections, worn O-rings, or damaged parts. Tighten any loose connections and replace any worn or damaged parts.
Adjusting the Handle Position: If the handle is not properly aligned, loosen the set screw and adjust the handle position. Retighten the set screw and test the faucet again.
Cleaning the Faucet: After reassembling the faucet, clean the faucet with a soft cloth to remove any fingerprints or smudges.
Ongoing Maintenance: To prevent future problems, regularly clean the faucet and check for leaks. Replace any worn parts as needed. Consider installing a water softener to reduce mineral buildup.
Following these steps will ensure proper reassembly and functionality of the Moen bathtub faucet. If having any difficulty reassembling the faucet, consult a professional plumber for assistance.

How To Repair A Moen Shower Faucet Step By

Replace Upgrade Your Shower And Bath Handle

How Can I Remove My Moen Shower Faucet Home Improvement Stack Exchange

Moen Shower Faucet Cartridge Replacement Lever Is Hard To Turn

How To Replace A Moen Cartridge And Fix Leaky Bathtub Faucet It Tutorials

How To Replace A 101408 Handle With 114346 And 114343 Moen Solutions

Bathroom Repair How To A Push Pull Faucet

How To Repair A Moen Shower Tub Valve

Shower Handle Replacement

How To Simply Fix Loose Faucet Handles Diy Family Handyman
Related Posts