How To Take Off a Delta Bathtub Faucet Handle
Removing a Delta bathtub faucet handle is a common task for homeowners undertaking bathroom renovations, repairs, or simple cleaning. While Delta faucets are known for their durability and design, understanding the specific mechanism of the handle you're dealing with is crucial for a successful removal. This article provides a detailed guide on how to safely and effectively remove various types of Delta bathtub faucet handles without causing damage to the faucet or plumbing.
Before starting any plumbing work, it is paramount to prioritize safety. Begin by turning off the water supply to the bathtub faucet. Typically, this can be done by locating the shut-off valves beneath the sink associated with the bathtub, or, if those are not present, by turning off the main water supply to the house. Once the water is shut off, open the bathtub faucet to relieve any residual pressure in the pipes. Cover the bathtub drain with a cloth or stopper to prevent small parts from falling into the drain and potentially causing a blockage.
Gather the necessary tools before beginning. These commonly include: a flathead screwdriver, a Phillips head screwdriver, an Allen wrench set (particularly a small size for set screws), penetrating oil (optional, but helpful for loosening stubborn handles), pliers (needle-nose and regular), and a soft cloth to protect faucet surfaces from scratches. Having these tools readily available will streamline the process and minimize frustration.
Identifying Your Delta Bathtub Faucet Handle Type
Delta utilizes a variety of handle designs across its bathtub faucet lines. Correctly identifying the type of handle you're dealing with is the first and most important step. Common handle types include: setscrew handles, cap-style handles, and handles with directly exposed screws. Misidentification can lead to applying the wrong removal technique, potentially damaging the faucet or handle.
Setscrew Handles: These handles are typically secured to the faucet stem with a small setscrew, which is usually located on the side or underside of the handle. The setscrew is often recessed and may be hidden by a small decorative cap. This is one of the most common Delta handle designs.
Cap-Style Handles: These handles feature a decorative cap that covers the screw securing the handle to the faucet stem. The cap must be carefully removed to access the screw beneath.
Handles with Directly Exposed Screws: These handles have screws that are visible on the surface of the handle, eliminating the need to remove a cap or search for a setscrew. This is a simpler design and often found in older models.
Once the handle type is identified, the appropriate removal method can be applied. Remember documentation may be helpful. Consult any available installation or maintenance manuals for your specific Delta faucet model. If manuals are unavailable, searching online using the model number can often yield diagrams or instructions.
Removing Handles Secured with a Setscrew
If your Delta bathtub faucet handle is secured with a setscrew, the following steps will guide you through the removal process. Setscrew handles are a common design, and this method is applicable to many Delta faucet models.
Locate the Setscrew: Carefully inspect the handle for a small hole, typically on the side or underside. This hole houses the setscrew. In some cases, the hole may be covered with a small decorative cap. If a cap is present, gently pry it off using a small flathead screwdriver. Be cautious not to scratch the handle finish during this step.
Loosen the Setscrew: Insert the correct size Allen wrench into the setscrew. Rotate the Allen wrench counterclockwise to loosen the setscrew. It may be necessary to apply penetrating oil if the setscrew is corroded or stuck. Allow the penetrating oil to soak for several minutes before attempting to loosen the screw again.
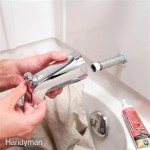
Remove the Handle: Once the setscrew is sufficiently loosened, gently pull the handle straight off the faucet stem. If the handle is stuck, try wiggling it slightly while pulling. Avoid using excessive force, as this could damage the faucet stem or handle. If the handle remains extremely difficult to remove, double-check that the setscrew is fully loosened and consider applying more penetrating oil.
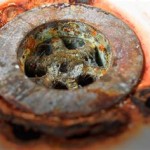
Inspect the Stem: After removing the handle, inspect the faucet stem for any signs of damage or corrosion. Clean the stem with a soft cloth and water to remove any debris. This step is important for ensuring the proper function of the faucet after the handle is reinstalled.
Removing Cap-Style Handles
Cap-style handles require a slightly different approach. The initial step involves removing the decorative cap to access the screw underneath.
Remove the Decorative Cap: Use a small flathead screwdriver or a specialized cap removal tool to gently pry off the decorative cap. Insert the screwdriver blade or tool tip between the cap and the handle body, and apply gentle pressure. Work your way around the cap to loosen it evenly. Be extremely careful not to scratch or damage the handle finish during this process. Some caps may be held in place with a threaded connection, in which case you would need to turn the cap counterclockwise to loosen it. Check the faucet documentation if available or search online to ensure the correct method is used.
Locate and Remove the Screw: Once the cap is removed, you will find a screw underneath. This screw typically requires a Phillips head screwdriver. Insert the correct size screwdriver into the screw head and turn it counterclockwise to loosen and remove the screw. Keep the screw in a safe place, as it will be needed for reassembly.
Remove the Handle: With the screw removed, gently pull the handle straight off the faucet stem. Wiggling the handle slightly may help to loosen it. As with setscrew handles, avoid using excessive force. If the handle proves difficult to remove, inspect the stem for corrosion or debris and clean it accordingly. A small amount of penetrating oil applied around the base of the handle may also help.
Inspect the Stem: After removing the handle, inspect the faucet stem for any signs of damage or corrosion. Clean the stem with a soft cloth and water to remove any debris. This ensures a smooth reinstallation of the handle.
Removing Handles with Directly Exposed Screws
Handles with directly exposed screws are the simplest to remove, as the screw is readily accessible. This design is typically found in older Delta faucet models.
Locate and Remove the Screw: Identify the screw head on the surface of the handle. Determine the type of screw (typically Phillips head or flathead) and select the corresponding screwdriver. Insert the correct size screwdriver into the screw head and turn it counterclockwise to loosen and remove the screw. Take care not to strip the screw head during this process.
Remove the Handle: Once the screw is removed, gently pull the handle straight off the faucet stem. Wiggling the handle may be necessary to loosen it. Avoid using excessive force. If resistance is encountered, double-check that the screw has been completely removed and that there are no other obstructions.
Inspect the Stem: After removing the handle, inspect the faucet stem for any signs of damage or corrosion. Clean the stem with a soft cloth and water to remove any debris. Ensure that the stem is clean and free of any corrosion or buildup before reinstalling the handle.
Regardless of the handle type, careful observation and gentle manipulation are key to a successful removal. Avoid using excessive force, as this can damage the faucet components. When reassembling the faucet, ensure that all parts are properly aligned and tightened to prevent leaks. If unsure about any step, consult a qualified plumber.

Fix Leaky Shower Head With A Stuck Handle

How To Repair A Delta Tub Shower Valve

Delta Shower Handle Cartridge Replacement Ifixit Repair Guide

How To Replace A Delta Cartridge And Fix Leaky Bathtub Faucet It Tutorials

Delta Shower Handle Cartridge Replacement Ifixit Repair Guide

How To Replace A Delta Tub Or Shower Cartridge

Problem Removing Handle Off Of Delta Monitor 1400 Series Tub Shower Faucet Diy Home Improvement Forum

How To Simply Fix Loose Faucet Handles Diy Family Handyman

Replace A Bathtub Faucet Handle Even When The Bonnet And Casing Are Difficult To Remove

Shower Faucet Repair Advocate Master Plumbing
Related Posts