How To Take Off a Bathtub Faucet
Removing a bathtub faucet is a common plumbing task often undertaken as part of a renovation, repair, or upgrade. Understanding the steps involved is crucial for a successful outcome, whether you are a seasoned do-it-yourselfer or a homeowner tackling a minor plumbing project. This article provides a thorough guide to safely and effectively removing various types of bathtub faucets.
Before commencing any plumbing work, safety precautions are paramount. The first and most important step is to shut off the water supply to the faucet. Typically, this involves locating the shut-off valves for both the hot and cold water lines leading to the bathtub. These valves are usually situated behind an access panel near the tub, in the basement directly beneath the bathroom, or within a utility closet. If individual shut-off valves are not present, the main water supply to the entire house must be turned off. Once the water supply is off, open the faucet to relieve any remaining pressure in the pipes. Place a towel or bucket underneath the faucet area to catch any residual water that may escape during the removal process. This prevents water damage to the surrounding surfaces.
Gathering the necessary tools is the next critical step. The specific tools required will vary depending on the type of faucet being removed, but a general toolkit should include: an adjustable wrench, a pipe wrench, a screwdriver set (both Phillips and flathead), penetrating oil (such as WD-40), a basin wrench (also known as a faucet wrench), pliers, a utility knife, safety glasses, and work gloves. Having these tools readily available will streamline the process and minimize frustration. It is also recommended to keep a flashlight or work light handy to illuminate the work area, especially in dimly lit bathrooms.
Identifying the Faucet Type
Different types of bathtub faucets require different removal techniques. The most common types include: spout faucets (also known as slip-on faucets), threaded faucets, and faucets connected to the water supply through a mixing valve. A spout faucet typically slips onto a copper pipe and is secured with a set screw. A threaded faucet is screwed directly onto the pipe. Mixing valve faucets are more complex and often involve multiple connections located behind the wall. Correct identification of the faucet type is crucial for choosing the appropriate removal method and avoiding potential damage to the plumbing.
To identify a spout faucet, look for a small set screw located on the underside or side of the faucet near the base. This screw secures the faucet to the copper pipe. Threaded faucets, on the other hand, will have a visible threaded connection where the faucet meets the pipe. Mixing valve faucets will usually have a handle or knob that controls both the hot and cold water, and the connections will be hidden behind a wall plate or escutcheon. Carefully inspecting the faucet and its connections will help determine the type and guide the removal process.
Once the faucet type is identified, the appropriate removal strategy can be determined. Attempting to remove a faucet using the wrong method can result in damage to the faucet, the pipes, or the surrounding wall. This can lead to costly repairs and unnecessary complications.
Removing a Spout Faucet (Slip-On Faucet)
Removing a spout faucet, the most common type, generally involves loosening a set screw. Locate the set screw on the underside or side of the faucet, near where it meets the wall. Use a screwdriver (usually an Allen wrench or a Phillips head) to loosen the set screw. In some cases, the set screw may be corroded or stuck. Applying penetrating oil to the set screw and allowing it to sit for a few minutes can help loosen it. Once the set screw is sufficiently loosened, gently pull the faucet straight off the copper pipe. If the faucet is stuck, try twisting it slightly while pulling. Avoid excessive force, as this could damage the copper pipe.
Sometimes, mineral deposits or corrosion can make it difficult to remove the faucet. If the faucet is stuck despite loosening the set screw and applying penetrating oil, try using a heat gun to gently warm the faucet near the base. The heat can help to expand the metal and loosen the bond between the faucet and the pipe. Use caution when applying heat, and avoid overheating the surrounding wall or plumbing. Once the faucet is removed, inspect the copper pipe for any damage or corrosion. Clean the pipe thoroughly before installing a new faucet.
If the copper pipe is damaged, it may need to be repaired or replaced before a new faucet can be installed. Small dents or scratches can often be smoothed out with sandpaper, but more significant damage may require professional plumbing assistance. Consider consulting a plumber if you are unsure about the condition of the pipe or if you lack the necessary skills to repair it.
Removing a Threaded Faucet
Removing a threaded faucet requires a different approach. First, locate the threaded connection where the faucet meets the pipe. Use an adjustable wrench or a pipe wrench to grip the faucet securely. Apply gentle, steady pressure to turn the faucet counterclockwise. Threaded faucets can sometimes be difficult to remove, especially if they have been in place for a long time and are corroded. Applying penetrating oil to the threads and allowing it to sit for several minutes can help loosen the connection.
If the faucet is particularly stubborn, try using a cheater bar to increase the leverage on the wrench. However, exercise caution to avoid damaging the pipe or the faucet. Alternating between tightening and loosening the faucet can sometimes help to break the bond and make it easier to remove. If the faucet is damaged or stripped, a pipe wrench with a tighter grip may be necessary.
Once the faucet is removed, carefully inspect the threads on the pipe for any damage or corrosion. Use a wire brush to clean the threads thoroughly. If the threads are damaged, a pipe thread sealant may be necessary when installing the new faucet to ensure a watertight seal. Consider using Teflon tape on the threads of the new faucet before installation to further prevent leaks.
In some situations, the threaded connection may be recessed into the wall. In this case, a basin wrench may be required to reach and grip the faucet. A basin wrench is designed to reach into these tight spaces and provide the necessary leverage to remove the faucet.
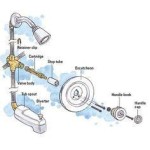
Removing a Mixing Valve Faucet
Removing a mixing valve faucet is generally more complex than removing a spout or threaded faucet, as it often involves accessing connections behind the wall. The first step is to remove the handle or knob from the faucet. This usually involves loosening a set screw or removing a decorative cap to access a screw underneath. Once the handle is removed, the escutcheon (the decorative plate that covers the wall opening) can be removed. This may require gently prying it away from the wall with a utility knife to break any paint or caulk seals.
With the escutcheon removed, the connections to the water supply should be visible. These connections may be threaded or soldered. If the connections are threaded, use an adjustable wrench or pipe wrench to loosen and disconnect them. If the connections are soldered, a propane torch and soldering tools will be required to desolder the connections. This is a more advanced task that may require professional assistance.
Before disconnecting any water lines, have a bucket and towels ready to catch any remaining water in the pipes. Carefully disconnect the hot and cold water lines, as well as any other connections to the faucet. Once all connections are disconnected, the faucet assembly can be removed from the wall. Inspect the pipes and connections for any damage or corrosion. Repair or replace any damaged components before installing a new faucet.
Replacing a mixing valve faucet often involves aligning the new faucet with the existing plumbing and making the necessary connections. Ensure that all connections are properly secured and are watertight to prevent leaks. Test the faucet thoroughly after installation to ensure that it is functioning correctly and that there are no leaks.
Remember to always consult with a qualified plumber if you are unsure about any aspect of the removal or installation process. Improper plumbing work can lead to water damage, leaks, and other costly problems. Taking the time to understand the steps involved and using the correct tools and techniques will help ensure a successful and safe faucet removal.

How To Fix A Leaking Bathtub Faucet Diy Family Handyman

How To Remove A Tub Faucet Replace It With New One

How To Replace A Bathtub Faucet

How To Remove Tub Spout Without Set Bostingner

Replacing A Tub Faucet Bathtub Spout Replacement

How To Change A Bathtub Faucet 14 Steps With Pictures Wikihow

Learn How To Remove And Install Various Tub Spouts

How To Replace A Bathtub Spout Family Handyman

How To Replace A Bathtub Spout

How To Replace Shower Faucet Trim