How to Seal a Bathtub with Caulk
A leaky bathtub can be a source of frustration and even damage to your bathroom. Water seeping under the tub can lead to mold growth, rot, and even structural problems. Fortunately, sealing your bathtub with caulk is a relatively simple and inexpensive fix. This article will guide you through the process step-by-step, ensuring you're equipped to tackle this common home repair task.
1. Preparation is Key
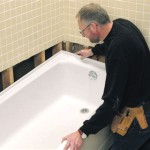
Before you start applying caulk, it's crucial to prepare the area thoroughly. This ensures a clean, dry surface for the caulk to adhere to and prevents any issues with premature peeling or cracking.
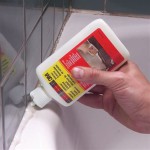
Begin by carefully removing any existing caulk. A utility knife or a caulk remover tool is helpful for this task. Scrape away the old caulk, ensuring you don't damage the surrounding surfaces. Once the old caulk is removed, clean the area with a cleaning solution like rubbing alcohol or white vinegar to remove any residue, dirt, or grease. Make sure to dry the area completely before proceeding further.
2. Choose the Right Caulk
Selecting the appropriate caulk for your bathtub is essential. The best choice depends on the type of bathtub you have and your personal preference.
For most bathtubs, silicone caulk is a popular choice. It offers excellent water resistance and is durable. It's also available in various colors to match your bathroom decor. However, if you intend to paint over the caulk, you'll need to use a paintable caulk. Avoid using acrylic caulk in bathrooms as it's not as water-resistant as silicone caulk and tends to mildew.
3. Applying the Caulk
Now that your surface is prepared and you've chosen the right caulk, it's time to apply the caulk. This process requires a steady hand and patience for optimal results.
Cut the caulk tube at a 45-degree angle, providing a clean, smooth edge for application. Then, insert the caulk tube into a caulk gun. Now, start applying the caulk to the desired area. Use a steady, even pressure, maintaining a consistent bead thickness. It's best to apply a slightly thicker bead than needed to avoid having to reapply. Ensure you fill any gaps or cracks completely.
Once you've applied the caulk, use a damp finger or a caulk tool to smooth out the bead. This creates a clean, even surface for the caulk to dry. While smoothing, maintain a slight angle to create a slightly rounded edge, which enhances the aesthetic appeal and durability of the seal.
4. Allowing the Caulk to Cure
After applying the caulk, you need to allow it to cure properly. The cure time varies depending on the type of caulk, temperature, and humidity. Refer to the product directions for specific information. However, it generally takes 24 hours for the caulk to fully cure and achieve optimal adhesion and water resistance.
During the curing period, avoid touching or applying pressure to the caulk. Keep the area dry to prevent any moisture interference with the curing process. Once the caulk has cured, you can use the bathtub as usual.
Regularly inspecting the caulk for any signs of cracking, shrinking, peeling, or mildew is crucial. Re-caulking as needed will ensure your bathroom stays leak-free and aesthetically pleasing.

How To Caulk A Bathtub 13 Steps With Pictures Wikihow

How To Seal A Bath Properly

How To Caulk A Bathtub 13 Steps With Pictures Wikihow

Caulk Or Sealant Which Is Right For Your Bathtub Badeloft

How To Use Bathroom Caulk For A Fresh New Seal

How To Caulk A Bathtub 13 Steps With Pictures Wikihow

How To Seal A Bath

How To Caulk A Bathtub Or Shower Tile Pro Depot

How To Caulk A Bathtub Like Pro

Don T Caulk Here
Related Posts