How to Seal a Bathtub
A properly sealed bathtub is essential for preventing water damage and mold growth. This guide outlines the steps involved in sealing a bathtub, covering common sealant types and application techniques.
Preparation is Key
Before applying any sealant, thorough preparation is crucial. This involves removing existing caulk, cleaning the tub and tile surfaces, and ensuring the area is completely dry.
Removing Existing Caulk
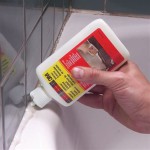
A caulk removal tool, utility knife, or putty knife can be used to remove old caulk. Care should be taken to avoid scratching the tub or tile surfaces. Residual caulk can be removed with a caulk remover solvent, following the manufacturer's instructions. A toothbrush or other small brush can be helpful for removing caulk from tight corners.
Cleaning the Surfaces
Once the old caulk is removed, the tub and tile surfaces should be thoroughly cleaned. A bathroom cleaner designed for soap scum and mildew removal is recommended. After cleaning, the surfaces must be rinsed with clean water and allowed to dry completely. A dry surface is crucial for proper sealant adhesion.
Choosing the Right Sealant
Several types of bathtub sealant are available, each with its own advantages and disadvantages. Common options include silicone caulk, acrylic caulk, and hybrid sealants.
Silicone Caulk: Silicone caulk is known for its flexibility and water resistance, making it a popular choice for bathtubs. It is available in various colors and can withstand temperature fluctuations. However, it can be more difficult to apply smoothly than other types of caulk.
Acrylic Caulk: Acrylic caulk is easier to apply and clean up than silicone caulk and can be painted over. However, it is not as flexible or water-resistant as silicone and may not be suitable for areas with high moisture exposure.
Hybrid Sealants: Hybrid sealants combine the benefits of silicone and acrylic caulks, offering excellent flexibility, water resistance, and paintability.
Applying the Sealant
Once the surfaces are clean and dry, the sealant can be applied. Cut the tip of the sealant tube at a 45-degree angle, creating an opening appropriate for the size of the gap being sealed. Load the tube into a caulking gun.
Apply consistent pressure to the caulking gun, moving steadily along the seam between the tub and tile. Aim for a smooth, continuous bead of sealant. Avoid applying too much sealant, as this can create a messy finish and increase drying time.
Smoothing the Sealant
After applying the sealant, it should be smoothed to create a watertight seal and a professional appearance. A caulking tool, wet finger, or ice cube can be used for smoothing. If using a caulking tool, choose one with a concave shape to create a slightly concave bead, allowing water to run off easily.
If using a finger or ice cube, dip it in soapy water to prevent the sealant from sticking. Run the finger or ice cube along the bead of sealant, applying gentle pressure to smooth and shape it. Wipe away excess sealant with a damp cloth.
Drying and Curing
Allow the sealant to dry and cure completely before using the bathtub. Drying time varies depending on the type of sealant used and the humidity levels. Refer to the manufacturer's instructions for specific drying and curing times. Typically, silicone caulk takes 24-48 hours to fully cure.
Maintaining the Seal
Regular cleaning and inspection of the bathtub seal are essential for preventing leaks and maintaining its effectiveness. Clean the sealed area regularly with a mild bathroom cleaner. Inspect the seal periodically for any signs of cracking, peeling, or mold growth. If any damage is observed, remove the damaged sealant and reapply a new bead.
Additional Tips
Consider using painter's tape to create clean lines when applying sealant, especially if you are a beginner. Apply the tape along the edges of the area to be sealed, leaving a small gap for the sealant. Apply the sealant, smooth it, and then carefully remove the tape before the sealant dries.
Ventilation is important when working with sealants. Open a window or use a fan to ensure adequate ventilation.
For larger gaps or cracks, consider using backer rod before applying sealant. Backer rod is a foam rope that is inserted into the gap to provide a base for the sealant and prevent it from sinking too deeply.
By following these steps, individuals can effectively seal their bathtubs, preventing water damage and ensuring a clean and healthy bathroom environment.

How To Seal A Bath Properly

How To Seal A Bath Step By Guide

Seal Around Your Bath Or Shower Without Using Silicone Sealer

How To Seal Around A Tub Or Shower

Caulking A Bathtub Simple Steps For Successful Seal

The Step By Guide For How To Seal A Bath Mira Showers

How To Seal A Bath Step By Guide

How To Seal A Bath In 7 Simple Steps Victorian Plumbing

How To Seal A Bath

Diy How To Reseal A Bath Shower Or Sink With Philippa Tuttiett
Related Posts