How to Replace a Stripped Bathtub Faucet Stem
A stripped bathtub faucet stem is a common nuisance that can lead to persistent dripping, difficulty controlling water temperature, and ultimately, wasted water. This issue typically arises from repeated use, mineral buildup, or excessive force applied when trying to turn the faucet on or off. Rather than immediately calling a plumber, a homeowner comfortable with basic plumbing tasks can often replace the stripped stem independently, saving both time and money. This article provides a comprehensive guide on how to replace a stripped bathtub faucet stem, outlining the necessary tools, safety precautions, and step-by-step instructions.
Before commencing any plumbing repair, it is paramount to prioritize safety. This includes turning off the water supply to the affected faucet. This simple step prevents potential flooding and reduces the risk of water damage to the bathroom and surrounding areas. Identifying the location of the water shut-off valves is the first critical step in the repair process. Furthermore, having suitable tools readily available contributes to a smooth and efficient repair.
Key Point 1: Preparation and Safety Procedures
Prior to addressing the stripped faucet stem, the correct tools and materials must be assembled. This ensures that the task can be completed efficiently and without unnecessary delays. The required tools typically include:
*Flathead and Phillips head screwdrivers: These are essential for removing handles, escutcheons (decorative plates), and other faucet components.
*Adjustable wrench: This versatile tool is used to loosen and tighten the faucet stem, packing nut, and other fittings.
*Penetrating oil: This helps to loosen corroded or stuck parts, making disassembly easier.
*Faucet stem socket set (or deep socket set): This specialized set is designed to fit the specific size and shape of the faucet stem, providing a secure grip for removal.
*New faucet stem: This is the replacement part, which should be identical to the old stem in terms of size, thread, and valve type. It is crucial to correctly identify the required stem to ensure compatibility.
*Plumber's grease (silicone grease): Applying this to the new stem's threads helps to prevent future corrosion and makes future removal easier.
*Rag or towel: This is used to clean up spills and protect the surrounding surfaces.
*Flashlight: This provides adequate lighting for working in tight spaces.
Once all the necessary tools and materials are gathered, the next step is to turn off the water supply. Locate the shut-off valves for the bathtub faucet. These are typically found under the sink in the adjacent bathroom or in the basement or crawl space directly beneath the bathroom. If individual shut-off valves are not present, the main water supply to the entire house must be turned off. After turning off the water supply, open the faucet to relieve any residual pressure in the pipes. This prevents water from spraying when the faucet is disassembled.
With the water supply safely shut off and tools assembled, the work area can be prepared for the repair. Place a rag or towel over the drain to prevent small parts from falling into the drain and causing a blockage. This simple precaution can save considerable time and effort in the long run.
Key Point 2: Stem Removal Process
The removal of the stripped bathtub faucet stem involves a systematic disassembly of the faucet components. This process requires patience and careful observation to avoid damaging any parts. The following steps outline the stem removal process:
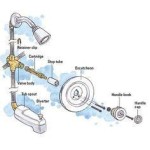
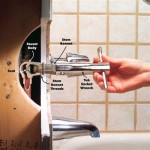
Remove the Handle: The handle is typically attached to the faucet stem with a screw hidden beneath a decorative cap. Use a flathead screwdriver to gently pry off the cap and expose the screw. Remove the screw with a Phillips head screwdriver. If the handle is stuck, apply penetrating oil around the base of the handle and gently wiggle it until it loosens.
Remove the Escutcheon: The escutcheon is the decorative plate that covers the faucet valve body. It is usually held in place by screws or a threaded collar. Remove the screws or unscrew the collar to detach the escutcheon. Again, penetrating oil can be helpful if the escutcheon is corroded or stuck.
Loosen the Packing Nut: The packing nut is the nut that holds the faucet stem in place. Use an adjustable wrench to loosen the packing nut. Be careful not to overtighten the wrench, as this can damage the nut. If the packing nut is difficult to loosen, apply penetrating oil and let it sit for a few minutes before attempting to loosen it again.
Remove the Faucet Stem: Once the packing nut is loosened, the faucet stem can be removed. Use a faucet stem socket set or a deep socket set to grip the stem and turn it counterclockwise to unscrew it from the valve body. If the stem is tightly seized, apply penetrating oil around the stem and let it sit for a few minutes. Then, try again to unscrew the stem. If the stem is still stuck, consider using a faucet stem puller tool, which is designed to extract stubborn stems without damaging the valve body.
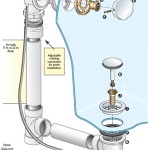
Inspect the Valve Seat: After removing the stem, inspect the valve seat, which is the part of the valve body that the stem seals against. The valve seat should be smooth and free of corrosion or damage. If the valve seat is damaged, it may need to be reamed or replaced using a valve seat wrench or a valve seat grinding tool. A damaged valve seat can cause the new stem to leak, even if the stem itself is in good condition.
Key Point 3: Stem Installation and Testing
Once the old stem is removed, the new stem can be installed. This process involves reversing the steps taken during removal, ensuring that all components are properly aligned and tightened. Before installation, a crucial step involves matching the new stem to the old one, ensuring they are identical to avoid compatibility issues.
Apply Plumber's Grease: Before installing the new faucet stem, apply a thin layer of plumber's grease (silicone grease) to the threads of the stem. This will help to prevent corrosion and make future removal easier. It also helps to ensure a smooth and leak-free seal.
Install the New Faucet Stem: Insert the new faucet stem into the valve body and turn it clockwise to screw it in. Tighten the stem using the faucet stem socket set or deep socket set, but be careful not to overtighten it. Overtightening the stem can damage the valve body or the stem itself.
Tighten the Packing Nut: Tighten the packing nut with an adjustable wrench. Again, be careful not to overtighten it. The packing nut should be snug but not excessively tight.
Reinstall the Escutcheon: Reattach the escutcheon by screwing it back into place or tightening the threaded collar. Ensure that the escutcheon is properly aligned and securely fastened.
Reinstall the Handle: Reattach the handle by inserting it onto the stem and securing it with the screw. Replace the decorative cap over the screw. Ensure that the handle is properly aligned and securely fastened.
Turn on the Water Supply: Slowly turn the water supply back on, either at the individual shut-off valves or the main water supply. Check for leaks around the faucet stem, packing nut, escutcheon, and handle. If there are any leaks, tighten the packing nut slightly or re-tighten the stem. If the leaks persist, the stem may not be properly seated, or there may be damage to the valve body or valve seat.
Test the Faucet: Turn the faucet on and off several times to ensure that it is working properly. Check for smooth operation and proper temperature control. Observe if there are any drips or leaks from either the spout or around the handle. Make adjustments as needed until the faucet operates smoothly and without leaks.
Monitor for Leaks: After completing the repair, continue to monitor the faucet for any signs of leaks over the next few days. This will help to ensure that the repair was successful and that there are no hidden issues that may require further attention. If any leaks are detected, repeat the steps outlined above to identify and address the source of the leaks.
Replacing a stripped bathtub faucet stem is a manageable task with the right tools, preparation, and a systematic approach. By following these instructions, homeowners can effectively address this common plumbing issue and prevent further water wastage and damage.

How To Remove Bathtub Faucet Stems Quick And Easy

Plumbing How To Un Faucet Valve Stem When It S Stuck Home Improvement Stack Exchange

How To Repair A Stripped Bath Faucet

How To Repair Replace Tub Water Valve Seat Fast Easy

What To Do If Is Rusted Out Or Broken In Shower Faucet Handle Shaft Easy Fix Diy Repair

How To Simply Fix Loose Faucet Handles Diy Family Handyman

How To Fix A Stripped Bathtub Faucet Handle 3 Easy Methods

How To Fix Shower Valve Stems That Are Stripped

Trying To Remove A Single Handle Shower Faucet With Stripped Out Set Home Improvement Stack Exchange

How To Fix A Stripped Faucet Handle In 10 Minutes Or Less Ricks Plumbing
Related Posts