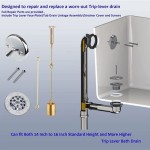
How to Replace a Pop-Up Bathtub Drain
Pop-up bathtub drains are a common feature in many bathrooms. They provide a convenient way to drain the tub, but over time, they can wear out or become damaged. If your bathtub drain is leaking, slow to drain, or simply not working properly, you may need to replace it. Replacing a pop-up bathtub drain is a relatively simple DIY project that can be completed with the right tools and some basic plumbing knowledge.
Step 1: Gathering the Necessary Tools and Supplies
Before you begin, gather the following tools and supplies:
- Adjustable wrench
- Channel-lock pliers
- Phillips screwdriver
- Flat-head screwdriver
- Plumber's putty
- New pop-up bathtub drain assembly
- Optional: Safety glasses and gloves
You can find new pop-up bathtub drain assemblies at most hardware stores or online retailers. When choosing a replacement, ensure it is compatible with your existing drain pipe and bathtub.
Step 2: Disconnecting the Old Drain Assembly
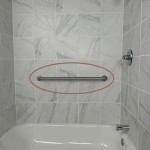
To replace the pop-up bathtub drain, you must first disconnect the old assembly. Start by turning off the water supply to the bathtub. This is usually located under the sink or behind the tub. Once the water is off, drain the bathtub completely. Locate the overflow plate, which is usually a small, circular plate located on the side of the tub, just above the drain opening. Remove the overflow plate by unscrewing it.
Next, locate the drain lever, which is the mechanism that controls the pop-up drain. Use a flat-head screwdriver to pry open the drain lever and expose the threaded rod attached to it. Grip the threaded rod with channel-lock pliers and unscrew it from the drain assembly. Once the rod is removed, you can proceed to detach the drain assembly from the bathtub's drain pipe. This is usually accomplished with an adjustable wrench. Be careful not to overtighten the wrench, as this can damage the pipe.
Step 3: Installing the New Drain Assembly
With the old drain assembly removed, you can now install the new one. Start by placing a small amount of plumber's putty around the bottom of the new drain assembly. This will help to create a watertight seal between the drain assembly and the bathtub.
Next, screw the new drain assembly onto the drain pipe. Make sure it is tightly secured but avoid overtightening, which can damage the pipe. Once the drain assembly is in place, you can reattach the threaded rod to the drain lever. Thread the rod through the drain assembly and screw it into the drain lever. Make sure the rod is securely attached.
Finally, replace the overflow plate and turn the water supply back on. Check for leaks and make sure the drain is operating smoothly. If you encounter any leaks, tighten the connections or reapply plumber's putty.
Step 4: Testing the New Drain Assembly
After installing the new pop-up bathtub drain, it is important to test it thoroughly. Fill the bathtub with water and let it drain fully. Check for leaks and make sure the drain is operating as intended. This includes checking the pop-up mechanism to ensure it is functioning properly.
If you notice any leaks or malfunctions, you may need to adjust the connections or reapply plumber's putty. If the problem persists, you may need to contact a professional plumber for assistance.

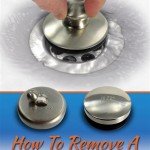
How To Remove Pop Up Tub Stopper Easy Method

Bathroom Repair How To A Pop Up Tub Drain Stopper

How To Remove A Bathtub Drain The Home Depot

How To Remove A Bathtub Drain Stopper

Tip Toe Pop Up Bathtub Plug Assembly

Bathroom Repair How To A Pop Up Tub Drain Stopper

So Easy How To Remove A Watco Pop Up Drain Plug

How To Remove A Bathtub Drain Stopper

Bathtub Drain Stopper Replacement

Remove Pop Up Bath Tub Drain Stopper 3 Ways
Related Posts