How To Replace a Plastic Bathtub Faucet Stem
The bathtub faucet is a crucial plumbing fixture that controls the flow of water into the bathtub. Over time, faucet stems, particularly those made of plastic, can wear out, leading to leaks, drips, and difficulty in controlling water temperature and flow. Replacing a plastic bathtub faucet stem is a relatively simple plumbing task that can be accomplished by most homeowners with basic tools and a methodical approach. This article provides a comprehensive guide on how to replace a plastic bathtub faucet stem, ensuring a properly functioning and leak-free faucet.
Before beginning any plumbing repair, it is imperative to understand the potential risks involved and to take necessary safety precautions. Water can cause significant damage to property if leaks occur during the repair process. Therefore, shutting off the water supply is the most critical first step. Failure to do so can result in flooding and unnecessary water waste. Additionally, working with plumbing fixtures can involve the use of tools that can cause injury if not handled properly. Always wear safety glasses to protect the eyes from debris and gloves to protect the hands.
Gathering Necessary Tools and Materials
Before starting the replacement process, ensure that all the necessary tools and materials are readily available. This will streamline the process and minimize interruptions. The required tools are typically found in a basic homeowner's toolbox.
The following tools and materials are essential:
- New Faucet Stem: Identify the correct replacement stem. Remove the old stem and take it to a hardware store for matching or find the model number of the faucet and search online. Ensure the new stem is compatible with the existing faucet body. Plastic stems are often brand specific and may vary even within the same brand based on bathtub model.
- Screwdrivers: A Phillips head and a flathead screwdriver will be needed to remove the faucet handle and escutcheon.
- Adjustable Wrench: An adjustable wrench or a basin wrench will be required to loosen and tighten the faucet stem. A basin wrench is particularly useful for reaching stems in tight spaces.
- Pliers: Pliers can be used to grip small parts and to help remove any stubborn components. Slip-joint pliers are generally sufficient.
- Penetrating Oil: Penetrating oil can help to loosen corroded or stuck stems. Spraying the stem a few minutes before attempting to remove it can significantly ease the process.
- Clean Rags: Rags are essential for cleaning up spills and wiping away any debris or grime.
- Plumber's Grease: Plumber's grease can be applied to the new stem's threads and O-rings to ensure smooth operation and prevent leaks.
- Safety Glasses: Always wear safety glasses to protect your eyes from debris.
- Gloves: Gloves protect your hands from dirt and potential contaminants.
Step-by-Step Guide to Replacing the Faucet Stem
The process of replacing a plastic bathtub faucet stem involves several steps, each of which should be followed carefully to ensure a successful repair.
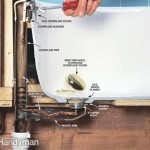
- Shut Off the Water Supply: Locate the shut-off valves for the bathtub faucet. These are typically located beneath the bathtub or in an adjacent utility area. Turn both the hot and cold water supply valves clockwise until they are completely closed. After closing the valves, turn on the bathtub faucet to relieve any residual water pressure in the pipes.
- Remove the Faucet Handle: The faucet handle is typically attached to the stem with a screw. Look for a small setscrew, often hidden beneath a decorative cap on the handle. Use a small flathead screwdriver to pry off the cap, revealing the screw. Use the appropriate screwdriver (Phillips or flathead) to remove the screw. Once the screw is removed, gently pull the handle off the faucet stem. Some handles are held on by friction and may require gently wiggling them back and forth while pulling.
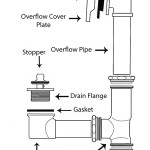
- Remove the Escutcheon: The escutcheon is the decorative plate that covers the faucet stem. It is usually threaded or slips onto the faucet valve. Unscrew the escutcheon if it is threaded, or gently pry it off if it is a slip-on type. If the escutcheon is stuck, use a flathead screwdriver to carefully work around the edges to loosen it. Note the orientation of the escutcheon for reinstallation.
- Remove the Old Faucet Stem: With the escutcheon removed, the faucet stem will be visible. Use an adjustable wrench or a basin wrench to loosen the stem. Place the wrench around the stem and turn it counterclockwise to loosen it. If the stem is corroded or stuck, apply penetrating oil to the threads and let it sit for a few minutes before attempting to loosen it again. Once the stem is loose, unscrew it completely from the faucet body. Be prepared for a small amount of water to drain out when the stem is fully removed.
- Inspect the Faucet Seat: The faucet seat is the part of the faucet body that the stem seals against. Inspect the seat for any damage, such as corrosion or pitting. If the seat is damaged, it may need to be repaired or replaced. This often requires a specialized tool called a seat wrench. If the seat is severely damaged, it may be necessary to replace the entire faucet.
- Install the New Faucet Stem: Apply a small amount of plumber's grease to the threads and O-rings of the new faucet stem. This will help to ensure a smooth installation and prevent leaks. Insert the new stem into the faucet body and turn it clockwise to tighten it. Use the adjustable wrench or basin wrench to tighten the stem snugly, but avoid over-tightening, which could damage the stem or the faucet body.
- Reinstall the Escutcheon: Reinstall the escutcheon onto the faucet valve. Screw it on if it is threaded, or snap it into place if it is a slip-on type. Ensure that the escutcheon is properly aligned and secure.
- Reinstall the Faucet Handle: Reinstall the faucet handle onto the stem. Align the handle with the stem and push it into place. Tighten the screw that secures the handle to the stem. Replace the decorative cap that covers the screw.
- Turn on the Water Supply: Slowly turn on the hot and cold water supply valves. Check for any leaks around the faucet stem, the escutcheon, and the faucet handle. If leaks are present, tighten the stem or the escutcheon slightly. If the leaks persist, the stem may not be properly seated or the O-rings may be damaged.
- Test the Faucet: Turn the faucet on and off several times to ensure that it is functioning properly. Check the water temperature and flow to ensure that the new stem is controlling the water as expected.
Troubleshooting Common Problems
Even with careful execution, some problems may arise during the faucet stem replacement process. Understanding how to troubleshoot these issues can help to resolve them quickly and efficiently.
Here are some common problems and their solutions:
- Stem is Difficult to Remove: If the old faucet stem is difficult to remove, it may be corroded or stuck. Apply penetrating oil to the threads and let it sit for a few minutes before attempting to loosen it again. You can also try gently tapping the stem with a hammer to help loosen the corrosion. Ensure the correct size wrench is being used to avoid rounding off the stem's corners.
- New Stem Leaks: If the new stem leaks, it may not be properly seated or the O-rings may be damaged. Tighten the stem slightly to ensure that it is properly seated. If the leaks persist, remove the stem and inspect the O-rings for any damage. Replace the O-rings if necessary. Ensure that plumber's grease was applied to the threads and O-rings before installation.
- Faucet Handle is Loose: If the faucet handle is loose, tighten the screw that secures it to the stem. If the screw is stripped, it may be necessary to replace the screw or the handle. Ensure the handle is properly aligned with the stem before tightening the screw.
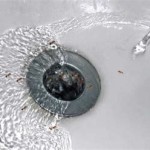
- Water Pressure is Low: If the water pressure is low after replacing the stem, check the aerator on the faucet spout. The aerator may be clogged with debris. Remove the aerator and clean it thoroughly. Also, ensure the shut-off valves are fully open.
Replacing a plastic bathtub faucet stem is a manageable task that can save money and prevent further water damage. By following these steps and taking the necessary precautions, homeowners can successfully complete this plumbing repair with confidence. Regular maintenance and prompt attention to leaks can extend the life of the faucet and prevent more extensive repairs in the future.

Diy Bathtub Faucet Repair

How To Remove Bathtub Faucet Stems Quick And Easy

How To Change A Bathtub Faucet 14 Steps With Pictures Wikihow

Replacing A Tub Faucet Bathtub Spout Replacement

How To Repair Replace 3 Handle Shower Valve

How To Change A Bathtub Faucet 14 Steps With Pictures Wikihow

How To Simply Fix Loose Faucet Handles Diy Family Handyman

Fix Leaking Shower Head Or Bathtub Faucet Rebuild Replace Valve

Fast Way To Replace Or Retrofit A Two Handle Shower System With One

How To Change A Bathtub Faucet 14 Steps With Pictures Wikihow
Related Posts