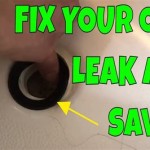
How To Replace an Old Bathtub Faucet Stem
Replacing an old bathtub faucet stem is a common plumbing task that homeowners can often undertake themselves, potentially saving on the cost of a professional plumber. The faucet stem is a crucial component within the faucet assembly; it controls the flow of water to the tub spout and showerhead. Over time, these stems can wear down, leading to drips, leaks, and difficulty regulating water temperature and pressure. This article provides a detailed, step-by-step guide on how to replace an old bathtub faucet stem, ensuring a successful and leak-free repair.
Before starting the replacement process, proper preparation is essential. This includes gathering the necessary tools and materials, identifying the correct replacement stem, and shutting off the water supply. A well-prepared workspace and understanding of the faucet's components will significantly contribute to a smooth and efficient replacement.
Key Point 1: Identification and Preparation
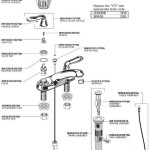
The first and perhaps most crucial step is identifying the correct replacement faucet stem. Bathtub faucets come in various designs and stem configurations. Attempting to install an incompatible stem will inevitably lead to leaks or complete failure. The faucet stem type is typically determined by the manufacturer and model of the faucet, so begin by gathering this information if available. Look for any markings or logos on the faucet body, handles, or escutcheon plates. If the manufacturer and model are unknown, the old faucet stem must be physically removed and taken to a hardware store or plumbing supply shop for matching. The store personnel can assist in identifying the stem based on its dimensions, thread pattern, and other characteristics.
Once the replacement stem is identified, the following tools and materials are required:
*New faucet stem(s): Ensure the replacement stem(s) are the exact match for the old ones.
*Screwdrivers: A set of flathead and Phillips head screwdrivers in various sizes will be needed.
*Adjustable wrench: For loosening and tightening the packing nut and faucet stem.
*Penetrating oil (optional): For loosening corroded parts.
*Plumber’s grease: For lubricating the new faucet stem and preventing future corrosion.
*Plumber’s tape (Teflon tape): For sealing the threads of the new faucet stem.
*Basin wrench (optional): Useful for accessing stems in tight spaces.
*Flashlight: To illuminate the work area.
*Towels or rags: To protect the bathtub and soak up any water.
*Bucket: To catch any remaining water in the pipes.
Before proceeding with any disassembly, the water supply must be shut off. Typically, there are shut-off valves located near the bathtub itself, often accessible through an access panel behind the tub or in an adjacent room. If individual shut-off valves are not present, the main water shut-off valve for the entire house must be turned off. This is usually located in the basement, garage, or near the water meter. After shutting off the water supply, open the bathtub faucet to relieve any residual pressure in the pipes. Catch any remaining water with a bucket.
Key Point 2: Removing the Old Faucet Stem
After the water supply is shut off and the necessary tools and materials are gathered, the old faucet stem can be removed. The process typically involves the following steps:
First, remove the faucet handle(s). The handle is typically secured with a screw, often concealed beneath a decorative cap. Use a small screwdriver to carefully pry off the cap and expose the screw. Remove the screw and gently pull the handle off the faucet stem. Some handles may be held in place with a setscrew; if the handle does not come off easily, inspect the underside for a small setscrew that needs to be loosened with an Allen wrench.
Next, remove the escutcheon plate, which is the decorative flange that covers the faucet valve body. The escutcheon plate may be threaded onto the valve body or held in place with screws or a clip. If threaded, carefully unscrew the plate. If secured with screws, remove the screws. If held by a clip, use a screwdriver to gently pry the clip loose.
With the handle and escutcheon plate removed, the packing nut will be exposed. The packing nut holds the faucet stem in place and prevents water from leaking around the stem. Use an adjustable wrench to loosen the packing nut. If the nut is corroded or difficult to turn, apply penetrating oil and allow it to soak for several minutes before attempting to loosen it again. Be careful not to damage the nut while applying force.
Once the packing nut is loosened, carefully unscrew and remove it. After removing the packing nut, the faucet stem can be pulled out of the valve body. If the stem is stuck, gently rock it back and forth while pulling. Avoid using excessive force, as this could damage the valve body or the stem itself. If the stem remains stuck, apply more penetrating oil and allow it to soak longer.
After removing the old faucet stem, thoroughly inspect the valve seat inside the valve body. The valve seat is the point where the faucet stem seals against the valve body to stop the flow of water. Over time, the valve seat can become corroded or damaged, which can cause leaks even with a new faucet stem. If the valve seat is damaged, it may need to be repaired or replaced using a valve seat wrench or a valve seat grinding tool.
Key Point 3: Installing the New Faucet Stem
With the old faucet stem removed and the valve seat inspected, the new faucet stem can be installed. The installation process is essentially the reverse of the removal process, but with a few important considerations.
Before installing the new faucet stem, apply a small amount of plumber’s grease to the threads of the stem and to the rubber washers or O-rings. This will lubricate the stem and washers, making it easier to install and preventing future corrosion. Be sure to use a plumber's grease that is compatible with potable water systems.
Wrap the threads of the new faucet stem with plumber’s tape (Teflon tape). This will help to create a watertight seal between the stem and the valve body. Wrap the tape in a clockwise direction, overlapping each layer slightly. Apply two to three layers of tape for adequate sealing.
Carefully insert the new faucet stem into the valve body. Ensure that the stem is properly aligned and that the rubber washers or O-rings are seated correctly. Screw the stem into the valve body until it is snug.
Reinstall the packing nut and tighten it with an adjustable wrench. Do not overtighten the packing nut, as this could damage the faucet stem or the valve body. Tighten the nut enough to create a snug seal, but not so much that it is difficult to turn the stem.
Reinstall the escutcheon plate and secure it with screws or by threading it onto the valve body. Ensure that the escutcheon plate is properly aligned and that it covers the valve body completely.
Reattach the faucet handle to the faucet stem and secure it with the screw or setscrew. Ensure that the handle is properly aligned and that it turns smoothly. Test the faucet stem by turning the handle on and off. Check for any leaks around the stem or the escutcheon plate.
After reinstalling the faucet stem, slowly turn the water supply back on. Check for any leaks around the faucet stem, the packing nut, and the escutcheon plate. If any leaks are present, tighten the packing nut slightly or re-wrap the faucet stem threads with plumber’s tape. Once any leaks are resolved, allow the faucet to run for several minutes to flush out any debris from the pipes.
By following these steps, homeowners can successfully replace an old bathtub faucet stem and restore proper function to their bathtub faucet. Regular maintenance of the faucet, including lubricating the stem and replacing worn washers, can help to prevent future leaks and extend the life of the faucet. If you are uncomfortable performing this repair yourself, it is always recommended to consult a qualified plumber.

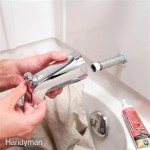
How To Fix A Leaking Bathtub Faucet Diy Family Handyman

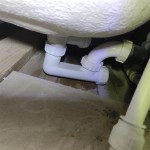
Bathtub Faucet Stem And Seat Replacement

How To Fix A Leaking Bathtub Faucet Diy Family Handyman

How To Remove Bathtub Faucet Stems Quick And Easy

Fixing Faucets How To Replace A Difficult Tub Faucet Cartridge

How To Repair A Shower Valve Stem Ask This Old House

How To Remove Older Plastic Moen Tap Cartridge Valve Stem Doityourself Com Community Forums

How To Fix A Leaking Bathtub Faucet Diy Family Handyman

How To Fix A Leaky Bathtub Faucet

Plumbing How To Un Faucet Valve Stem When It S Stuck Home Improvement Stack Exchange
Related Posts