How to Replace an Old Bathtub Faucet
Replacing an old bathtub faucet is a common home improvement task that can improve the aesthetics and functionality of a bathroom. Over time, bathtub faucets can become worn, leaky, or outdated. Replacing a faucet offers an opportunity to update the bathroom's style, improve water efficiency, and prevent water damage caused by leaks. This article provides a comprehensive guide on how to replace an old bathtub faucet, covering the necessary tools, preparation steps, and installation procedures.
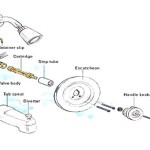
Before embarking on the replacement process, it's crucial to identify the type of faucet currently installed. Bathtub faucets generally fall into a few primary categories: compression faucets, ball faucets, cartridge faucets, and ceramic disc faucets. Compression faucets are easily identified by their separate hot and cold knobs, requiring multiple turns to control water flow. Ball faucets feature a single handle that rotates around a ball mechanism to adjust temperature and flow. Cartridge faucets also utilize a single handle but employ a cartridge inside the faucet body to control water. Ceramic disc faucets are recognized by their sleek, modern design and smooth, quarter-turn operation.
Determining the existing faucet type is important because it influences the tools required and the specific steps involved in removal and installation. Some faucets are easily replaced with a like-for-like model, while others might require modifications to the plumbing connections. Furthermore, understanding the faucet type aids in diagnosing problems if the faucet is leaking or malfunctioning prior to replacement.
Gathering Necessary Tools and Materials
Successful faucet replacement hinges on having the right tools and materials readily available. A well-prepared workspace minimizes delays and ensures a smooth installation process. The following items are generally required:
Adjustable Wrench: An adjustable wrench is essential for loosening and tightening nuts and fittings. It offers versatility in accommodating various sizes of plumbing components.
Basin Wrench: A basin wrench, also known as a sink wrench, is a specialized tool designed to reach and grip nuts in tight spaces, such as under the sink or behind the bathtub. Its long handle and pivoting head allow for access to otherwise inaccessible areas.
Pliers: A pair of pliers can be used for gripping, bending, and manipulating small parts. Channel-lock pliers, with their adjustable jaws, are particularly useful for plumbing tasks.
Screwdrivers: A set of screwdrivers, including both flathead and Phillips head, are necessary for removing handles, escutcheons, and other faucet components.
Hacksaw or Pipe Cutter: A hacksaw or pipe cutter may be required if the existing plumbing pipes need to be cut or shortened to accommodate the new faucet.
Plumber's Tape (Teflon Tape): Plumber's tape is used to create a watertight seal on threaded connections. It is wrapped around the threads of pipes and fittings before they are joined together.
Plumber's Putty: Plumber's putty is a pliable compound used to seal the base of faucets and drains. It prevents water from seeping between the fixture and the surface it is mounted on.
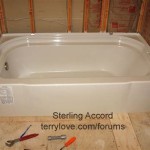
New Bathtub Faucet: The new faucet should be compatible with the existing plumbing connections and the bathtub configuration. Verify the faucet type, style, and finish before purchasing.
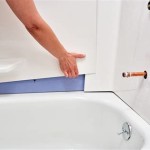
Towels or Rags: Towels or rags are essential for wiping up spills and protecting the bathtub surface from scratches.
Bucket: A bucket is needed to catch any residual water that may drain from the pipes after the water supply is shut off.
Safety Glasses: Safety glasses protect the eyes from debris and splashes during the installation process.
Preparation: Shutting Off the Water Supply and Removing the Old Faucet
Before beginning any faucet replacement work, the water supply to the bathtub must be shut off. This prevents flooding and potential water damage. The shut-off valves are typically located near the water meter or under the sink. If individual shut-off valves are not available, the main water supply to the entire house should be turned off.
Once the water supply is shut off, open the bathtub faucet to relieve any remaining pressure in the pipes. Place a bucket underneath the faucet to catch any residual water that may drain out.
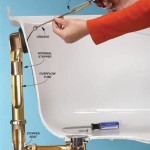
The next step involves removing the old faucet. The specific removal procedure varies depending on the faucet type. For compression faucets, the handles are typically held in place by screws located on the top or side. Remove the screws and pull off the handles. Next, unscrew the escutcheons (decorative plates) that cover the faucet stems. Use an adjustable wrench or basin wrench to loosen and remove the faucet stems from the plumbing connections.
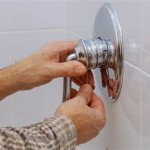
For single-handle faucets, such as ball faucets and cartridge faucets, the removal process usually involves loosening a set screw located on the handle. Once the set screw is loosened, the handle can be pulled off. Next, unscrew the escutcheon and remove any retaining clips or nuts that hold the faucet body in place. Disconnect the water supply lines from the faucet body using an adjustable wrench. Exercise caution when disconnecting the water supply lines to avoid damaging the pipes.
Carefully inspect the exposed plumbing connections for any signs of corrosion or damage. If necessary, clean the threads of the pipes with a wire brush. If the pipes are corroded or damaged, they may need to be replaced or repaired before installing the new faucet.
Installing the New Bathtub Faucet
With the old faucet removed and the plumbing connections prepared, the next step is to install the new faucet. Before beginning the installation, carefully read the manufacturer's instructions that come with the new faucet. The instructions provide specific details on the installation procedure for that particular model.
Begin by applying plumber's tape to the threads of the plumbing connections. Wrap the tape clockwise around the threads, overlapping each layer slightly. This creates a watertight seal and prevents leaks. Do not use excessive amounts of plumber's tape, as this can make it difficult to tighten the connections.
Attach the new faucet body to the plumbing connections, tightening the nuts or fittings with an adjustable wrench. Avoid overtightening the connections, as this can damage the pipes or the faucet. Ensure that the faucet is properly aligned and that the escutcheons are flush against the bathtub surface.
For single-handle faucets, insert the cartridge or ball mechanism into the faucet body, following the manufacturer's instructions. Secure the mechanism with any retaining clips or nuts that are provided. Attach the handle to the faucet body and tighten the set screw. Ensure that the handle operates smoothly and that the water flow and temperature are properly controlled.
For faucets with separate hot and cold handles, attach the handles to the faucet stems and secure them with screws. Ensure that the handles are properly aligned and that they turn smoothly. Verify that the hot and cold water flows from the correct spouts. If the hot and cold water are reversed, the faucet stems may need to be switched.
Once the faucet is installed, turn the water supply back on slowly. Check for any leaks around the faucet body, the plumbing connections, and the handles. If any leaks are detected, tighten the connections or apply additional plumber's tape as needed. If the leaks persist, consult a professional plumber.
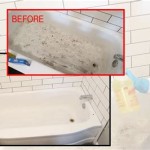
After verifying that there are no leaks, clean the bathtub surface and remove any debris or tools. Test the faucet to ensure that it is functioning properly. Check the water flow and temperature, and verify that the drain operates smoothly. The old faucet can now be disposed of properly.

How To Fix A Leaking Bathtub Faucet Diy Family Handyman

3 Ways To Remove A Tub Faucet Wikihow

Plumbing How To Replace A Jacuzzi Bathtub Faucet Home Improvement Stack Exchange

Replacing A Tub Spout An Easy Repair Job Theworldlink Com

3 Ways To Remove A Tub Faucet Wikihow

Faucet Repair How To A Leaky Bath

How To Replace A Bathtub Faucet

Fixing Faucets How To Replace A Difficult Tub Faucet Cartridge

3 Ways To Remove A Tub Faucet Wikihow

Learn How To Remove And Install Various Tub Spouts
Related Posts