How to Replace a Moen Cartridge in a Bathtub Faucet
A Moen bathtub faucet cartridge is a crucial component that controls the flow of water and temperature. Over time, these cartridges can wear out, leading to problems like leaks, drips, or difficulty adjusting the water flow. Replacing the cartridge is often a simple and effective solution to restore proper functionality to your faucet. This guide will provide a step-by-step approach to replacing a Moen bathtub faucet cartridge, equipping you with the knowledge to handle this common plumbing repair.
Step 1: Gather Necessary Tools and Supplies
Before embarking on the replacement process, ensure you have the following tools and supplies readily available:
- Adjustable wrench
- Channel-lock pliers
- Phillips screwdriver
- Flat-head screwdriver
- Replacement Moen cartridge
- Teflon tape
- Bucket or towels for catching water
- Optional: Work gloves for protection
It is essential to ensure that the replacement cartridge is compatible with your Moen faucet model. Refer to the user manual or the manufacturer's website for specific part numbers. You can usually find the model number on a label on the faucet itself.
Step 2: Turn Off the Water Supply
The first step is to shut off the water supply to the bathtub faucet. Locate the water shut-off valves for the hot and cold water lines leading to the faucet. These valves are typically found beneath the sink or behind an access panel on the wall. Turn the handles of the valves clockwise to completely shut off the water flow.
After turning off the valves, open the faucet slightly to release any remaining pressure in the lines. This will help prevent water from spilling out during the replacement process.
Step 3: Remove the Handle and Handle Cap
With the water supply turned off, you can now dismantle the faucet handle. Start by removing the handle cap. This is usually a decorative piece that covers the screw that secures the handle. Use your fingers or a small flat-head screwdriver to pry it off gently.
Once the handle cap is removed, you will see a screw holding the handle in place. Use a Phillips screwdriver to loosen and remove this screw. The handle should now come off easily.
Step 4: Remove the Bonnet Nut and Cartridge
Beneath the handle, you will find a bonnet nut that secures the cartridge to the faucet body. This nut is usually hexagonal and can be removed using an adjustable wrench. Hold the faucet body steady with one hand while turning the bonnet nut counterclockwise with the wrench.
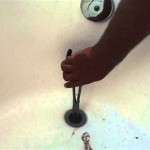
Once the bonnet nut is loosened and removed, you can carefully lift the old cartridge out of the faucet. It may stick slightly due to mineral deposits or corrosion. If necessary, use a small flat-head screwdriver or a pair of channel-lock pliers to gently pry the cartridge out.
Step 5: Install the New Cartridge
Before installing the new cartridge, it's a good idea to inspect the faucet body for any debris or mineral buildup. Use a small brush or a cloth to clean the area around the cartridge opening.
Next, carefully place the new cartridge into the opening in the faucet body. Ensure it is fully seated and aligned correctly. Once the cartridge is in place, wrap a few turns of Teflon tape around the threads of the bonnet nut. This will help prevent leaks when you tighten the nut.
Align the bonnet nut with the threads on the faucet body and hand-tighten it. You can then use the adjustable wrench to tighten it further, but avoid over-tightening, which could damage the faucet.
Step 6: Reassemble the Faucet
With the new cartridge installed, you can now proceed to reassemble the faucet. Replace the handle onto the stem, aligning the screw holes. Screw the handle screw back in place using the Phillips screwdriver. Put the handle cap back on to complete the assembly.
Step 7: Turn On the Water and Test
Once the faucet is reassembled, turn the water supply back on by rotating the shut-off valves counterclockwise. Allow the water pressure to build up and check for any leaks.
If everything is functioning properly, test the hot and cold water flow by turning the faucet on and adjusting the temperature control. If you notice any issues, inspect the installation or refer to the instruction manual for further troubleshooting.

How To Replace A Moen Cartridge And Fix Leaky Bathtub Faucet It Tutorials

Moen Bathtub Drippingfaucet Repair

How To Fix Leaky Shower Tub Faucet Replace Moen 1200 Or 1225 Cartridge Demo

How To Replace A Moen Shower Cartridge

How To Replace A Cartridge In Moen Bathroom Faucet

Moen Shower Faucet Cartridge Replacement Lever Is Hard To Turn

Replace A Moen Shower Cartridge Fix Leaky Tub Faucet

How To Replace A 1224 Moen Cartridge

Replacing A Stuck Moen Shower Valve Cartridge

Moen Bathroom Faucet Repair 1225
Related Posts