How To Replace a Moen Cartridge in a Bathtub
A dripping faucet can be a persistent annoyance and a significant source of water waste. Often, the culprit behind this issue is a worn-out or damaged cartridge. Fortunately, replacing a Moen cartridge is a relatively straightforward task that most homeowners can accomplish with a few basic tools and some patience. This article provides a step-by-step guide to replacing a Moen cartridge in a bathtub faucet.
1. Gather Necessary Tools and Materials
Before beginning the repair, gather all the necessary tools and materials. This preparation will streamline the process and prevent interruptions. The required tools typically include:
- A flathead screwdriver
- A Phillips head screwdriver
- An Allen wrench (often included with the replacement cartridge)
- Needle-nose pliers
- Channel-lock pliers
- A utility knife
- A small container or bucket
- Replacement Moen cartridge (ensure compatibility with the faucet model)
Having these tools readily available will make the replacement process smoother and more efficient.
2. Shut Off the Water Supply
Turning off the water supply is crucial to prevent unwanted flooding. Locate the shut-off valves for the bathtub. These are usually found beneath the sink or behind the access panel for the bathtub plumbing. Turn both the hot and cold water supply valves clockwise until they are completely closed. After shutting off the valves, turn on the bathtub faucet to release any remaining water pressure in the lines. This will prevent water from spraying out when the cartridge is removed.
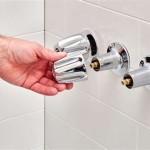
3. Remove the Faucet Handle
The next step involves removing the faucet handle. Most Moen faucets have a small cap covering the handle screw. Use a flathead screwdriver to carefully pry off this cap. Once the screw is exposed, use the appropriate screwdriver (usually a Phillips head) to remove it. The handle can then be pulled straight off the faucet stem. Some Moen handles might have a retaining clip instead of a screw. If this is the case, use needle-nose pliers to remove the clip before pulling off the handle.
4. Remove the Escutcheon and Retaining Clip
The escutcheon is the decorative plate behind the faucet handle. It may be secured with screws or simply snap onto the faucet body. If screws are present, remove them with the appropriate screwdriver. If it snaps on, gently pry it off using a flathead screwdriver, being careful not to damage the surrounding finish. Once the escutcheon is removed, the retaining clip holding the cartridge in place will be visible. Use needle-nose pliers to carefully remove this clip. It may require some maneuvering to dislodge it fully. Be mindful of the clip's orientation for easier reinstallation later.
5. Extract the Old Cartridge
With the retaining clip removed, the cartridge is now ready for extraction. Some Moen cartridges have a small brass stem protruding from the top. If present, use the provided Allen wrench to insert it into the stem. Using the Allen wrench as leverage, gently pull the cartridge straight out of the valve body. If the cartridge is stuck, gently wiggle it back and forth while pulling to loosen it. If the cartridge still resists removal, use channel-lock pliers to grip the cartridge body and carefully pull it out, ensuring not to damage the valve body.
6. Install the New Cartridge
Before installing the new cartridge, inspect the valve body for any debris or mineral buildup. Clean the inside of the valve body using a cloth or your finger to ensure a smooth and proper fit for the new cartridge. Align the new cartridge with the notches in the valve body and push it straight in until it is fully seated. The cartridge should slide in smoothly without requiring excessive force. Once the cartridge is in place, reinstall the retaining clip, ensuring it snaps securely into position.
7. Reassemble the Faucet
After the new cartridge is securely installed, reassemble the faucet in the reverse order of disassembly. Place the escutcheon back onto the faucet body and secure it with screws if necessary. Reattach the faucet handle and tighten the handle screw. Replace the handle cap if applicable. Slowly turn the water supply valves back on, checking for any leaks around the faucet. If leaks are present, tighten connections as needed or re-check the cartridge installation to ensure a proper seal.
Replacing a Moen cartridge is a manageable task that can save money on plumbing repairs. By following these steps carefully and taking precautions, homeowners can address a leaky faucet effectively and efficiently.

How To Replace A Moen Cartridge And Fix Leaky Bathtub Faucet It Tutorials

How To Replace A Moen Shower Cartridge

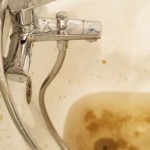
Moen Bathtub Drippingfaucet Repair

Replacing A Stuck Moen Shower Valve Cartridge

Replace A Moen Shower Cartridge Fix Leaky Tub Faucet

Replace Moen Handle Faucet Cartridge Fix A Leaky Bathtub Or Shower With Danco Core Puller

Bathtub Shower Moen Danco Cartridge Replacement How To Repair Fix Faucet Diy Home Improvement 4k Hd

Moen Shower Faucet Cartridge Replacement Lever Is Hard To Turn

Moen Cartridge Replacement For Bathtub Model 1248 1224b

Fix Or Replace Bath Tub Mixer Cartridge Moen 10 Steps With Pictures Instructables
Related Posts