How to Replace a Delta Bathtub Faucet Cartridge
A leaking faucet can be a major annoyance, not to mention a waste of water. If you have a Delta bathtub faucet that is leaking, the problem may be with the cartridge. Replacing a Delta faucet cartridge is a relatively simple task that can be completed in about an hour. Here are the steps on how to replace a Delta bathtub faucet cartridge:
Tools and Materials You'll Need
- Phillips head screwdriver
- Adjustable wrench
- New Delta faucet cartridge
- Bucket or bowl
- Paper towels
Step-by-Step Instructions
Step 1: Turn Off the Water Supply
The first step is to turn off the water supply to the faucet. This is usually done by turning off the two valves that are located under the sink. If you do not know where the valves are located, consult your faucet's installation manual.
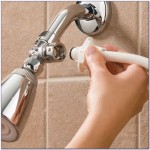
Step 2: Remove the Handle
Once the water supply is turned off, you can remove the handle. To do this, use a Phillips head screwdriver to remove the set screw that is located in the center of the handle. Once the set screw is removed, the handle will come off easily.
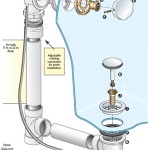
Step 3: Remove the Escutcheon Plate
The escutcheon plate is the decorative plate that covers the base of the faucet. To remove the escutcheon plate, use an adjustable wrench to loosen the retaining nut that is located behind the plate. Once the retaining nut is loosened, the escutcheon plate will come off easily.
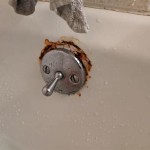
Step 4: Remove the Cartridge
The cartridge is the part of the faucet that controls the flow of water. To remove the cartridge, use an adjustable wrench to loosen the packing nut that is located at the base of the cartridge. Once the packing nut is loosened, the cartridge will come out easily.
Step 5: Install the New Cartridge
To install the new cartridge, simply insert it into the faucet body and tighten the packing nut. Make sure that the cartridge is properly aligned before tightening the packing nut.
Step 6: Reinstall the Escutcheon Plate
Once the new cartridge is installed, you can reinstall the escutcheon plate. To do this, simply place the escutcheon plate over the base of the faucet and tighten the retaining nut.
Step 7: Reinstall the Handle
To reinstall the handle, simply place the handle on the faucet body and tighten the set screw. Make sure that the handle is properly aligned before tightening the set screw.
Step 8: Turn On the Water Supply
Once the handle is reinstalled, you can turn on the water supply to the faucet. Check for leaks and make sure that the faucet is working properly.
Conclusion
Replacing a Delta bathtub faucet cartridge is a relatively simple task that can be completed in about an hour. By following the steps outlined in this article, you can easily replace the cartridge and get your faucet working properly again.

Delta Shower Faucet Cartridge Replacement 1700 Monitor Leak Repair

How To Replace A Delta Cartridge And Fix Leaky Bathtub Faucet It Tutorials

How To Repair A Delta Tub Shower Valve

Delta Monitor Shower Valve Cartridge Replacement

How To Replace A Delta Tub Or Shower Cartridge

Delta Shower Handle Cartridge Replacement Ifixit Repair Guide

Replacing Delta Shower Cartridge

Which Delta Cartridge Do You Have How To Replace A

How To Replace A Delta Tub Shower Cartridge Tutorial No More Leaky Faucet Super Simple Diy

Repairing A Leaky Delta Bath Or Shower Faucet Single Lever And Setting Temp
Related Posts