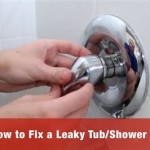
How to Replace a Corroded Bathtub Drain
A corroded bathtub drain is a common plumbing issue that can lead to slow draining, leaks, and potentially water damage in the surrounding areas. Replacing a corroded drain is a task that, while potentially intimidating, can be accomplished by a homeowner with some basic plumbing knowledge and the right tools. This article provides a step-by-step guide on how to safely and effectively replace a corroded bathtub drain.
Before starting any plumbing project, safety should be the primary concern. Turning off the water supply to the bathtub is crucial. Locate the shut-off valves, which are usually found near the water supply lines behind the bathtub. After turning off the valves, open the faucet to release any remaining water pressure in the pipes. If the valves are not readily accessible, the main water supply to the house must be shut off. It's also advisable to wear eye protection and gloves to protect against debris and potential chemical exposure from cleaning products or cleaning agents that may have been used on the drain.
Key Point 1: Preparation and Assessment
The success of a drain replacement significantly depends on thorough preparation and a careful assessment of the existing drain and surrounding plumbing. Gather all the necessary tools and materials before commencing the work. This includes:
- New bathtub drain assembly (ensure it's compatible with the bathtub's specifications)
- Adjustable wrench
- Channel-lock pliers
- Screwdrivers (both flathead and Phillips head)
- Putty knife or scraper
- Old towels or rags
- Penetrating oil (e.g., WD-40)
- Plumber's putty
- Pipe wrench
- Hacksaw or reciprocating saw (if necessary)
- Safety glasses
- Gloves
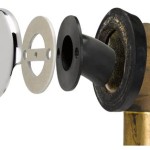
Carefully inspect the corroded drain. Note the type of drain stopper mechanism (e.g., pop-up, lift-and-turn, toe-touch). This information is critical when selecting a replacement drain assembly. Examine the drain flange (the part visible inside the tub) and the drain shoe (the part underneath the tub connected to the drainpipe). Assess the extent of the corrosion. Severe corrosion might require more force to remove the old drain and could potentially damage the bathtub's finish if not addressed carefully. Identifying the type of existing drain and the level of corrosion will help inform the best approach for removal and replacement.
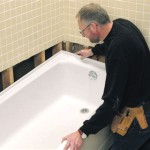
Access to the drainpipe underneath the bathtub is imperative. This typically requires accessing the plumbing through an access panel, often located behind the bathtub or in an adjoining room. If no access panel exists, a small section of the wall may need to be carefully cut open to gain access. Ensure the area is well-lit to facilitate the work.
Key Point 2: Removing the Old Corroded Drain
Removing a corroded drain can be challenging, particularly if the drain is severely rusted or calcified. The process should be approached methodically to avoid damaging the bathtub or plumbing.
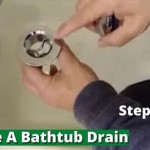
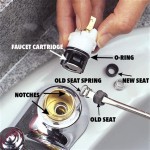
First, remove the drain stopper. The method for removing the stopper varies depending on the type of stopper mechanism. Pop-up stoppers typically have a linkage that can be disconnected from underneath the bathtub. Lift-and-turn stoppers often have a screw that can be loosened to remove the stopper. Toe-touch stoppers usually require unscrewing the top portion of the stopper.
Next, apply penetrating oil to the drain flange and the drain shoe. Allow the oil to soak for at least 15-20 minutes. This helps to loosen any rust or corrosion that may be binding the drain components together. Multiple applications of penetrating oil may be necessary for heavily corroded drains.
Using a drain wrench or a specialized bathtub drain removal tool, attempt to unscrew the drain flange from inside the tub. If a drain wrench is not available, insert the jaws of channel-lock pliers into the drain flange and turn counterclockwise. Apply steady, even pressure. Avoid excessive force, which could damage the bathtub. If the drain flange refuses to budge, gently tap around the flange with a hammer and punch to help break the corrosion bond. Repeat the penetrating oil application and soaking process.
While working on the drain flange from the top, simultaneously hold the drain shoe underneath the bathtub with a pipe wrench or adjustable wrench to prevent it from rotating. This provides leverage and helps loosen the drain flange.
If the drain flange is severely corroded and cannot be unscrewed, a hacksaw or reciprocating saw may be necessary. Carefully cut the drain flange vertically in two or three places. Be extremely cautious not to damage the bathtub's surface. Once the flange is cut, it should be easier to pry out using a putty knife or scraper. Clean all remaining debris from the drain opening using a wire brush or scraper.
After the flange is removed, the drain shoe underneath the bathtub can be unscrewed from the drainpipe. Again, use a pipe wrench or adjustable wrench and apply steady pressure. If the drain shoe is also corroded, repeat the penetrating oil application and soaking process. In extreme cases, the drainpipe itself may need to be cut if the drain shoe cannot be removed without damaging the pipe. This requires additional plumbing skills and may necessitate the assistance of a professional plumber.
Once all the old drain components are removed, thoroughly clean the drain opening and the surrounding area. Remove any old plumber's putty or sealant. Ensure the surface is clean and dry before proceeding with the installation of the new drain.
Key Point 3: Installing the New Bathtub Drain
With the old drain removed and the area cleaned, the installation of the new bathtub drain can begin. This requires careful attention to detail to ensure a watertight seal and proper drainage.
Apply a generous amount of plumber's putty to the underside of the new drain flange. Roll the putty into a rope shape and press it firmly against the edge of the flange. Ensure there are no gaps or breaks in the putty.
Insert the new drain flange into the drain opening from inside the bathtub. Press down firmly to create a good seal between the flange and the bathtub surface. Excess putty will squeeze out from underneath the flange. Remove the excess putty with a putty knife or scraper, ensuring a clean and smooth finish.
From underneath the bathtub, attach the new drain shoe to the drain flange. Tighten the drain shoe securely using a pipe wrench or adjustable wrench. Ensure the drain shoe is properly aligned with the drainpipe. Some drain assemblies utilize rubber gaskets instead of plumber's putty. Follow the manufacturer's instructions for installing these types of drains. The goal is to create a watertight seal between the drain flange, the bathtub, and the drain shoe.
Connect the drain shoe to the drainpipe. Use Teflon tape on the threads of the drainpipe to ensure a watertight connection. Tighten the connection securely using a pipe wrench. Avoid overtightening, which could damage the drainpipe or the drain shoe. Check for any leaks around the connection.
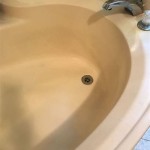
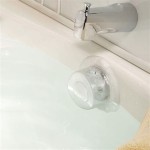
Install the new drain stopper according to the manufacturer's instructions. Ensure the stopper functions properly and seals the drain effectively. Test the drain by filling the bathtub with water and then releasing the stopper. Observe the draining speed and check for any leaks around the drain flange, the drain shoe, and the drainpipe connection.
If leaks are detected, tighten the connections further. If the leaks persist, disassemble the drain and reapply plumber's putty or Teflon tape. Ensure all components are properly aligned and securely tightened. It may be necessary to replace the drain assembly if the leaks cannot be resolved.
After confirming that the drain is functioning properly and there are no leaks, replace the access panel or repair the wall that was cut open to access the plumbing. Ensure the area is clean and dry. Dispose of the old drain components and any used materials properly.
The replacement of a corroded bathtub drain requires patience, attention to detail, and a methodical approach. By following these steps, a homeowner can successfully complete the project and restore proper drainage to the bathtub.

Remove Old Corroded Tub Drain No Tools Needed

How To Remove Broken Bathtub Drain Without Special Removal Tool Cross Members

Fix And Prevent Corrosion On A Bath Tub Drain Hometalk

How To Remove A Corroded Bathtub Drain

How To Remove A Corroded Bathtub Drain

Plumbing How Do I Replace A Broken Bathtub Drain Home Improvement Stack Exchange

How To Remove A Bathtub Drain The Home Depot

Problems Removing Tub Drain Diy Home Improvement Forum

Replace That Corroded Tub Drain Easy

Replace That Corroded Tub Drain Easy
Related Posts