How To Replace a Bathtub Surround
Replacing a bathtub surround is a home improvement project that can significantly enhance the aesthetic appeal and functionality of a bathroom. Over time, bathtub surrounds can become outdated, damaged, or prone to mold and mildew growth. A new surround can revitalize the space, improve water resistance, and simplify cleaning. This article provides a comprehensive guide to the process of replacing a bathtub surround, outlining the necessary steps and considerations for successful completion.
Before embarking on this project, it is crucial to assess the existing surround and determine the appropriate replacement material. Common materials include acrylic, fiberglass, tile, and composite panels. Each material offers unique advantages and disadvantages in terms of cost, durability, ease of installation, and aesthetic appeal. Careful consideration of these factors will ensure a satisfactory outcome.
Furthermore, it's recommended to check local building codes and regulations that may pertain to bathroom renovations and plumbing modifications. Obtaining necessary permits and adhering to code requirements will prevent potential issues and ensure the project complies with legal standards.
Preparing for the Tub Surround Replacement
Proper preparation is essential for a smooth and efficient bathtub surround replacement. This phase involves gathering the necessary tools and materials, as well as protecting the surrounding area from damage.
Gathering the necessary tools and materials: The following tools are typically required for this project:
- Utility knife
- Screwdriver (various sizes)
- Pry bar
- Caulk gun
- Level
- Tape measure
- Safety glasses
- Gloves
- Dust mask
- Construction adhesive
- Caulk
- Putty knife or scraper
- New bathtub surround kit or individual panels
- Backer board (if needed)
- Cement board screws
- Circular saw or tile saw (if necessary)
- Drill with appropriate bits
Protecting the surrounding area: Before commencing the demolition process, it is important to protect the bathroom floor and any nearby fixtures. Drop cloths or plastic sheeting should be used to cover the floor, toilet, vanity, and any other vulnerable surfaces. This will prevent debris, dust, and accidental damage from occurring during the removal and installation phases.
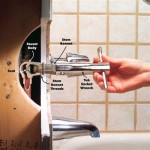
Shutting off the water supply: Prior to removing any plumbing fixtures, such as the showerhead or faucet, the water supply to the bathtub and shower must be shut off. Locate the shut-off valves for the hot and cold water lines and turn them off. If individual shut-off valves are not present, the main water supply to the house may need to be temporarily shut off.
Removing the Existing Bathtub Surround
The removal of the old bathtub surround is a crucial step that requires caution and precision. Improper removal can damage the underlying wall structure and create additional work. Different types of surrounds require slightly different removal techniques.
Cutting through the caulk: Use a utility knife to carefully cut through the caulk lines along the seams where the surround meets the bathtub, walls, and ceiling. This will help to loosen the surround and prevent it from pulling off pieces of the drywall during removal. A flexible putty knife or scraper can also be used to assist in separating the surround from the wall.
Removing the panels: Depending on the type of surround, the panels may be attached with adhesive, screws, or a combination of both. If screws are present, use a screwdriver to remove them. If adhesive is used, carefully pry the panels away from the wall using a pry bar. Start at a corner or edge and work slowly, applying gentle pressure to avoid damaging the wall. In some cases, heating the adhesive with a heat gun on a low setting can help to soften it and make removal easier. Exercise caution when using a heat gun to avoid overheating the material or causing a fire hazard.
Addressing the backer board: Once the surround panels are removed, inspect the underlying backer board, if present. Backer board, typically made of cement board, provides a moisture-resistant surface for the surround to adhere to. If the backer board is damaged or deteriorated, it should be replaced. Cut the backer board to size using a circular saw or tile saw and attach it to the wall studs with cement board screws. Ensure that the seams between the backer board pieces are properly sealed with cement board tape and thin-set mortar.
Cleaning the area: After removing the old surround and backer board (if applicable), thoroughly clean the area to remove any remaining adhesive, caulk, or debris. A clean, dry surface is essential for proper adhesion of the new surround. Use a scraper to remove any stubborn residue and wipe down the walls with a damp cloth.
Installing the New Bathtub Surround
Installing the new bathtub surround requires careful measurement, precise cutting, and proper adhesion to the wall surface. Close adherence to the manufacturer's instructions is critical for achieving a professional-looking and watertight result.
Measuring and cutting the panels: Accurately measure the dimensions of the bathtub enclosure and transfer these measurements to the new surround panels. Use a circular saw or tile saw to cut the panels to the correct size and shape. It is advisable to make the cuts slightly larger than necessary and then fine-tune them with a file or sandpaper for a perfect fit. Dry-fit the panels in place to ensure that they fit properly before applying adhesive.
Applying adhesive: Apply construction adhesive to the back of the surround panels according to the manufacturer's instructions. Typically, this involves applying beads of adhesive in a zigzag pattern across the entire surface of the panel. Be sure to use a construction adhesive that is specifically designed for use with bathroom surfaces and that is compatible with the material of the surround panels.
Positioning and securing the panels: Carefully position the surround panels against the wall, ensuring that they are properly aligned and level. Press the panels firmly against the wall to ensure good contact with the adhesive. Use shims or spacers to hold the panels in place while the adhesive cures. The manufacturer's instructions will specify the recommended curing time for the adhesive.
Caulking the seams: Once the adhesive has cured, apply a bead of caulk along all the seams where the surround meets the bathtub, walls, and ceiling. Use a high-quality mildew-resistant caulk to prevent mold and mildew growth. Smooth the caulk line with a wet finger or a caulk smoothing tool for a professional finish. Allow the caulk to dry completely before using the shower or bathtub.
Reinstalling plumbing fixtures: Reinstall the showerhead, faucet, and any other plumbing fixtures that were removed during the demolition process. Ensure that all connections are tight and watertight to prevent leaks. Turn the water supply back on and check for any leaks around the fixtures and the surround panels.
Final inspection: Conduct a final inspection of the installed bathtub surround to ensure that all seams are properly caulked, all panels are securely attached, and all plumbing fixtures are functioning correctly. Address any issues or imperfections before considering the project complete.
Replacing a bathtub surround is a project that requires careful planning, preparation, and execution. Following the steps outlined in this guide will equip homeowners with the knowledge and skills necessary to achieve a successful and aesthetically pleasing result. While this article aims to provide detailed guidance, if uncertainty arises at any point, consulting with a professional contractor is always advisable.

How To Install A Bath Tub Surround

How To Install A Bath Tub Surround

3 Ways To Install A Tub Surround Wikihow Life

How To Replace A Bathtub Step By

Semi Diy Bathroom Remodel Replacing A Tub Surround The Bathtub Tile

How To Install A Glue Up Shower Enclosure The Home Depot

How To Install A Glue Up Shower Enclosure The Home Depot

Semi Diy Bathroom Remodel Replacing A Tub Surround The Bathtub Tile

3 Ways To Install A Tub Surround Wikihow Life

How To Install A Bathtub An Acrylic Tub And Surround Diy