How To Replace A Bathtub with a Standing Shower
Replacing a bathtub with a standing shower is a significant home renovation project that can dramatically transform your bathroom's functionality and aesthetics. It can offer a more modern and accessible space, especially for individuals with mobility limitations. This article will guide you through the essential steps involved in this renovation, outlining the process from planning to completion.
1. Planning and Preparation
The first step is to carefully plan and prepare for the project. This involves assessing your current bathroom layout, understanding the necessary plumbing modifications, and gathering the required materials and tools.
1.1. Assess Your Bathroom Layout
Begin by carefully evaluating the existing layout of your bathroom. Consider the size and shape of the bathtub area, the location of drain pipes, and the proximity to other fixtures. Take measurements and create a sketch to visualize how a standing shower would fit into the space.
1.2. Determine Plumbing Modifications
Next, analyze the plumbing situation. Will existing drain pipes be compatible with a new shower drain? Do you need to relocate or install new supply lines for the showerhead? Consider engaging a licensed plumber to assess these aspects and advise on any necessary adjustments.
1.3. Gather Materials and Tools
Before starting the renovation, ensure you have the necessary materials and tools. This includes: * Shower pan and base unit * Shower walls (tile, acrylic, or other material) * Shower door, enclosure, or curtain * Showerhead and arm * Plumbing fixtures (faucet, shower valve, drain) * Tile adhesive and grout (if tiling) * Waterproof membrane * Cutting tools, sealant, and other installation materials * Safety equipment (gloves, goggles, etc.)
2. Removal of the Existing Bathtub
Once you have planned and prepared, it's time to remove the existing bathtub. This step requires careful demolition and may require assistance.
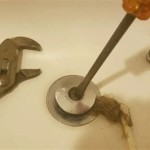
2.1. Disconnect the Plumbing
Begin by turning off the water supply to the bathtub and drain the water. Carefully disconnect the supply lines and the drain pipe. Make sure you have a bucket or drain pan to catch any remaining water.
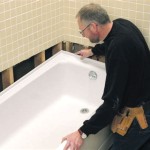
2.2. Demolish the Bathtub
Using a crowbar or other appropriate tools, carefully remove the bathtub. Be mindful of adjacent walls and fixtures. The bathtub may need to be broken into smaller pieces for removal.
2.3. Remove the Bathtub Surround
Carefully detach the existing bathtub surround, which may be made of tile, drywall, or other materials. Remove any remaining adhesive and debris.
3. Installing the Shower Base and Walls
With the bathtub removed, you can begin installing the shower base and walls. This requires careful preparation and precise installation.
3.1. Install the Shower Base
First, install the shower base according to the manufacturer's instructions. This may involve leveling, securing, and waterproofing the base. Ensure the drain is properly connected to the existing drainage system.
3.2. Install the Shower Walls
Install the shower walls, whether made of tile, acrylic, or another material. Follow the manufacturer's guidelines for installation and ensure the walls are securely attached to the base and surrounding structure. If tiling, apply a waterproof membrane and adhesive to the walls before installing the tiles.
4. Plumbing and Fixture Installation
Once the shower base and walls are in place, you can install the plumbing fixtures and showerhead.
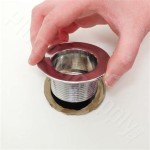
4.1. Connect the Plumbing
Connect the shower supply lines to the existing plumbing system, ensuring secure connections. Securely connect the shower drain to the base drain.
4.2. Install the Showerhead and Faucet
Install the showerhead and arm according to the manufacturer's specifications. Connect the shower valve to the supply lines, ensuring a tight seal. Ensure the faucet is properly installed and securely attached.
5. Finishing Touches
With the shower base, walls, and plumbing installed, you can move on to the finishing touches. This includes installing the shower door or enclosure, grouting if tiling, and sealing.
5.1. Install the Shower Door or Enclosure
Install the shower door or enclosure, ensuring a proper fit and secure attachment. Make sure the door or enclosure is properly sealed to prevent leaks.
5.2. Grout the Tiles (If Applicable)
If you have tiled the shower walls, apply grout to the tile joints. Ensure the grout is properly mixed and applied, allowing it to cure according to the manufacturer's instructions.
5.3. Apply Sealant
Apply sealant around the edges of the shower base, door or enclosure, and any other areas that require sealing. Allow the sealant to cure completely before using the shower.

How To Convert A Tub Surround Walk In Shower Bathroom Renovation

Sweeten Bathtub To Shower Conversions That Add Style Space

How To Convert A Tub Walk In Shower Budget Dumpster

Diy Shower Remodel Start To Finish Part 1 Of 2

Bathtub Removal To Standing Shower Conversion Ilet Pte Ltd

How To Convert A Tub Walk In Shower Budget Dumpster

Can I Put A Shower Over Freestanding Bath Bella Bathrooms Blog

Pros And Cons Of Walk In Showers Naperville Il

Three Ways To Add A Shower Walk In Bathtub Posh Living

How To Convert A Tub Shower Walk In Part 1
Related Posts