How to Replace a Bathtub Soap Holder: A Step-by-Step Guide
Does your bathtub soap holder look rusty, broken, or just plain unsightly? It's time to replace it. While it may seem like a daunting task, replacing a bathtub soap holder is actually quite simple. In this guide, we'll walk you through the process step-by-step, so you can get a fresh, functional soap holder in no time.
### Step 1: Gather Your MaterialsBefore you start, you'll need to gather a few essential materials:
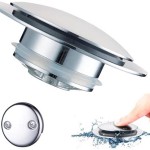
- New soap holder
- Phillips head screwdriver
- Drill with 1/4-inch drill bit (for new installations only)
- Silicone caulk
- Caulk gun
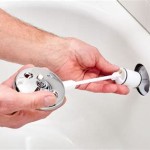
The first step is to remove the old soap holder. Start by unscrewing the mounting screws using the Phillips head screwdriver. If the screws are rusted or stuck, you may need to use a drill to remove them.
### Step 3: Clean the Mounting Surface (New Installations Only)If you're installing a new soap holder, the next step is to clean the mounting surface where the soap holder will be installed. Use a damp cloth or sponge to remove any dirt or debris.
### Step 4: Drill Pilot Holes (New Installations Only)For new installations, you'll need to drill pilot holes to guide the mounting screws. Use a 1/4-inch drill bit to create two pilot holes in the marked locations.
### Step 5: Install the New Soap HolderPosition the new soap holder over the pilot holes (or the old mounting holes for replacements), and insert the mounting screws. Tighten the screws until the soap holder is securely in place.
### Step 6: Apply CaulkTo prevent water from leaking behind the soap holder, apply a bead of silicone caulk around the edges of the soap holder where it meets the wall. Use a caulk gun to apply the caulk evenly.
### Step 7: Smooth the CaulkUse your finger or a caulk tool to smooth the caulk and create a clean, sealed edge. Remove any excess caulk.
### Step 8: Let the Caulk CureAllow the caulk to cure for 24 hours before using the soap holder. This will give the caulk time to fully set and create a waterproof seal.
### TipsHere are a few tips for replacing a bathtub soap holder:
- If the old soap holder is difficult to remove, try soaking it in a solution of vinegar and water for a few minutes. This will help loosen the screws.
- When installing a new soap holder, make sure to use screws that are the appropriate length. Too-short screws will not hold the soap holder securely, while too-long screws may damage the wall.
- Apply painter's tape around the soap holder before caulking to create a clean line and prevent caulk from getting on the wall.

How To Remove And Install Soap Dish Holder Tile

Replacing Ceramic Soap Dish Harder Than You Think The Spokesman Review

How To Install A Soap Dish In Tile Shower

How To Install A Ceramic Soap Dish

Soap Dish Fell Off Ceramic Tile Advice Forums John Bridge

Soap Holder Dish For Shower Suction Cup Wall Mounted No Drilling Self Draining Removable Waterproof Strong Vacuum Bar Sponge Bathroom Bathtub Kitchen Sink Com

How To Replace A Kitchen Sink Soap Dispenser Exquisitely Unremarkable

Yubnlvae Drain Rack Shower Wall Soap Dish Holder Mounted Draining For Bathroom Tile Rectangle Bar Soapdish With Perforation Replacement Suction Soapholder Kitchen Supplies Com

Removing Embedded Soap Dish Thing Help Ceramic Tile Advice Forums John Bridge

Franklin Brass Futura Wall Mounted Soap Dish In White D2406w The Home Depot
Related Posts