How To Replace a Bathtub Overflow Plate With Trip Lever
The bathtub overflow plate, often a seemingly insignificant component, plays a crucial role in preventing water damage by directing excess water down the drain when the tub is filled beyond a certain point. Over time, these plates, especially those incorporating a trip lever for drain control, can corrode, break, or simply become aesthetically unappealing. Replacing the overflow plate is a relatively straightforward plumbing task that can often be accomplished by a homeowner with basic tools and a clear understanding of the process. This article provides a comprehensive guide on how to replace a bathtub overflow plate with a trip lever, ensuring a functional and visually pleasing update to the bathroom fixture.
Prior to commencing the replacement process, safety remains paramount. It is essential to gather all necessary tools and materials and to understand the type of overflow assembly present in the bathtub. The trip lever mechanism, common in many bathtubs, requires careful attention to ensure proper alignment and functionality upon reinstallation. A thorough assessment of the existing setup will contribute to a smooth and successful replacement.
Preparing for the Replacement
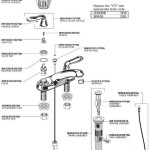
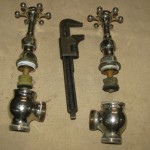
Before initiating the replacement, it is crucial to gather the necessary tools and materials. This proactive step will minimize interruptions and ensure a seamless workflow. The required tools typically include a screwdriver (usually a Phillips head, but a flathead might be necessary for some older models), pliers (potentially needed to loosen tight connections or remove stubborn parts), a new overflow plate with trip lever assembly, plumber's putty or silicone sealant, and a clean rag or sponge.
The selection of the new overflow plate is critical. It is imperative to choose a replacement that is compatible with the existing bathtub drain system. Measure the distance between the screw holes on the existing plate to ensure a proper fit with the new plate. Similarly, verify that the length of the trip lever mechanism is appropriate for the depth of the bathtub. A mismatch in these dimensions can lead to improper drain closure or difficulty in installation. Purchasing a universal replacement kit can sometimes alleviate compatibility concerns, as these kits often include multiple adapter pieces to accommodate various configurations.
Shutting off the water supply to the bathtub is generally not required for this particular replacement. However, it is always a good practice to have a bucket or towels readily available to catch any residual water that may trickle down from the overflow pipe. This precautionary measure helps prevent minor spills and potential water damage to the surrounding area.
Removing the Old Overflow Plate
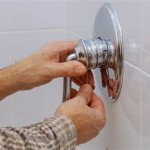
The first step in the replacement process involves carefully removing the old overflow plate. Using the appropriate screwdriver, loosen and remove the screws that secure the plate to the bathtub. These screws may be corroded or stuck, requiring a bit of patience. If the screws are particularly stubborn, a penetrating oil or lubricant can be applied to help loosen them. Allow the lubricant to soak in for a few minutes before attempting to remove the screws again.
Once the screws are removed, gently pull the overflow plate away from the bathtub. If the plate is sealed with caulk or plumber's putty, it may be necessary to use a utility knife to carefully score around the edges of the plate to break the seal. Avoid applying excessive force, as this could damage the bathtub's finish.
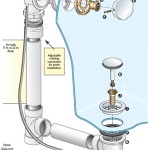
With the plate removed, the trip lever mechanism will be exposed. This mechanism typically consists of a linkage rod that connects the trip lever to a plunger or stopper in the drainpipe. Carefully examine the linkage rod and how it connects to both the lever and the drain stopper. This observation will be helpful during the reinstallation process.
To remove the trip lever mechanism, gently pull the linkage rod upwards. It may be necessary to rotate the rod slightly to disengage it from the drain stopper. If the rod is stuck, avoid forcing it. Instead, try applying a small amount of lubricant to the connection points and gently wiggling the rod until it comes free. Once the linkage rod is removed, inspect the drain stopper for any signs of damage or wear. If the stopper is damaged, it may need to be replaced as well.
Clean the area around the overflow opening thoroughly. Remove any old caulk, plumber's putty, or debris that may be present. A clean surface is essential for ensuring a proper seal with the new overflow plate.
Installing the New Overflow Plate
Before installing the new overflow plate, apply a small amount of plumber's putty or silicone sealant to the back of the plate around the overflow opening. This sealant will create a watertight seal and prevent leaks. Ensure that the sealant is applied evenly and that it covers the entire perimeter of the opening.
Carefully insert the new trip lever mechanism into the overflow opening, aligning the linkage rod with the drain stopper. It may be necessary to adjust the position of the stopper slightly to ensure proper engagement. Refer to the observations made during the removal of the old mechanism to guide this process.
Secure the new overflow plate to the bathtub using the screws provided with the replacement kit. Tighten the screws evenly, avoiding over-tightening, which could crack the plate or damage the bathtub. As the screws are tightened, excess sealant will be squeezed out from behind the plate. Wipe away any excess sealant with a clean rag or sponge.
Test the trip lever to ensure that it is functioning correctly. The lever should move smoothly and engage the drain stopper fully, creating a watertight seal. If the lever is not working properly, check the alignment of the linkage rod and the drain stopper. Adjust the position of the rod or stopper as needed until the lever functions as intended.
Allow the sealant to cure completely according to the manufacturer's instructions. This curing time is essential for ensuring a watertight seal. During this time, avoid using the bathtub to prevent any disturbance to the newly installed overflow plate.
Once the sealant has cured, inspect the installation for any leaks. Fill the bathtub with a small amount of water and check around the overflow plate for any signs of seepage. If a leak is detected, tighten the screws slightly or apply additional sealant as needed. If the leak persists, it may be necessary to remove the plate and reapply the sealant, ensuring that the surface is clean and dry before reinstallation.
Finally, clean the bathtub and surrounding area thoroughly. Remove any remaining debris or sealant residue. With the new overflow plate installed and functioning correctly, the bathtub is ready for use. Regular maintenance, such as cleaning the overflow plate and drain stopper, will help prevent future problems and prolong the lifespan of the assembly.

How To Replace Bathtub Overflow Plate With Trip Lever Easy Simple

How To Replace Bathtub Overflow Plate With Trip Lever Easy Diy Guide

How To Fix A Trip Lever Bathtub Drain Stopper Hofen

Plumbing Can I Replace This Trip Lever Drain Stopper Combo By Myself Home Improvement Stack Exchange

How To Replace Bathtub Drain Stopper With A Lift And Turn Diy

How To Replace Your Bathtub Drain Lever Faceplate

Plumbing Can I Replace This Trip Lever Drain Stopper Combo By Myself Home Improvement Stack Exchange

How To Replace A Trip Lever Tub Stopper Eagle Mountain Woodford Watco Blog

Drain Overflow Assemblies Fine Homebuilding

Bath Tub Trip Lever Stopper Replacement Or Adjustnment
Related Posts