How to Replace a Bathtub Faucet Valve
Replacing a bathtub faucet valve is a relatively simple do-it-yourself project that can be completed in under an hour. Tools required for this task include a flat-head screwdriver, a Phillips-head screwdriver, a wrench, pliers, and a new faucet valve.
1. Turn off the Water Supply: Before you start, turn off the water supply to the tub by closing the shut-off valves under the sink. If your tub does not have shut-off valves, you may need to turn off the water supply to the entire house.
2. Remove the Handle: Using a screwdriver, remove the handle by unscrewing the set screw that is located under the handle. Once the set screw is removed, pull the handle straight up to remove it.
3. Remove the Escutcheon Plate: Behind the handle is the escutcheon plate, which is typically held in place by screws. Remove these screws and carefully pull the escutcheon plate away from the wall.
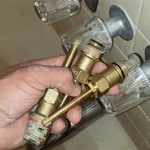
4. Remove the Cartridge: Once the escutcheon plate is removed, you will see the cartridge. Use a wrench to loosen the cartridge nut and then pull the cartridge straight out of the faucet body.
5. Install the New Cartridge: Insert the new cartridge into the faucet body and tighten the cartridge nut. Be sure not to overtighten the nut, as this can damage the cartridge.
6. Reassemble the Faucet: Place the escutcheon plate back over the faucet body and secure it with the screws. Then, put the handle back on and tighten the set screw.
7. Turn on the Water Supply: Turn on the water supply to the tub and check for any leaks. If there are any leaks, tighten the cartridge nut or the escutcheon plate screws a little further.
By following these steps, you can easily replace a bathtub faucet valve and get your tub running again in no time.

Here S How Replace A Shower Mixing Valve

Fixing Faucets How To Replace A Difficult Tub Faucet Cartridge

Bath Tub Cartridge Replacement Ifixit Repair Guide

How To Fix A Leaking Bathtub Faucet Repair Tub

How To Install A Tub Spout The Home Depot With Thisoldhouse

How To Replace A Shower Valve Like Professional Plumber

How To Fix A Leaking Bathtub Faucet Diy Family Handyman

How To Repair Replace Tub Water Valve Seat Fast Easy

How To Fix A Leaky Bathtub Faucet 6 Ways Stop Drips

How To Fix A Leaking Bathtub Faucet The Home Depot