How To Replace Bathtub Faucet Handles: A Comprehensive Guide
Replacing bathtub faucet handles is a common home maintenance task that can significantly improve the appearance and functionality of a bathroom. Worn, damaged, or outdated handles not only detract from the overall aesthetic but can also become difficult to operate, leading to leaks and wasted water. This guide provides a step-by-step process for replacing bathtub faucet handles, ensuring a smooth and successful installation.
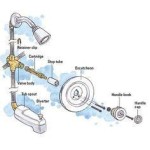
Before commencing the replacement process, it is crucial to understand the different types of bathtub faucets. Faucets generally fall into a few categories: compression, ball, cartridge, and ceramic disc. Compression faucets, often found in older homes, utilize rubber washers that are compressed to stop the flow of water. Ball faucets use a slotted ball to control water flow and temperature. Cartridge faucets employ a cartridge mechanism that moves up and down to control the water. Ceramic disc faucets are the most modern type, using two ceramic discs that slide over each other to regulate water flow. Identifying the type of faucet installed is essential for selecting the correct replacement handles and understanding the underlying mechanics.
The selection of replacement handles should be based on both aesthetic preference and compatibility with the existing faucet. Ensure the handles are the correct size and style for the specific faucet type. Consider the material of the handles, with options including metal, plastic, and ceramic. Metal handles are typically more durable and resistant to wear and tear, while plastic handles are often more affordable. Ceramic handles offer a classic and elegant look but can be more prone to chipping or cracking. It’s also crucial to consider the finish of the handles, such as chrome, brushed nickel, or oil-rubbed bronze, to match the existing bathroom fixtures.
Essential Tools and Materials
Before starting the replacement, gather all necessary tools and materials. This preparation streamlines the process and minimizes potential disruptions. The following is a comprehensive list of items typically required:
- New bathtub faucet handles
- Screwdrivers (both flathead and Phillips head)
- Adjustable wrench
- Pliers
- Allen wrench set (if applicable)
- Penetrating oil (e.g., WD-40)
- Plumber's tape
- Clean cloths or rags
- Bucket
- Flashlight
Having these tools readily available will contribute to a more efficient and less frustrating experience. It is also recommended to have a small container to store screws and other small parts to avoid misplacing them.
Step-by-Step Handle Replacement Procedure
The actual replacement process involves several key steps, each requiring careful attention to detail. Safety is paramount, so always ensure the water supply is shut off before proceeding.
1. Shut Off the Water Supply: The first and most critical step is to shut off the water supply to the bathtub faucet. Locate the shut-off valves for both the hot and cold water lines. These valves are typically located either under the bathtub behind an access panel, in an adjacent room, or in the basement. Turn the valves clockwise until they are completely closed. After closing the valves, turn on the bathtub faucet to relieve any remaining pressure in the pipes. If water continues to flow, the shut-off valves may not be functioning correctly and require repair or replacement before proceeding.
2. Remove the Existing Handles: Examine the existing faucet handles to determine how they are attached. Most handles are secured with either a visible screw or a hidden screw covered by a decorative cap. If there is a cap, carefully pry it off using a small flathead screwdriver. Be gentle to avoid damaging the cap. Once the screw is exposed, use the appropriate screwdriver (Phillips head or flathead) to loosen and remove it. If the screw is corroded or difficult to remove, apply a small amount of penetrating oil and allow it to sit for a few minutes before attempting to loosen it again. After removing the screw, carefully pull the handle straight off the faucet stem. If the handle is stuck, gently wiggle it back and forth while pulling outwards. Avoid using excessive force, as this could damage the faucet stem or the surrounding plumbing.
3. Prepare the Faucet Stem: Once the old handle is removed, inspect the faucet stem for any corrosion or mineral buildup. Clean the stem with a clean cloth or rag. If there is significant buildup, use a small wire brush or steel wool to carefully remove it. Be careful not to scratch or damage the stem. Applying a small amount of plumber's grease to the stem can help ensure smooth operation of the new handle.
4. Install the New Handles: Align the new handle with the faucet stem. Ensure the handle is oriented correctly (hot or cold). Slide the handle onto the stem until it is fully seated. Secure the handle with the screw that was removed from the old handle. If the new handles came with new screws, use those instead. Tighten the screw firmly, but avoid over-tightening, as this could damage the handle or the faucet stem. If the handle has a decorative cap, carefully snap it back into place.
5. Test the New Handles: After installing the new handles, slowly turn the water supply back on by opening the shut-off valves counterclockwise. Check for leaks around the handles and the faucet spout. If there are any leaks, immediately shut off the water supply and re-tighten the handle screws or check the O-rings or washers inside the faucet. Once the leaks are resolved, test the handles to ensure they operate smoothly and control the water flow and temperature properly. Turn the handles on and off several times to ensure they are functioning correctly.
Addressing Common Issues
During the handle replacement process, several common issues may arise. Understanding how to address these issues can prevent frustration and ensure a successful outcome.
Stuck Handles: If the old handles are stuck and difficult to remove, applying penetrating oil can help loosen them. Spray the oil around the base of the handle and allow it to sit for several minutes before attempting to remove the handle again. Gently wiggling the handle back and forth while pulling outwards can also help to break it free. Avoid using excessive force or tools that could damage the faucet or the surrounding plumbing.
Stripped Screws: If the screw securing the handle is stripped and cannot be removed, try using a rubber band or steel wool between the screwdriver and the screw head to provide more grip. Alternatively, a screw extractor tool can be used to remove the stripped screw. If the screw is severely corroded, it may be necessary to drill it out. This should be done with caution to avoid damaging the faucet stem.
Leaks After Installation: If there are leaks after installing the new handles, check the O-rings or washers inside the faucet. These may be worn or damaged and require replacement. Plumber's tape can also be used to seal the threads of the faucet stem or the handle screws. If the leaks persist, it may be necessary to replace the entire faucet.
Incompatible Handles: If the new handles are not compatible with the existing faucet, they will not fit properly or operate correctly. Ensure the handles are the correct size and style for the specific faucet type before attempting to install them. If the handles are slightly too large, they may be able to be modified with a file or sandpaper. However, if they are significantly too small, they will need to be replaced with compatible handles.
Preventative Maintenance Tips
Regular maintenance can extend the life of bathtub faucet handles and prevent future problems. Here are some preventative maintenance tips:
Clean Regularly: Clean the faucet handles regularly with a mild soap and water solution. Avoid using abrasive cleaners or scouring pads, as these can damage the finish. Regularly cleaning the handles will help prevent mineral buildup and corrosion.
Lubricate Moving Parts: Periodically lubricate the moving parts of the faucet handles with plumber's grease. This will help ensure smooth operation and prevent sticking or binding.
Check for Leaks: Regularly check for leaks around the handles and the faucet spout. Addressing leaks promptly can prevent water damage and save money on water bills.
Replace Worn Parts: Replace worn O-rings, washers, and other parts as needed. These parts are relatively inexpensive and easy to replace, and replacing them can prevent more serious problems down the road.
Winterize Properly: If the bathtub faucet is located in an area that is subject to freezing temperatures, winterize it properly to prevent damage from frozen pipes. This may involve draining the water from the pipes or insulating them to prevent them from freezing.
By following these steps and tips, homeowners can successfully replace bathtub faucet handles and maintain their bathroom fixtures for years to come. Proper planning, careful execution, and regular maintenance are the keys to a successful and long-lasting installation. Remember to prioritize safety by shutting off the water supply before beginning any plumbing work. If unsure about any step, consulting a qualified plumber is always recommended.

Fast Way To Replace Or Retrofit A Two Handle Shower System With One

2 Handle Shower Faucet Replacement 1 Tom Plumber

Fast Way To Replace Or Retrofit A Two Handle Shower System With One

Repairing A Leaky Two Three Handle Tub Shower Faucet

How To Remove Old Bathtub Plumbing

How To Fix A Leaking Bathtub Faucet Diy Family Handyman

2 Handle Shower Faucet Replacement 1 Tom Plumber

How To 008 Leaking Bathtub Faucet Delta Handle Removal

Plumbing How To Replace A Jacuzzi Bathtub Faucet Home Improvement Stack Exchange

Valley Shower Valve Repair Parts
Related Posts