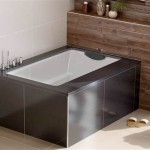
How To Replace Bathtub Faucet Handles
Replacing bathtub faucet handles is a common plumbing task that homeowners can often undertake themselves, saving on the cost of a professional plumber. This project primarily involves removing the old handles and installing new ones, which can refresh the look of a bathroom or address issues like worn-out or damaged handles. Success hinges on careful preparation, understanding the type of faucet system involved, and following systematic steps throughout the process.
Before beginning, it is crucial to gather all necessary tools and materials. A typical list would include: a new set of bathtub faucet handles compatible with the existing faucet stem, a screwdriver set (both flathead and Phillips head), pliers, an adjustable wrench, penetrating oil, a utility knife, a rag or sponge, and possibly a handle puller. The handle puller is especially useful if the existing handles are corroded or stuck.
The first and arguably most important step is to shut off the water supply to the bathtub. This prevents any water leakage or potential flooding during the handle replacement. Locate the shut-off valves for the hot and cold water lines leading to the bathtub. These valves are commonly found in the basement, crawl space, or utility closet adjacent to the bathroom. Turn them clockwise until they are fully closed. After shutting off the water, turn on the existing bathtub faucet to relieve any residual pressure in the pipes.
Identifying the Faucet Type
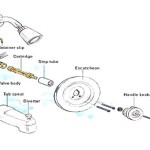
Bathtub faucets come in various types, and understanding the specific type is essential for a successful handle replacement. The most common types include compression faucets, ball faucets, cartridge faucets, and ceramic disc faucets. Each type has a distinct internal mechanism and requires slightly different handling during the replacement process.
Compression faucets are the oldest and simplest type. They utilize separate hot and cold water handles. The handles operate a stem with a rubber washer at the end. When the handle is turned, the washer presses against the valve seat to stop the flow of water. These faucets are generally identified by their tendency to drip when the washers are worn.
Ball faucets, cartridge faucets, and ceramic disc faucets are all single-handle faucets, although dual-handle versions exist. Ball faucets have a slotted metal ball inside the faucet body that controls the water flow and temperature. Cartridge faucets employ a cylindrical cartridge that moves up and down or rotates to regulate the water. Ceramic disc faucets feature two ceramic discs that slide over each other to control the water flow. Knowing the type of faucet allows homeowners to anticipate the internal components and the potential challenges associated with their removal and replacement.
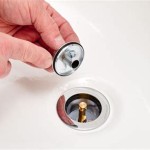
Once the water supply is shut off and the faucet type identified, the removal of the old handles can begin. The process varies depending on the faucet design but generally involves locating and removing a decorative cap or screw that secures the handle to the faucet stem.
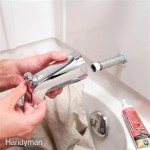
For compression faucets, examine the handle for a small, decorative cap, usually located on the front or top of the handle. This cap can often be pried off with a small flathead screwdriver or utility knife. Be careful not to damage the surrounding finish. Beneath the cap, a screw will be visible. Use the appropriate screwdriver (Phillips head or flathead) to loosen and remove the screw. Once the screw is removed, the handle should pull straight off the stem. If the handle is stuck, apply penetrating oil around the base of the handle and allow it to sit for a few minutes before gently trying to pull it off again. A handle puller can be used as a last resort, but exercise caution to avoid damaging the faucet body or the underlying stem.
For single-handle faucets (ball, cartridge, or ceramic disc), the handle removal process may involve locating a setscrew, often hidden beneath the handle or on the side. This setscrew typically uses a small Allen wrench. Loosen the setscrew and carefully pull the handle off the faucet body. If the handle is difficult to remove, apply penetrating oil as needed. Some single-handle faucets may have a different mechanism, so a visual inspection of the handle construction is essential.
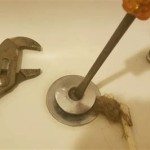
After removing the old faucet handles, it is advisable to clean the exposed valve stems. Use a rag or sponge to remove any mineral deposits or corrosion. This will ensure a smooth fit for the new handles. If the stems are heavily corroded, a wire brush or a specialized plumbing cleaning solution can be used.
Installing the New Faucet Handles
The installation of the new faucet handles is essentially the reverse of the removal process. First, ensure that the new handles are compatible with the existing faucet stems. Carefully slide the new handles onto the stems. For compression faucets, align the handle with the stem and secure it with the screw that was removed earlier. Replace the decorative cap on the handle. For single-handle faucets, align the handle with the faucet body and tighten the setscrew to secure it in place.
When tightening the screws or setscrews, avoid over-tightening, as this can damage the handles or the underlying stems. A snug fit is sufficient to hold the handles securely in place. Over-tightening can also strip the threads of the screws or setscrews, making future removal difficult.
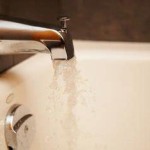
After the new handles are installed, turn the water supply back on slowly. Monitor the faucets for any leaks around the base of the handles or from the spout. If leaks are present, carefully tighten the screws or setscrews on the handles. If the leaks persist, the underlying valve stems may need to be replaced or repaired. In this case, consulting with a professional plumber is recommended.
With the water supply fully restored, test the operation of the new handles. Ensure that they turn smoothly and control the water flow and temperature effectively. Check for any unusual noises or vibrations coming from the faucet. If any problems are detected, re-examine the installation and make any necessary adjustments.
In certain situations, the old faucet handles may be severely corroded or damaged, making their removal particularly challenging. In such cases, specialized tools and techniques may be required. For example, a handle puller can be used to exert controlled force on the handle without damaging the faucet body. Penetrating oil can also be applied liberally to help loosen the handle from the stem.
If the stems themselves are corroded or damaged, they may need to be replaced along with the handles. Replacing the stems requires a deeper understanding of the faucet mechanism and may involve disassembling the entire faucet. This task is generally best left to a professional plumber.
Addressing Potential Issues and Considerations
Several potential issues can arise during the process of replacing bathtub faucet handles. One common issue is difficulty in removing the old handles due to corrosion or mineral buildup. As mentioned earlier, penetrating oil and a handle puller can be helpful in these situations. However, it is important to exercise caution to avoid damaging the faucet body or the underlying stems.
Another potential issue is the discovery of worn or damaged valve stems. If the stems are leaking or if the handles are difficult to turn, the stems may need to be replaced. Replacing the stems is a more complex task than simply replacing the handles and may require specialized tools and techniques.
Furthermore, it is essential to choose new faucet handles that are compatible with the existing faucet stems. The handles must fit securely on the stems and allow for proper control of the water flow and temperature. Before purchasing new handles, it is advisable to take detailed measurements of the existing stems to ensure a proper fit.
When working with plumbing fixtures, it is always a good idea to have a basic understanding of the local plumbing codes and regulations. These codes may specify certain requirements for faucet installation and repair. Consulting with a local building inspector or a professional plumber can help ensure that the work is done in compliance with these codes.
Proper disposal of the old faucet handles is also important. Metal handles can often be recycled at a local recycling center. Plastic handles should be disposed of in accordance with local waste management guidelines. Avoid simply throwing the old handles in the trash, as this can contribute to environmental pollution.
Finally, regular maintenance of bathtub faucets can help prevent future problems with the handles. Periodically cleaning the handles with a mild detergent and water can help remove mineral deposits and corrosion. Lubricating the stems with a silicone-based lubricant can also help keep the handles turning smoothly.
Replacing bathtub faucet handles is a manageable task for many homeowners. By carefully following the steps outlined above, homeowners can save money on plumbing costs and refresh the appearance of their bathrooms. However, it is important to recognize the limitations of one's skills and to seek professional help when necessary. Complex plumbing repairs or installations should always be entrusted to qualified plumbers who have the expertise and experience to do the job safely and effectively.

How To Fix A Leaking Bathtub Faucet Diy Family Handyman

How To Replace A Bathtub Faucet

How To Replace Bathtub Faucet Handles

Diy How To Replace Shower Faucet Trim Plate And Handle Moen

Replace Faucet Handles In Existing Bathtub Home Improvement Stack Exchange

How To Fix A Leaking Bathtub Faucet Diy Family Handyman

Diy Bathtub Handle Replacement Save 100 S

Longer Version Replace A Bathtub Faucet Handle Handles

How To Remove Stubborn Bathtub Faucet Handles

How To Change A Bathtub Faucet 14 Steps With Pictures Wikihow
Related Posts