How To Replace a Bathtub Drain Cover
The bathtub drain cover plays a crucial role in preventing debris from clogging the drainage system. Over time, these covers can become worn, damaged, or simply unsightly. Replacing a bathtub drain cover is a relatively straightforward plumbing task that homeowners can typically accomplish without professional assistance. However, understanding the different types of drain covers and the specific procedures involved is essential for a successful and leak-free replacement.
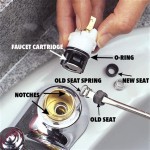
Prior to starting any plumbing project, safety precautions must be considered. Water should be shut off to the bathtub faucet to prevent accidental water flow. Adequate lighting is also necessary to clearly observe the drain and its surrounding area. Gathering the necessary tools beforehand ensures a smooth and efficient process. These tools generally include a screwdriver (usually flathead or Phillips, depending on the screw type), pliers (needle-nose or regular), a putty knife or scraper, plumber's putty, and the replacement drain cover. Having a clean cloth or towel readily available is also helpful for cleaning up any debris or water.
Identifying the Type of Bathtub Drain Cover
Bathtub drain covers come in various designs, each requiring a slightly different removal and installation technique. Identifying the specific type of drain cover installed in the bathtub is the first step in a successful replacement process. Common types include:
Lift-and-Turn Drain: These drain covers feature a knob or lever on top. Lifting and turning the knob opens and closes the drain. They are often secured with a center screw.
Toe-Touch Drain: A toe-touch drain operates by pressing down on the drain cover with a toe. Pressing again releases the drain. These typically lack visible screws and are held in place by a linkage mechanism.
Push-and-Pull Drain: Similar to toe-touch drains, push-and-pull drains open and close with pressure. Pushing down on the drain cover seals it, while pulling it up opens it. Again, these generally do not have visible screws.
Pop-Up Drain: Pop-up drains utilize a lever, often located near the faucet, to control the drain's opening and closing. The drain cover itself usually has a simple, often smooth, design.
Grid Drain or Strainer: These are simple, stationary drain covers with a grid or strainer pattern to catch hair and debris. They are often secured with screws or simply rest in place.
Once the type of drain cover is identified, the appropriate removal method can be determined.
Removing the Old Bathtub Drain Cover
The procedure for removing the old drain cover depends on its type. Below are the removal steps for each common type:
Lift-and-Turn Drain: Locate the screw in the center of the drain cover. Using the appropriate screwdriver (flathead or Phillips), carefully unscrew and remove the screw. Once the screw is removed, the drain cover should lift straight out. If it's stuck, gently wiggle it back and forth while pulling upwards.
Toe-Touch Drain: Typically, there is no visible screw on toe-touch drains. However, some models might have a set screw hidden on the side of the drain cover. Inspect the side of the drain cover closely for a small screw. If one is present, loosen it with a small Allen wrench. If there is no screw, try rotating the drain cover counterclockwise. This might unscrew it from its linkage mechanism. If neither of these work, the drain cover might be held in place by a spring. Gently try to pry the drain cover up using a putty knife or scraper. Be cautious not to damage the bathtub's finish. If resistance is met, consult the manufacturer's instructions for specific removal procedures.
Push-and-Pull Drain: Removal of push-and-pull drains mirrors the process for toe-touch drains. Look for a set screw first. If none is present, attempt to unscrew the drain cover by rotating it counterclockwise. As a last resort, carefully pry the drain cover up with a putty knife, being mindful of potential damage to the tub's surface.
Pop-Up Drain: With pop-up drains, the drain cover itself typically doesn't have any screws or mechanisms for direct removal. The stopper is controlled by a linkage connected to a lever located near the faucet. Accessing the drain stopper usually requires removing or adjusting the overflow plate (the plate beneath the bathtub faucet). Unscrew the overflow plate. After removing the overflow plate, the linkage connected to the stopper can be accessed. Disconnect the linkage from the stopper, and then pull the stopper directly up and out of the drain.
Grid Drain or Strainer: If the grid drain is secured with screws, simply unscrew them and lift the drain cover out. If the drain cover is not screwed in, it might be held in place by friction or plumber's putty. Use a putty knife or scraper to gently pry the drain cover loose. Work carefully around the edges to avoid damaging the tub's finish.
After removing the old drain cover, thoroughly clean the drain opening. Remove any old plumber's putty, hair, or other debris. A clean drain opening is essential for a proper seal with the new drain cover.
Installing the New Bathtub Drain Cover
Before installing the new drain cover, carefully examine it and compare it to the old one. Ensure the new cover is the correct type and size for the bathtub drain. Apply a ring of plumber's putty to the underside of the new drain cover, where it will meet the bathtub surface. The putty creates a watertight seal, preventing leaks.
The installation procedure varies depending on the type of drain cover:
Lift-and-Turn Drain: Place the new drain cover into the drain opening, aligning the screw hole. Insert the screw and tighten it securely, but avoid over-tightening, which could damage the drain or the tub. Remove any excess plumber’s putty that squeezes out from under the drain cover.
Toe-Touch Drain: If the drain cover screws into the linkage mechanism, apply plumber's tape to the threads before screwing it in. Rotate the drain cover clockwise until it is snug. If there is a set screw, tighten it to secure the drain cover in place. For those that simply pop in, align the drain cover and press firmly until it clicks into place.
Push-and-Pull Drain: The installation process for push-and-pull drains mirrors that of toe-touch drains. Apply plumber's tape to the threads (if applicable) and screw the drain cover in clockwise. Tighten any set screws. For pop-in models, align the drain cover and press firmly.
Pop-Up Drain: Reconnect the linkage to the new stopper after inserting the stopper into the drain opening. Reattach the overflow plate, ensuring it is securely fastened. Test the lever to ensure it properly opens and closes the drain.
Grid Drain or Strainer: If the grid drain is secured with screws, align the drain cover and screw it into place. If the drain cover is not screwed in, press it firmly into the drain opening, ensuring the plumber's putty creates a seal. Remove any excess plumber’s putty that squeezes out from under the drain cover.
After installing the new drain cover, test the drain for leaks. Fill the bathtub with a few inches of water and check around the drain cover for any signs of leakage. If leaks are present, tighten the screws (if applicable) or reapply plumber's putty. If leaks persist, the drain assembly might need to be inspected and potentially replaced.
Properly disposing of the old drain cover is important. Depending on the material of the drain cover, it can often be recycled. Check with the local recycling center for guidelines regarding metal or plastic recycling. If recycling is not possible, dispose of the drain cover in accordance with local waste disposal regulations.
Maintaining the new bathtub drain cover helps prolong its lifespan. Regularly cleaning the drain cover removes hair and debris, preventing clogs. Using a drain strainer or screen can further reduce the amount of debris entering the drain. Avoid using harsh chemicals or abrasive cleaners on the drain cover, as these can damage the finish. Following these simple maintenance tips ensures the bathtub drain remains free-flowing and functional for years to come.

How To Remove A Bathtub Drain The Home Depot

How To Replace Bathtub Drain

How To Replace Bathtub Drain Stopper With A Lift And Turn Diy

Easy Replacement Of A Bathtub Drain

How To Remove A Bathtub Drain Stopper

How To Remove A Bathtub Drain The Home Depot

How To Remove A Bathtub Drain Forbes Home

How To Remove A Bathtub Drain The Home Depot

Easy Replacement Of A Bathtub Drain

Diy How To Replace Bathtub Drain Stopper Tutorial Clogged
Related Posts