How to Replace a Two-Handle Bathtub Faucet Cartridge
Replacing a bathtub faucet cartridge is a relatively straightforward plumbing task that can be accomplished by homeowners with basic DIY skills. The cartridge is the internal mechanism that controls water flow and temperature. Over time, mineral deposits, wear and tear, or damage can cause the cartridge to malfunction, leading to leaks, drips, or difficulty controlling the water flow. This article will provide a step-by-step guide to replacing a two-handle bathtub faucet cartridge, equipping you with the knowledge and confidence to tackle this common plumbing problem.
Step 1: Gather Supplies and Tools
Before embarking on the replacement process, ensure you have the necessary tools and supplies readily available. This will streamline the process and prevent any delays or frustrations. The essential items include:
- New cartridge for your specific faucet model
- Adjustable wrench
- Channel-lock pliers
- Phillips screwdriver
- Flathead screwdriver
- Plumber's tape (Teflon tape)
- Bucket or container for draining water
- Rag or towel to clean up spills
Step 2: Turn Off Water Supply and Drain the Faucet
Safety is paramount when working with plumbing. Before disassembling the faucet, turn off the water supply to the bathtub. This is typically achieved by locating the shut-off valve for the bathtub, usually located beneath the sink or in the basement. Once the water supply is turned off, open the faucet handles to drain any remaining water in the lines. This will minimize the amount of water you'll be dealing with during the replacement process.
Step 3: Remove the Faucet Handles
The next step involves removing the handles from the faucet. This is typically accomplished by unscrewing a small set screw located on the handle. The set screw may be concealed under a cap or decorative cover. Use a small flathead screwdriver to carefully remove the set screw. Once the screw is removed, pull the handle straight up and off the stem. Repeat the process for both handles.
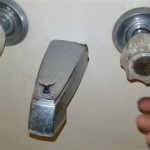
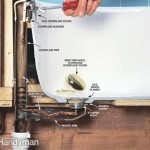
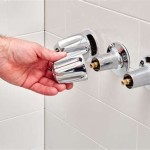
Step 4: Remove the Old Cartridge
With the handles removed, you'll have access to the cartridge. The cartridge is usually held in place by a retaining nut or cap. Use an adjustable wrench or channel-lock pliers to grip the nut or cap and unscrew it counterclockwise. Once the retaining nut is loose, carefully pull the old cartridge out. Take note of its orientation and any markings on the cartridge, as this will help you install the new cartridge correctly.
Step 5: Install the New Cartridge
With the old cartridge removed, it's time to install the new one. Before installing the new cartridge, ensure it is compatible with your faucet model. If necessary, refer to the manufacturer's instructions or consult a plumbing specialist for compatibility information. Insert the new cartridge into the faucet stem, aligning it with the grooves or markings. Make sure the cartridge seats properly and is fully inserted.
Step 6: Reassemble the Faucet
Once the new cartridge is installed, reassemble the faucet by reversing the disassembly process. Tighten the retaining nut or cap clockwise to secure the cartridge in place. Be careful not to overtighten the nut, as this could damage the cartridge or the faucet. Replace the handles by aligning the stem with the handle and pressing it down until it clicks into place. Secure the set screws with a flathead screwdriver.
Step 7: Test and Turn On Water Supply
After reassembling the faucet, it's essential to test for leaks before turning the water supply back on. Turn the faucets on and check for any leaks or drips. If no leaks are present, you can safely turn the water supply back on. Allow the water to run for a few minutes to clear any air pockets in the lines and ensure proper water flow. Remember to check for leaks again after running the water, ensuring a secure and leak-free installation.

Gerber How To Install A Cartridge Tub Shower 2 Handle Volume Control Washerless

2 Handle Shower Faucet Replacement 1 Tom Plumber

Repairing A Leaky Two Three Handle Tub Shower Faucet

Fast Way To Replace Or Retrofit A Two Handle Shower System With One

Bath Tub Cartridge Replacement Ifixit Repair Guide

Diy Bathtub Faucet Repair

How To Fix A Leaking Dripping Delta Bathtub Faucet 2

How To Fix A Leaking Bathtub Faucet Diy Family Handyman

Gerber How To Install A Cartridge Tub Shower 2 Handle Temperature Control Washerless

Bath Tub Cartridge Replacement Ifixit Repair Guide