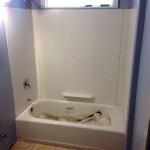
How to Replace a Kohler Bathtub Faucet
Replacing a Kohler bathtub faucet can be a straightforward DIY project that enhances the functionality and aesthetics of your bathroom. Kohler faucets are known for their quality and durability, but over time, they may require replacement due to wear and tear, leaks, or simply a desire for an updated look. This guide provides a step-by-step process to replace your Kohler bathtub faucet, ensuring a smooth and successful installation.
1. Gather Your Supplies and Tools
Before embarking on the replacement process, it's essential to gather all the necessary supplies and tools. This will streamline the process and prevent delays. Here's a comprehensive list of what you'll need:
- New Kohler bathtub faucet (ensure compatibility with your existing plumbing setup)
- Adjustable wrench
- Channel-lock pliers
- Phillips screwdriver
- Flathead screwdriver
- Plumber's tape (Teflon tape)
- Silicone sealant
- Bucket
- Rag or towel
- Safety glasses
- Work gloves
Having these tools readily available will ensure a seamless and efficient faucet replacement.
2. Turn Off the Water Supply
Safety is paramount when working with plumbing. The first step is to shut off the water supply to the bathtub. This is usually accomplished by turning the valves located beneath the sink or on the wall. Once the valves are closed, run the bathtub faucet to ensure the water flow has completely stopped.
If you are unsure about the location of the water supply valves, consult your home's plumbing diagram or seek guidance from a professional plumber.
3. Disconnect the Old Faucet
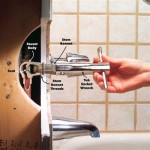
With the water supply turned off, you can now safely disconnect the old faucet. Begin by removing the decorative escutcheon plates that cover the faucet's mounting points. These plates are usually held in place by screws that can be easily removed using a Phillips screwdriver.
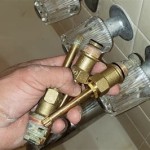
Once the escutcheon plates are removed, you'll need to disconnect the hot and cold water lines. These lines are typically attached to the faucet with compression fittings that can be loosened using an adjustable wrench. While loosening the fittings, be careful not to apply excessive force that could damage the pipes. If the fittings are stubborn, use channel-lock pliers for added grip.
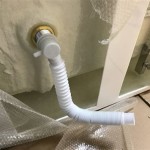
Once the water lines are disconnected, you can remove the old faucet assembly from the tub spout. This is usually held in place by a nut under the spout, which can be loosened using an adjustable wrench while holding the spout steady with another wrench.
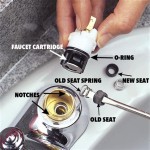
4. Prepare the New Faucet
With the old faucet removed, you can now prepare the new Kohler faucet for installation. Start by carefully inspecting the new faucet and its components. This includes the faucet body, handles, spout, and any other accessories. It's essential to ensure all parts are present and in good condition before proceeding.
Next, apply plumber's tape to the threaded ends of the hot and cold water supply lines. This tape creates a seal to prevent leaks and ensures a secure connection. Wrap the tape clockwise, ensuring it's applied tightly and evenly.
5. Install the New Faucet
With the new faucet components prepped, you can now begin the installation process. This involves attaching the faucet body to the tub spout and connecting the hot and cold water supply lines. Use the wrench to tighten the mounting nut under the spout, ensuring it is securely fastened.
Next, attach the hot and cold water lines to the faucet body. Use the wrench to tighten the compression fittings, ensuring a secure connection. Be careful not to overtighten, as this could damage the fittings or pipes.
Once the water lines are connected, reconnect the decorative escutcheon plates. Use the Phillips screwdriver to secure the screws that hold them in place.
6. Test for Leaks
Before using the newly installed faucet, it's crucial to test for leaks. Slowly turn on the water supply at the valves. Carefully inspect all connections for any signs of leaks. If any leaks are detected, immediately turn off the water supply and re-tighten the corresponding fittings.
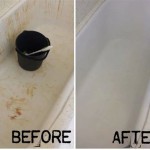
Once you've confirmed that there are no leaks, you can enjoy your newly installed Kohler bathtub faucet. Remember to clean up any spills or debris and dispose of the old faucet components responsibly.

Replace Diverter Bathtub Spout Kohler K Gp85556 Cp With Slip Fit Connection

Fix A Leaking Single Handle Bathtub Faucet Kohler Repair

Kohler Faucets Finial Series Tub Spout Replaced

How To Replace A Bathtub Spout

Kohler Faucet Replace Spline Insert

How To Replace A Kohler Bathtub Spout 1147450 Cp When Yours Breaks

Pt 2 Diy Kohler Purist Faucet Valve Install Mariposa Bathtub Home How To Bathroom Remodel Renovation

Trick To Remove That Stuck Tub Spout

How To Replace A Kohler Shower Faucet Cartridge

Water Not Coming Out Of Shower Head Tub Spout Diverter Repair
Related Posts