How To Replace A Bathtub Faucet Stem
Replacing a bathtub faucet stem is a common plumbing repair that homeowners can often undertake themselves, saving on the cost of a professional plumber. The faucet stem is the key component that controls the flow of water in a bathtub faucet. Over time, these stems can corrode, wear out, or become damaged, leading to drips, leaks, or difficulty in turning the water on or off. Successfully completing this project requires understanding the necessary tools, identifying the correct replacement stem, and following a step-by-step process. This detailed guide provides comprehensive instructions for replacing a bathtub faucet stem.
Identifying the Problem and Determining the Need for Replacement
The initial step in this process is accurately diagnosing the problem. Common indicators that a faucet stem needs replacement include a persistent drip from the faucet, even when fully turned off. This dripping is often caused by a worn-out rubber washer or O-ring within the stem assembly. Another sign is difficulty in turning the faucet handle. This can be due to mineral buildup, corrosion, or damage to the stem's internal components. A third indication is a squealing or grinding noise when the faucet is turned on or off, suggesting that the stem is not operating smoothly.
Before concluding that the stem is the problem, ensure that the issue isn't related to other factors. Check the faucet handle itself for damage or looseness. Sometimes, simply tightening a loose handle screw can resolve minor issues. Also, examine the faucet spout for any cracks or leaks, as these could indicate separate problems that require addressing before focusing solely on the stem.
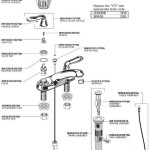
Once the problem is identified as stemming from the faucet stem itself, it is essential to determine what type of faucet is installed. Common types include two-handle faucets (with separate hot and cold water handles), single-handle faucets (which control both temperature and flow with one handle), and diverter faucets (which direct water between the tub spout and the showerhead). The type of faucet will influence the stem design and the replacement process.
Gathering the Necessary Tools and Materials
Before beginning the replacement process, it's crucial to gather all the necessary tools and materials. Having these on hand will streamline the process and prevent delays. Essential tools include:
*Screwdrivers: Both flathead and Phillips head screwdrivers are required for removing faucet handles and accessing the stem.
*Adjustable Wrench: An adjustable wrench is needed to loosen and tighten the packing nut that holds the stem in place.
*Penetrating Oil: This helps to loosen corroded or stuck parts, making removal easier. Apply it sparingly and allow it to soak for a few minutes before attempting to loosen the stem.
*Old Towels or Rags: These are used to protect the bathtub finish from scratches and to absorb any water spills.
*Flashlight: A flashlight helps to illuminate the area inside the faucet body, making it easier to see and work.
*Faucet Stem Socket Set (Optional, but Recommended): These specialized sockets are designed to fit over faucet stems and provide a secure grip for removal, especially when dealing with stubborn or corroded stems. If an adjustable wrench slips, it can damage the faucet stem and make it even harder to remove. A socket set minimizes this risk.
In addition to the tools, the most critical material is the replacement faucet stem. Accurate identification is crucial for ensuring compatibility. The best method is to remove the old stem and take it to a plumbing supply store or home improvement center. The staff can then assist in matching the stem to the correct replacement.
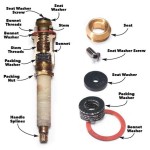
If removing the old stem beforehand is not possible, obtain detailed measurements and photographs of the stem. Pay close attention to the stem's length, thread size, number of splines on the stem (for handle attachment), and the type of seat (the surface the washer presses against). Take these measurements and photos to the store for assistance. Note the faucet manufacturer and model number, if available, as this can help narrow down the search.
Also, consider purchasing a faucet seat wrench. Faucet seats are the receptacles that the faucet stems press against to stop the flow of water. Over time, they can become worn or corroded, leading to leaks. Replacing the seats simultaneously with the stems can often ensure a longer-lasting repair. A seat wrench is specifically designed to remove and install these seats.
Step-by-Step Guide to Replacing the Faucet Stem
Once the tools and materials are gathered, the replacement process can begin. It's critical to proceed carefully and methodically to avoid damaging the faucet or plumbing.
Step 1: Turn Off the Water Supply
The most important step is to turn off the water supply to the bathtub faucet. Locate the shut-off valves for both the hot and cold water lines that feed the faucet. These valves are typically located under the sink, in the basement, or in a utility closet near the bathroom. Turn the valves clockwise until they are completely closed. To ensure that the water is completely shut off, turn on the faucet briefly to relieve any remaining pressure in the lines.
If individual shut-off valves are not available, it will be necessary to turn off the main water supply to the entire house. This valve is usually located near the water meter or where the water line enters the house. Turning off the main water supply will affect water usage throughout the entire house, so it's essential to notify other occupants beforehand.
Step 2: Remove the Faucet Handle
With the water supply turned off, the next step is to remove the faucet handle. The method for removing the handle varies depending on the design. Some handles have a decorative cap or cover concealing a screw. This cap can usually be pried off with a small flathead screwdriver. Once the cap is removed, unscrew the screw holding the handle in place. Other handles might be held in place by a setscrew located on the side of the handle. Loosen the setscrew with an Allen wrench. Once the screw is loosened, the handle should slide off.
In some cases, the faucet handle might be heavily corroded or stuck. Apply penetrating oil around the base of the handle and allow it to soak for a few minutes. Gently wiggle the handle back and forth to help loosen it. Avoid using excessive force, as this could damage the handle or the underlying faucet components.
Step 3: Remove the Packing Nut
After removing the faucet handle, the packing nut will be visible. The packing nut is a threaded component that holds the faucet stem in place within the faucet body. Use an adjustable wrench to loosen the packing nut. Turn the wrench counterclockwise to loosen the nut. If the nut is difficult to loosen, apply penetrating oil and allow it to soak. Be careful not to damage the finish of the faucet while loosening the nut. Once the packing nut is loosened, carefully unscrew it completely and remove it from the faucet body.
Step 4: Remove the Faucet Stem
With the packing nut removed, the faucet stem should now be accessible. In some cases, the stem may be easily pulled out by hand. However, if the stem is stuck due to corrosion or mineral buildup, use a faucet stem socket set (if available) or carefully grip the stem with an adjustable wrench. Gently rock the stem back and forth while pulling to loosen it from the faucet body. Avoid using excessive force, as this could break the stem.
If the stem is particularly stubborn, use a stem puller tool. This tool is designed to grip the stem securely and provide leverage for removal. Follow the instructions provided with the stem puller tool for proper usage.
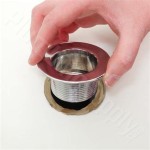
Step 5: Inspect the Faucet Seat
After removing the faucet stem, inspect the faucet seat. The seat is the receptacle that the faucet stem's washer presses against to shut off the water flow. The seat should be smooth and free from corrosion or damage. If the seat is corroded, pitted, or damaged, it should be replaced.
To remove the faucet seat, use a faucet seat wrench. Insert the wrench into the seat and turn it counterclockwise to loosen it. If the seat is difficult to remove, apply penetrating oil and allow it to soak. Once the seat is loosened, remove it from the faucet body. Install a new faucet seat using the seat wrench. Be sure to tighten the new seat securely.
Step 6: Install the New Faucet Stem
Before installing the new faucet stem, apply a thin layer of plumber's grease to the stem's threads and the rubber washer at the end of the stem. This will help to ensure a smooth and watertight seal. Insert the new faucet stem into the faucet body. Ensure that the stem is properly aligned and that the washer is seated correctly.
Step 7: Reinstall the Packing Nut and Handle
Reinstall the packing nut over the faucet stem. Tighten the nut securely using an adjustable wrench. Do not overtighten the nut, as this could damage the stem or the faucet body. Reinstall the faucet handle and secure it with the screw or setscrew. Ensure that the handle is properly aligned and that it turns smoothly.
Step 8: Turn On the Water Supply and Test for Leaks
Slowly turn on the water supply to the faucet. Check for any leaks around the faucet stem, packing nut, and handle. If any leaks are detected, tighten the packing nut slightly or adjust the handle. If the leaks persist, the faucet stem may not be properly seated, or the washer may be damaged. In this case, remove the stem and re-inspect it.
After confirming that there are no leaks, test the faucet by turning it on and off several times. Ensure that the water flows smoothly and that the faucet shuts off completely without dripping.
:max_bytes(150000):strip_icc()/how-to-replace-a-bathtub-faucet-5210836-10-6825223c1e75442187d5ab09690510d4.jpg?strip=all "How To Replace A Bathtub Faucet")
How To Replace A Bathtub Faucet

Bathtub Stem And Seat Replacement

How To Remove Bathtub Faucet Stems Quick And Easy
:max_bytes(150000):strip_icc()/how-to-replace-a-bathtub-faucet-5210836-08-dde7e85413a9421cb4414bb4655e49e3.jpg?strip=all "How To Replace A Bathtub Faucet")
How To Replace A Bathtub Faucet

How To Fix A Leaking Bathtub Faucet Diy Family Handyman

Bathtub Spout With Diverter Replacement Fix Leaking Tub Jonny Diy

Plumbing Repairing A Leaky Valve Stem Home Improvement Stack Exchange

Diy Bathtub Faucet Repair

How To Replace A Bathtub Faucet The Home Depot
:max_bytes(150000):strip_icc()/how-to-replace-a-bathtub-faucet-5210836-hero-dbea72550ab646829a3fb289eb4e9a65.jpg?strip=all "How To Replace A Bathtub Faucet")
How To Replace A Bathtub Faucet