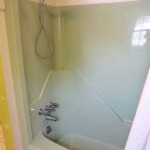
How to Replace a Bathtub Faucet Spout
Replacing a bathtub faucet spout is a relatively simple plumbing task that can be accomplished with basic tools and a little patience. This process involves removing the old spout, installing a new one, and ensuring that the connection is watertight. By following these steps, homeowners can save money on professional plumbing services and gain a sense of satisfaction from completing a DIY project.
1. Gathering Materials and Tools
Before embarking on the replacement process, it is essential to gather all necessary materials and tools. This will streamline the project and prevent delays. The following items are typically required:
- New bathtub faucet spout
- Adjustable wrench
- Channel-lock pliers
- Screwdriver (Phillips and flathead)
- Plumber's tape (Teflon tape)
- Bucket or container for catching water
- Towels
- Safety glasses
The new spout should be compatible with the existing faucet. Consider factors such as the finish, style, and size of the spout to ensure a cohesive look.
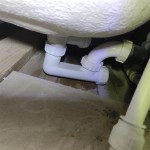
2. Shutting Off the Water Supply
Safety is paramount during any plumbing work. The first step is to turn off the water supply to the bathtub faucet. This can be done by locating the shut-off valve for the bathtub, typically positioned near the faucet or in the basement. Turn the valve clockwise until it stops, effectively cutting off the water flow.
After shutting off the water supply, open the faucet to drain any remaining water in the pipes. This prevents accidental water spills during the replacement process.
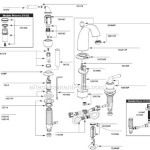
3. Removing the Old Spout
Once the water supply is off and the pipes are drained, the old spout can be removed. This involves the following steps:
Locate the retaining nut:
The old spout is typically secured by a retaining nut located on the underside of the faucet. This nut may be concealed by a decorative escutcheon or cover plate.Loosen the retaining nut:
Use the adjustable wrench to loosen the retaining nut, turning it counterclockwise. Some retaining nuts might be difficult to access, requiring the use of channel-lock pliers.Remove the old spout:
Once the retaining nut is completely loosened, gently pull the old spout away from the faucet body. Be careful not to damage the surrounding plumbing fixtures.Remove any escutcheon plates:
If an escutcheon plate is present, it can be removed by unscrewing the screws that hold it in place.
4. Installing the New Spout
With the old spout removed, the new spout can be installed. Follow these steps for a smooth installation:
Prepare the threads:
Before attaching the new spout, wrap the threads of the spout with plumber's tape. This creates a watertight seal and prevents leaks.Connect the new spout:
Carefully align the new spout with the faucet opening and gently push it into place. Ensure the spout is centered and positioned correctly.Secure the retaining nut:
Use the adjustable wrench to tighten the retaining nut, turning it clockwise. Tighten it securely but avoid overtightening, which could damage the spout or faucet body.Replace the escutcheon plate:
If an escutcheon plate was removed, reattach it by aligning its holes with the screw holes in the faucet body and tightening the screws.
5. Testing for Leaks
After installing the new spout, it is crucial to test for leaks before restoring the water supply. This simple step can prevent potential future problems.
Turn the water supply back on:
Slowly turn the water supply valve back on, monitoring for any leaks around the spout connection.Inspect for leaks:
Check carefully for leaks around the spout, the retaining nut, and the escutcheon plate. If any leaks are detected, tighten the retaining nut further or rewrap the threads with plumber's tape.Observe the water flow:
Once the connection is leak-free, turn on the faucet and check the water flow for any restrictions or irregularities.
If the new spout has been installed correctly and there are no leaks, the faucet is ready for use. Always test the water flow and pressure to ensure smooth operation.

Replacing A Tub Spout An Easy Repair Job Theworldlink Com

How To Replace A Bathtub Spout Family Handyman

Replacing A Tub Faucet Bathtub Spout Replacement

How To Replace A Bathtub Spout Family Handyman

How To Replace A Tub Spout

Learn How To Remove And Install Various Tub Spouts

Bathtub Spout With Diverter Replacement Fix Leaking Tub Jonny Diy

How To Change A Bathtub Faucet 14 Steps With Pictures Wikihow

How To Replace A Bathtub Spout

How To Replace A Delta Tub Spout
Related Posts