How to Replace a Bathtub Faucet Cartridge: A Comprehensive Guide
Replacing a bathtub faucet cartridge is a common plumbing task that can be completed in under an hour with the right tools and materials. A cartridge regulates the flow of water and temperature in your faucet, and when it becomes worn or damaged, it can cause leaks, drips, or difficulty controlling the water flow. Follow these detailed steps to successfully replace your bathtub faucet cartridge.
Step 1: Gather Materials and Tools
Before you begin, gather the necessary materials and tools: a new bathtub faucet cartridge, a wrench or adjustable pliers, a screwdriver, a bucket, and a flashlight (optional).
Step 2: Shut Off Water Supply
Locate the water supply valves beneath the sink or behind the bathtub and turn them off to prevent water from flowing while you work.
Step 3: Remove the Handle
Using a screwdriver or Allen wrench, remove the handle screw and pull the handle straight off the faucet stem.
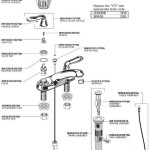
Step 4: Remove the Cartridge Retainer
Underneath the handle, you will find a cartridge retainer. Use a wrench or adjustable pliers to loosen and remove the retainer.
Step 5: Extract the Cartridge
Using your flashlight (if necessary), locate the cartridge. Use the wrench or pliers to carefully grip the cartridge and pull it straight out of the faucet body.
Step 6: Install the New Cartridge
Align the new cartridge with the faucet body and insert it into the space. Gently push the cartridge into place until it is fully seated.
Step 7: Replace the Cartridge Retainer
Screw the cartridge retainer back into place using the wrench or pliers. Ensure it is snug, but do not overtighten.
Step 8: Reassemble the Handle
Align the handle with the stem and insert it onto the faucet body. Secure the handle with the handle screw.
Step 9: Turn on Water Supply
Turn the water supply valves back on and check for leaks. If there are any leaks, tighten the cartridge retainer or handle screw as needed.
Step 10: Test the Faucet
Turn on the faucet and test the water flow and temperature. Adjust the handle as necessary to ensure proper operation.

Bath Tub Cartridge Replacement Ifixit Repair Guide

Bath Tub Cartridge Replacement Ifixit Repair Guide

How To Replace A Single Handle Shower Cartridge In 3 Steps

How To Replace A Moen Cartridge And Fix Leaky Bathtub Faucet It Tutorials

Replace A Moen Shower Cartridge Fix Leaky Tub Faucet

Bath Tub Cartridge Replacement Ifixit Repair Guide

Replacing A Stuck Moen Shower Valve Cartridge

Quickly Replace A Leaky Faucet Cartridge Diy Family Handyman

How To Fix A Leaking Bathtub Faucet Diy Family Handyman

How To Fix A Leaking Bathtub Faucet The Home Depot
Related Posts