How To Replace a Bathtub Drain Seal
The bathtub drain seal, often called a drain gasket or a drain shoe gasket, is a critical component responsible for preventing water from leaking through the drain assembly. Over time, this seal can degrade due to constant exposure to water, cleaning products, and general wear and tear. A leaking bathtub drain can lead to water damage in the bathroom floor, subfloor, and even adjacent rooms. Replacing the drain seal is a manageable DIY project for many homeowners, which can prevent costly repairs in the long run. This article will provide a comprehensive guide on how to replace a bathtub drain seal.
Before commencing the project, gather the necessary tools and materials. Essential items include a new bathtub drain seal (ensure it matches the drain’s specifications), plumber's putty, a flathead screwdriver, pliers or channel locks, a putty knife or scraper, a rag or sponge, a bucket, and potentially penetrating oil if dealing with a corroded drain assembly. The new seal should be compatible with the existing drain assembly. Taking the old seal to a hardware store for comparison is recommended.
Key Point 1: Preparation and Assessing the Situation
The initial step involves preparing the work area. Place a bucket underneath the drain assembly to catch any residual water. Remove any standing water from the bathtub. Thoroughly clean the area around the drain to remove soap scum, hair, and other debris. This will provide a clearer view of the drain assembly and facilitate the removal process.
Next, visually inspect the drain assembly to identify the type of drain stopper being used. Common types include lift-and-turn, pop-up, toe-touch, and trip-lever stoppers. Understanding the type of stopper is crucial for its proper removal. Each type requires a slightly different approach.
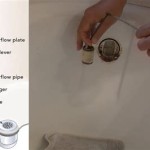
For a lift-and-turn stopper, simply lift and turn the stopper to loosen it. For a pop-up stopper, there might be a small screw on the side of the stopper that needs to be loosened before the stopper can be pulled out. A toe-touch stopper usually unscrews by rotating the stopper itself. A trip-lever stopper, typically found with an overflow plate, is connected to a linkage mechanism behind the overflow plate. To remove this type of stopper, the overflow plate must be unscrewed, and the linkage pulled out, allowing the stopper to be removed from the drain.
Once the stopper is removed, inspect the drain flange (the visible part of the drain assembly inside the bathtub) and the drain pipe underneath the tub. Look for signs of corrosion, damage, or excessive wear. This assessment will determine if just the seal needs replacing or if the entire drain assembly requires replacement. If the existing drain assembly is heavily corroded or damaged, replacing the entire assembly is often the most effective long-term solution.
If corrosion is present, apply penetrating oil to the threads of the drain assembly. This can significantly ease the removal process and prevent damage to the pipes. Allow the penetrating oil to soak for at least 15-30 minutes before attempting to loosen the drain.
Key Point 2: Removing the Old Drain Assembly
The subsequent step involves removing the old drain assembly. The procedure varies depending on the type of drain and its configuration. The most common type involves a drain flange inside the bathtub and a drain shoe underneath the tub. These two parts are connected by a threaded connection.
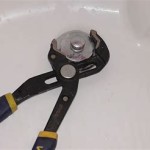
To remove this type of drain, use a flathead screwdriver and pliers or channel locks. Insert the screwdriver into the crossbars of the drain flange inside the bathtub. Simultaneously, use pliers or channel locks to grip the drain shoe underneath the tub. Apply counter-clockwise force to the drain flange while holding the drain shoe steady.
If the drain assembly is stubborn, apply more penetrating oil and allow it to soak longer. Avoid excessive force as this could damage the pipes or the bathtub itself. If the drain assembly is extremely difficult to remove, consider seeking professional assistance from a plumber.
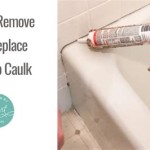
Once the drain assembly is loosened, carefully unscrew it completely. As the drain assembly separates, be prepared for water to drain out from the pipes. Have the bucket readily available to catch the draining water. After the drain assembly is removed, thoroughly clean the area where the old seal was located. Use a putty knife or scraper to remove any old plumber’s putty, caulk, or adhesive residue. Ensure the surface is clean and dry before installing the new seal.
Inspect the threads of the drain pipe and the drain flange. If the threads are damaged, it might be necessary to clean them with a wire brush or thread chaser. In severe cases, the drain pipe may need to be replaced. This is a more complex plumbing task and might require professional assistance.
Key Point 3: Installing the New Seal and Reassembling the Drain
With the old drain assembly removed and the area cleaned, the next step is to install the new drain seal. Apply a generous amount of plumber's putty to the underside of the new drain flange. The putty should form a continuous ring around the flange, ensuring a watertight seal. Roll the putty into a rope-like shape and press it firmly against the flange.
Carefully position the new drain flange into the drain opening in the bathtub. Ensure the flange is centered and seated properly. Press down firmly on the flange to compress the plumber’s putty and create a tight seal. Excess putty will squeeze out from under the flange. This excess putty will be removed later.
From underneath the bathtub, install the new drain seal onto the drain pipe. The seal should fit snugly against the bottom of the bathtub and the top of the drain shoe. Some drain seals are designed to be used with a rubber washer. Ensure the washer is properly positioned according to the manufacturer's instructions.
Carefully thread the drain shoe onto the drain flange. Tighten the connection by hand until it is snug. Use pliers or channel locks to further tighten the connection, but avoid over-tightening, which could damage the pipes or the bathtub. The goal is to achieve a watertight seal without damaging the components.
With the drain assembly reassembled, remove any excess plumber’s putty from around the drain flange inside the bathtub. Use a putty knife or scraper to carefully trim the excess putty, leaving a clean and smooth finish. Wipe the area clean with a rag or sponge.
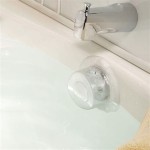
Once the new drain seal is installed and the drain assembly is reassembled, testing for leaks is essential. Plug the drain and fill the bathtub with a few inches of water. Allow the water to sit for at least 30 minutes, checking for any leaks around the drain flange and underneath the tub. If leaks are detected, tighten the drain assembly further or reapply plumber’s putty if necessary. If the leaks persist, the seal may be defective or the drain assembly may not be properly aligned. In such cases, disassemble the drain, inspect the components, and reassemble with fresh plumber's putty and a new seal if required.
After confirming that there are no leaks, reinstall the drain stopper. Ensure the stopper is properly adjusted to allow for proper drainage. Test the stopper to ensure it seals the drain effectively. If the stopper is not functioning correctly, adjust it according to the manufacturer's instructions. Proper adjustment is crucial for preventing water loss and ensuring the bathtub functions as intended.
Finally, clean the work area thoroughly. Remove any tools, materials, and debris. Dispose of the old drain seal and plumber’s putty properly. A clean and tidy workspace is important for safety and prevents future accidents.
Replacing a bathtub drain seal is a straightforward process when approached systematically. By following these steps, homeowners can effectively address a leaking bathtub drain and prevent further water damage. While this guide provides a comprehensive overview, it is important to remember that plumbing systems can vary, and seeking professional assistance is advisable when encountering complex or unfamiliar situations.

How To Replace Bathtub Drain Shoe Gasket

Easy Replacement Of A Bathtub Drain

How To Replace A Bathtub Drain

How To Replace Bathtub Drain Stopper With A Lift And Turn Diy

Replacing A Tub Drain Bathtub Removal And Replacement

How To Replace Bathtub Overflow Drain Gasket

Bathtub Leaks How To Change A Overflow Drain Seal

How To Remove A Bathtub Drain The Home Depot

How To Replace A Bathtub Drain And Fix Leak

Replace A Bathtub Overflow Gasket Bracket And Cover Plate